Peanut Butter and Jelly Grain Bread Sandwich
Enjoy this Peanut Butter and Jelly Grain Bread Sandwich in just 40 minutes! A delightful baking recipe featuring whole wheat flour and oats. Perfect for kids.

- about peanut butter and jelly grain bread sandwich
- the complete guide to authentic peanut butter and jelly grain bread sandwich
- your new favorite peanut butter and jelly grain bread sandwich
- health & nutrition highlights
- recipe at a glance
- essential components guide
- kitchen equipment essentials
- pro ingredient tips
- foolproof cooking steps
- expert kitchen wisdom
- perfect presentation
- storage & make - ahead
- creative variations
- expert faq solutions
- complete nutrition guide
- Recipe Card
about peanut butter and jelly grain bread sandwich
peanut butter and jelly sandwiches have a rich history that dates back to the early 1900s, the classic combination of creamy peanut butter, sweet jelly, and soft bread has captured the hearts (and taste buds) of countless generations, but let’s take it up a notch. when...
the unique selling points of this sandwich are abundant, first off, making your own whole grain bread means you're in control no preservatives or artificial ingredients here. plus, whole grains are packed with fiber and nutrients compared to white bread, so you'll be enjoying all those gooey layers of peanut butter and jelly without the guilt, it's comfort food at its best : satisfying, hearty, and oh - so - delicious .
the complete guide to authentic peanut butter and jelly grain bread sandwich
this delightful sandwich boasts a rich culinary heritage rooted in american kitchens everywhere, originally popularized during wartime as an easy source of protein for soldiers, its story is fascinating yet simple just like the recipe itself. over time, peanut butter became a pantry staple across households due to its affordability and versatility .
culturally speaking, the pb&j has grown beyond just being a kids' lunchbox favorite; it's embraced by people from all walks of life as an iconic symbol of simplicity and satisfaction, today’s modern - day twist on this classic includes adding homemade whole grain bread that enhances flavor while providing significant health benefits.
your new favorite peanut butter and jelly grain bread sandwich
what makes this sandwich truly unique ? it’s all about those flavor combinations. imagine biting into soft slices of freshly baked whole grain bread paired with creamy or crunchy peanut butter along with luscious grape jelly or strawberry jam it’s enough to make anyone swoon.
foolproof techniques ensure that even novice bakers can whip up their own loaves without any fuss, this expert - tested method guides you through each step with ease so you won’t have any surprises along the way unless you count how quickly it disappears once served. and if time is tight ? fear not; i've included tips throughout that will help save precious minutes in both baking preparation and assembly.
health & nutrition highlights
when it comes to nutrition, there are key benefits worth noting about our bread grain recipe peanut butter and jelly recipe . whole grains deliver high amounts of dietary fiber which aids digestion while keeping hunger pangs at bay longer than refined alternatives would offer .
this sandwich can accommodate various dietary needs too whether you're gluten - free (swap out for gluten - free flour), nut - free (try sunflower seed spread), or vegan (use plant - based spreads), overall wellness advantages abound since homemade breads typically use healthier fats compared to store - bought options laden with additives .
balanced nutrition facts show approximately 350 calories per serving packed full with protein a great option post - workout or midday pick - me - up.
recipe at a glance
- total preparation time : approximately 40 minutes
- skill level required : medium; don’t worry if you're new around dough.
- serving size details : makes 4 delicious sandwiches perfect for sharing or keeping them all for yourself.
- cost efficiency : with minimal ingredients required plus long - lasting leftovers from your loaf creation means budget - friendly meals ahead .
so grab those aprons because we're diving headfirst into one delectable adventure filled with memories and maybe some messy fingers too as we create our very own peanut butter & jelly grain bread sandwiches together. trust me; they’ll become your new go - to comfort food before long .
essential components guide
creating a delicious peanut butter and jelly grain bread sandwich starts with choosing the right ingredients, let’s dive into what you’ll need for that wholesome flavor.
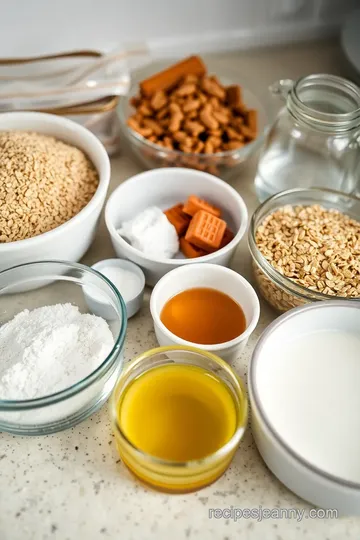
premium core ingredients
-
whole wheat flour (2 cups)
look for whole wheat flour that’s finely milled, ideally with a nutty aroma, this is your base, adding texture and nutrition to your bread, store it in an airtight container to keep it fresh . -
rolled oats (1 cup)
opt for old - fashioned rolled oats rather than quick oats for better texture, you want those classic chewy bits. keep them sealed in a cool, dry place to prevent spoilage . -
honey or maple syrup (1 tablespoon)
either one works well. choose pure honey or real maple syrup check labels to avoid corn syrup sneaking in there, a little goes a long way; store in the pantry . -
salt (1 teaspoon)
regular table salt will do, but sea salt can elevate flavors even more, just be careful not to overdo it. keep your salt in a dry spot away from moisture . -
active dry yeast (2 teaspoons)
check the expiration date before using; active yeast should be fresh for best results, it should fizz when activated in warm water store it in the fridge once opened if you don’t use it often . -
warm water (1 cup at about 110°f/43°c)
the temperature matters here. too hot will kill your yeast; too cold won’t activate it properly, use a thermometer if you’re unsure or feel free to test with your wrist. -
olive oil or melted coconut oil (2 tablespoons)
both oils contribute moisture and richness but offer different flavors olive oil adds fruitiness while coconut oil gives a subtle sweetness, store them tightly sealed away from light and heat .
signature seasoning blend
you might think pb&j doesn’t need seasoning beyond peanut butter and jelly but hold up. a couple of additions can make all the difference :
-
cinnamon : adding just a pinch of cinnamon into your dough can give warmth without overpowering it .
-
vanilla extract : for extra depth, consider stirring a half teaspoon of vanilla extract into either the dough or directly into your peanut butter .
these aromatic enhancements lift up this simple sandwich recipe.
smart substitutions
sometimes life happens, right ? if you find yourself short on something, don’t fret there are smart swaps :
-
flour alternatives : for gluten - free options, try almond flour mixed with some tapioca starch as substitutes .
-
nut butters : if allergies hit home, almond butter or sunflower seed spread work wonderfully instead of peanut butter .
-
fruit spreads : swap grape jelly out for any jam you have lying around raspberry could bring an unexpected twist.
seasonal variations are also fun a pumpkin spice version could rock fall vibes.
kitchen equipment essentials
now let’s talk tools you gotta have the right gear to whip this goodness together smoothly.
must - have tools
1, mixing bowls : you’ll need both small and large bowls preferably glass or stainless steel since they’re easy to clean .
1, measuring cups & spoons : accurate measurements matter. invest in good ones so you're never left guessing amounts again .
1, rolling pin : not strictly necessary but super helpful if you decide on pizza - style flatbreads later down the line.
1, serrated knife : perfectly slicing through that homemade grain bread makes all the difference when assembling sandwiches it’s worth having one specifically for this purpose .
recommended appliances
if you're feeling fancy :
-
stand mixer with dough hook attachment helps save time kneading by hand.
-
food processor speeds up chopping tasks like nuts/herbs if doing variations later on .
-
instant thermometer ensures perfect water temperatures for activating yeast without guesswork involved.
helpful gadgets
gadgets don’t have to break bank accounts either :
-
silicone baking mat prevents sticking while promoting even baking it makes cleanup easier too.
-
bread pan is essential because homemade loaves deserve proper shaping during their second rise phase as well as baking stage itself..
pro ingredient tips
let me share some insider tips i’ve picked up along my cooking journey :
selection secrets
for flour ? try local mills they often sell fresher products than big - name brands found on grocery shelves sometimes offer freshness guarantees which is great bonus feature..
quality markers
when buying oils look out clear bottles versus dark ones the latter provide better protection against uv rays degrading quality inside those liquids over time..
storage solutions
store grains like oats & flours tightly closed within air - tight containers keeping pests out plus extending shelf lives significantly longer overall..
and lastly . . .
money - saving tips
buy bulk whenever possible especially spices they last ages when stored correctly making penny - pinching much easier whilst stocking kitchen cupboards full flavor profiles waiting explore each meal made lovingly together..
so now you've got everything laid out from core ingredients down through equipment needed all set enjoy crafting delightful sandwiches bringing back memories childhood afternoons filled laughter friends family alike… happy cooking..
foolproof cooking steps
cooking can be a delightful experience when you have a solid plan, let’s break down the process into clear, easy - to - follow steps that even the most novice of chefs can handle .
essential preparation steps
mise en place details
before diving into cooking, gather all your ingredients, for this recipe, you'll need whole wheat flour, rolled oats, honey or maple syrup, salt, active dry yeast, warm water, olive oil (or melted coconut oil), peanut butter, and jelly, measure everything out and set them on your countertop, trust me; it saves time and makes the process smoother.
prep techniques
make sure to activate your yeast first by dissolving it in warm water for about 5 minutes until frothy, while that’s happening, you can mix together the dry ingredients – whole wheat flour and rolled oats with salt in a large bowl, this way, you're multitasking. if you’re feeling fancy (and let’s be honest : who doesn’t want to feel fancy ?), sift the flour for an even better texture .
time management
you’ll want to keep an eye on the clock here timing is key. set specific timers for each step : 5 minutes for activating yeast and around 30–45 minutes during both rises of the dough, it keeps you from wandering off too far trust me; i’ve burned bread before because i got distracted.
organization tips
keep your workspace tidy, as you measure ingredients or finish using items like bowls or measuring cups, clean up as you go along, a cluttered kitchen leads to chaos and burnt toast. plus, having everything organized means you'll have more fun baking .
professional cooking method
now let’s get down to business with our step - by - step process .
1, activate yeast : dissolve yeast in warm water (around 110°f/43°c), wait until frothy this usually takes about 5 minutes .
1, mix dry ingredients : combine flour (2 cups), rolled oats (1 cup), salt (1 teaspoon), and honey/maple syrup (1 tablespoon) in a large mixing bowl .
1, combine ingredients : pour frothy yeast mixture and olive/coconut oil (2 tablespoons) into your dry mixture .
1, knead dough : mix until combined then knead on a floured surface for about 8 - 10 minutes until smooth .
1, first rise : place dough in a greased bowl covered with a damp cloth in a warm place for about 30–45 minutes until doubled in size .
1, shape & second rise : punch down risen dough gently; form it into loaf shape and put it into a greased loaf pan covered again with cloth for another rise of approximately 20–30 minutes .
1, bake bread : preheat oven to 350°f (175°c), bake bread for around 25 - 30 minutes or till golden brown it should sound hollow when tapped on the bottom.
success indicators ? look out for that lovely golden color on top that's how you know it's ready.
expert techniques
to elevate this simple recipe further :
- make sure not to skip kneading the elasticity developed helps create fluffy bread.
- always check if your oven temperature is accurate because every oven behaves differently .
- use quality ingredients; fresh flour makes all the difference.
for those critical moments when you're uncertain if your dough has risen enough : poke it gently with two fingers a proper rise will leave an indention without springing back instantly .
success strategies
even experienced cooks run into hiccups now and then but don’t sweat it. here are some troubleshooting tips :
- if your bread didn’t rise well : check if your yeast was fresh or ensure that water wasn’t too hot while activating .
- did it turn out dense ? you might've over - kneaded or maybe just used too much whole wheat flour without balancing with white flour .
quality assurance starts right from choosing reputable sources of ingredients so look at expiration dates closely.
as final touches ? once baked completely cool on wire racks before slicing; cutting prematurely could cause squishing a big no - no if you're trying to impress anyone.
with these strategies under your belt and my favorite trick being cleaning up as i cook you’re well - equipped to tackle this delicious homemade grain bread sandwich filled lovingly with peanut butter and jelly. enjoy creating something scrumptious while embracing those little imperfections along the way it just adds character.
expert kitchen wisdom
when it comes to making this bread grain recipe peanut butter and jelly recipe, a little expert insight goes a long way .
professional insights
using fresh ingredients is key, for instance, check the expiration dates on your yeast before you start. nothing worse than waiting 45 minutes for dough to rise only to find out the yeast was dead, trust me; i've been there.
expert techniques
kneading the dough is crucial for that perfect texture, get in there with your hands don’t be shy. knead until it’s smooth and elastic, about 8 - 10 minutes, if you're feeling lazy (i get it), use a stand mixer with a dough hook .
kitchen wisdom
always keep an eye on rising times; they can vary based on room temperature, a warm kitchen speeds things up while cooler spaces slow it down .
success guarantees
to guarantee success, let your bread cool completely before slicing, this prevents it from becoming gummy and helps retain its shape when you make those beautiful sandwiches.
perfect presentation
now that you've mastered the basics of our delightful sandwich, let's talk about how to present it like a pro .
plating techniques
start by cutting your sandwiches diagonally for that classic look it's all about those angles. stack them neatly or serve them side by side on a colorful plate .
garnish ideas
a sprinkle of sesame seeds or some fresh herbs can elevate your dish visually and add flavor too. a few slices of strawberries on the side always looks cheerful as well .
serving suggestions
pair these sandwiches with some crunchy veggie sticks or fresh fruit salad for balance a bright contrast makes everything pop.
visual appeal tips
consider using fun plates or colorful napkins to brighten the table setting and create an inviting atmosphere that screams “delicious.”
storage & make - ahead
making extra sandwiches ? great idea. here’s how to store them properly so you don’t waste any goodness .
storage guidelines
once cooled, wrap individual sandwiches tightly in plastic wrap or aluminum foil, store in an airtight container at room temperature if you plan to eat them within two days .
preservation methods
for longer storage, consider freezing unassembled components : slice the bread once frozen for easy assembly later.
reheating instructions
if reheating is necessary (though i doubt you'll have leftovers.), pop them in the microwave wrapped in a damp paper towel for about 20 seconds just enough time to warm without getting soggy .
freshness tips
for optimal freshness, try not to assemble until you're ready to eat; keeping peanut butter and jelly separate prevents sogginess in your bread grain recipe peanut butter and jelly recipe .
creative variations
feeling adventurous ? let’s jazz things up with some creative variations.
flavor adaptations
try swapping grape jelly with raspberry preserves or even honey for something unique yet still delicious. almond butter could also make a great substitute if you're looking for something different .
dietary modifications
gluten - free folks can easily adapt by using gluten - free flour blends instead of whole wheat flour just ensure they’re suitable for baking since not all are created equal.
seasonal twists
come fall, why not add some pumpkin spice into your peanut butter mix ? or during summer, throw sliced peaches between layers it adds sweetness without all that added sugar from jams.
regional variations
take inspiration from local flavors : think spicy jalapeño jam paired with creamy almond butter if you're craving something bold a real treat from southern cuisine.
expert faq solutions
got questions ? no worries; i’ve got answers straight from my kitchen experience.
common concerns
“why did my bread turn out dense ?” most likely due to over - kneading or not letting it rise enough that's where patience pays off big time.
expert answers
if you’re unsure about ingredient substitutions (like oil vs melted coconut oil), just remember they both work well here but bring slightly different flavors along their journey into deliciousness .
troubleshooting guide
if your loaf doesn’t rise as expected after both rises are done ? check again if your yeast was active baking can sometimes feel like science class gone wrong but don't lose hope yet. .
success tips
keep practicing; each batch will teach you more about what works best according to your kitchen environment you’ll become an expert yourself soon enough. .
complete nutrition guide
nutrition matters too even when indulging in treats like this one.
detailed breakdown
each sandwich packs around 350 calories which means they're filling while offering energy needed throughout busy days ahead including those hectic mornings we all know too well. .
health benefits
whole grains offer fiber alongside protein - packed peanuts creating balanced meals perfect fuel sources post workouts or simply enjoying afternoons spent outdoors. .
dietary information
with approximately 12g protein per serving plus healthy fats found naturally occurring within nut spreads you'll feel satisfied without unnecessary spikes blood sugar levels either. .
portion guidance
one sandwich should suffice most appetites but hey., feel free indulge further especially when served alongside fruits veggies sides. .
Peanut Butter and Jelly Grain Bread Sandwich Card
⚖️ Ingredients:
- 2 cups whole wheat flour
- 1 cup rolled oats
- 1 tablespoon honey or maple syrup
- 1 teaspoon salt
- 2 teaspoons active dry yeast
- 1 cup warm water (110°F/43°C)
- 2 tablespoons olive oil or melted coconut oil
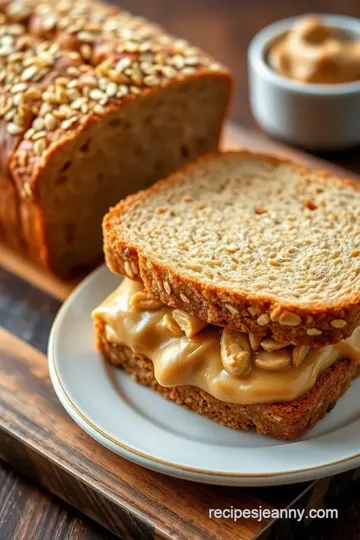
- ½ cup creamy peanut butter (or crunchy, if preferred)
- ½ cup grape jelly or strawberry jam
🥄 Instructions:
- Step 1: [Step 1: Prepare the Dough for Whole Grain Bread] In a small bowl, dissolve the active dry yeast in warm water and let it sit for about 5 minutes, or until frothy. In a large mixing bowl, combine whole wheat flour, rolled oats, honey/maple syrup, and salt. Add the frothy yeast mixture and olive oil to the dry ingredients. Mix until combined; then knead on a lightly floured surface for about 8–10 minutes, until smooth and elastic.
- Step 2: [Step 2: First Rise] Place the dough in a greased bowl, cover with a damp cloth, and let it rise in a warm place for about 30–45 minutes, or until doubled in size.
- Step 3: [Step 3: Shape & Second Rise] Punch down the risen dough gently to release air bubbles. Form into a loaf shape and place it into a greased loaf pan. Cover again with a damp cloth and let rise for another 20–30 minutes, until puffed up.
- Step 4: [Step 4: Baking Bread] Preheat your oven to 350°F (175°C) while waiting for your second rise to finish. Bake for about 25–30 minutes, or until golden brown on top and sounds hollow when tapped on the bottom. Remove from oven and cool on wire rack before slicing.
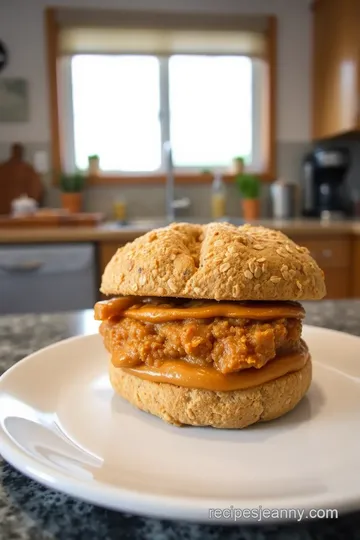
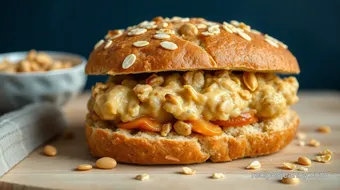
- Step 5: [Assemble Your Sandwiches] Once your bread is completely cooled, slice it into even pieces using a serrated knife. Spread ¼ cup of peanut butter on two slices of bread and ¼ cup of jelly/jam on another two slices. Press together each pair to form sandwiches.
Previous Recipe: Easy Canned Beef Hash with Eggs in 25 Min
Next Recipe: Bake Peanut Butter Grain Sandwich Delight