Perfectly Baked Treats: Your Guide to Using Bakery Racks
Ever wondered how bakery racks can elevate your home baking? Let me share my tips on using these essential tools for perfect treats every time!

Perfectly Baked Treats: Your Guide to Using Bakery Racks
Oh my gosh! let’s talk about a game changer in the baking world: bakery racks. picture this: you’ve just pulled a batch of cookies from the oven, golden brown and smelling divine.
But wait! what if i told you that the way you cool them can make all the difference in their texture and flavor? believe me, using the right baking racks can take your home baking to the next level.
You know how they say, “a happy baker makes a happy kitchen”? well, that’s true, and knowing how to use cooling racks effectively is a huge part of that happiness.
Recipe Overview
Bakery racks aren’t just for fancy bakeries; they’ve become a must-have for home chefs too! historically, they’re the silent heroes behind every crisp cookie and fluffy loaf of bread.
These wire racks for baking allow for even heat distribution and proper airflow in baking , which gives you more consistent results every single time.
Today, everyone from pro bakers to ensoiastic amateurs can enjoy the benefits of these essential tools.
Now, what’s the time commitment for this fabulousness? well, prep usually takes about 10 minutes , and from there, it all depends on the recipes you choose.
But don’t worry—using baking racks is relatively easy! this isn’t rocket science. if you’ve got a basic understanding of baking essentials , you’re set.
Plus, you don’t have to mortgage your house for the gear. these cool racks are affordable and can make your baking stash complete without breaking the bank.
Key Benefits
So, what’s the deal with bakery racks ? first off, they help you achieve that all-important moisture retention in baked goods .
I mean, nobody wants a dry cookie, right? using these racks ensures that your treats cool evenly, preventing that dreaded soggy bottom.
Plus, if you’re whipping up a batch for a special occasion, think about how impressive it is to present that perfectly baked bread or cookies to your guests.
Talk about a wow factor!
Another perk? they’re super versatile! wanna bake cookies, bread, or fancy pastries? you can do it all with the right racks.
I remember the first time i made cookies for a holiday party—it was like magic watching them cool perfectly on my wire baking racks .
Everyone kept asking for my secret recipe. spoiler alert: it was just spacing them out right on the racks!
Using Bakery Racks: The Essentials
If you’ve ever looked around your kitchen and felt overwhelmed by mixing techniques and baking tools, hang tight! this guide will help clear things up.
You’ll want to keep a few baking time guides handy, along with your baking sheets and parchment paper . and let’s not forget the handy non-stick baking spray —we all love what it does for our pans!
Before you even reach that baking phase, it’s key to have your tools organized. think of it like a well-rehearsed dance routine—everything flows better when you know where your ingredients for baking are stashed.
Ultimately, whether you’re a beginner or a baking pro, understanding cookie cooling methods can help you create treats that are irresistible.
You’ll find yourself adjusting recipes on the fly, experimenting with flavors, and sharing tips about baking for beginners with friends.
How exciting is that? you know what’s next? it’s time to gather your ingredients and gear up for some baking magic! with a little know-how and the right technique using bakery racks , you’ll be set to impress.
Just wait until you try them out—your baking game will forever be changed.
Let's dive into the ingredients you'll need and get started on making your next baking adventure completely unforgettable!
Your Essential Ingredients Guide: The Key to Perfect Baked Treats
Baking can be super rewarding, but let's be honest—sometimes it's tricky. i mean, who hasn’t had a loaf of bread that looked better in the pan than it did when it came out of the oven? this is where bakery racks come into play.
If you want to bake like a pro at home, understanding your ingredients and tools is essential, not to mention boosting your baking essentials knowledge.
So, let's dive into the nuts and bolts of baking!
Premium Core Components: The Heart of Baking
When we talk about the core ingredients , think of it like building a solid foundation for a house. Mess this up, and everything goes toppled.
-
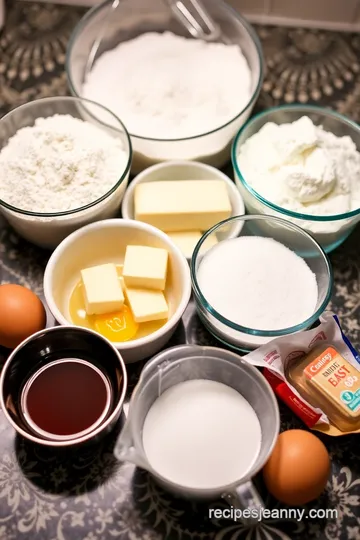
Measurements : in the baking world, precision is key. stick to 4 cups (480g) of all-purpose flour or 1 cup (200g) of granulated sugar .
Those numbers matter! if you’re like me, you love a good kitchen scale. it's my baking bestie, honestly.
-
Quality Indicators : Look for bright, white flour and granulated sugar that sparkles—no lumps! Fresh ingredients are a game-changer. Always check the expiration date. It’s mind-blowing how many people overlook this.
-
Storage Guidelines : Keep your flour and sugar sealed tightly. They last longer that way—especially if you have the cooling racks handy to keep things organized.
-
Freshness Tips : When in doubt, smell your ingredients. Stale flour has a weird, musty smell. If it smells bad, it’s time to toss it.
Spice it Up: Signature Seasoning Blend
Now to the fun part—flavor! Nothing takes your baked goods from "meh" to “wow!” faster than the right seasoning blend .
-
Essential Spice Combinations : Don’t shy away from nutmeg or cinnamon. They wake up your cookies or pastries.
-
Herb Selections : For bread baking, try rosemary or thyme. Seriously, those herbs can knock your guests’ socks off.
-
Flavor Enhancers : Think vanilla extract, sea salt, or a touch of citrus zest for a brighter flavor profile.
-
Regional Variations : If you’re feeling adventurous, mimic regional flavors. Sweet potato pie, anyone?
Smart Substitutions: Because Life Happens
You forgot eggs or you're out of flour? No problem! Smart substitutions are your friends.
-
Common Alternatives : Replace eggs with flaxseed meal or applesauce if you’re baking vegan or out of eggs. It's amazing what a little creativity can do!
-
Dietary Modifications : Gluten-free? Know your flour options ! Almond or coconut flour can work wonders, just keep in mind they’ll change your texture.
-
Emergency Replacements : Short on sugar at midnight? Honey or maple syrup can be lifesavers but remember, they’re sweeter! Adjust your measurements accordingly.
-
Seasonal Options : Use seasonal fruits. Fall? Toss in some pumpkin! Summer? Fresh berries are your best buddies.
Kitchen Equipment Essentials: The Tools of the Trade
Let’s round it off with the must-have tools. You don’t need an entire kitchen arsenal, but you should have the basics.
-
Bakeware : Invest in quality baking sheets and pans. You’ll thank yourself later when your bread bakes evenly thanks to the even heat distribution .
-
Bakery racks : of course, let’s talk bakery racks ! these are the unsung heroes. when you're done baking, transferring your goods to wire racks for cooling helps retain that perfect moisture level.
-
Preparation Tips : Having a good spatula on hand can make mixing and scraping easier.
-
Storage Solutions : Keep your tools organized. A messy kitchen leads to chaos, trust me!
So, now that you've got the scoop on essential ingredients, seasonings, substitutions, and tools, you're ready to start baking. the next step is putting this all into action, and you’ll see the difference.
Let’s transition to those delicious step-by-step instructions for your baking adventure. happy baking!
Perfectly Baked Treats: Your Guide to Using Bakery Racks
Have you ever pulled a fresh batch of cookies out of the oven only to find they’re a little soggier than you hoped? believe me, i’ve been there! the secret to bakery-quality treats at home can often boil down to one underestimated tool: bakery racks .
Seriously, these babies are game changers when it comes to cooling baked goods and achieving that perfect texture.
Getting Ready: Essential Preparation Steps
Before we dive into actual baking, let’s talk about mise en place —a fancy french term that just means “everything in its place.
” gather your ingredients first. having everything on hand keeps chaos at bay, trust me! you don’t want to be scrambling through the pantry while your butter’s melting in your mixing bowl.
Next up, time management . set timers for everything: mixing, baking, and cooling. i’ve learned the hard way that a moment of distraction can lead to burnt treats, and nobody wants that.
And don’t forget about organization—keep your tools and ingredients within reach. you’ll thank yourself later when you’re seamlessly flowing from one step to another.
Here's where we need to be safe. always remember to handle hot pans carefully. a good pair of oven mitts is your best friend! use those cooling racks to ensure your baked treats cool properly and evenly.
Speaking of cooling, proper airflow is crucial for moisture retention. that’s why having your baked goods on wire racks for baking helps prevent steaming that can lead to sogginess.
Step-by-Step Process
Now, it’s time to roll up our sleeves! Here’s a quick step-by-step guide that’ll have you on your way to amazing results.
- Preheat the Oven : Fire it up to 350° F (that’s a classic for cookies and cakes).
- Prep Your Bakeware : Line your baking sheets with parchment paper or hit them with non-stick baking spray .
- Mix Those Ingredients : Combine your dry ingredients first, then mix up the wet ones. Trust me, this part is always a blast – just watch out for flour clouds!
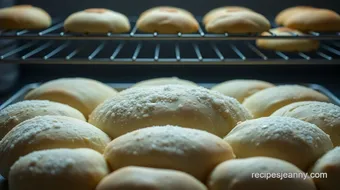
- Populate the Bakery Racks : For baking, place those prepared sheets on the racks in your oven. Don’t overcrowd them; airflow is essential!
- Monitor Baking : Keep half an eye on your treats. Look for visual cues like golden tops. Bake until your cookies are light brown around 10- 12 minutes and cakes come clean with a toothpick.
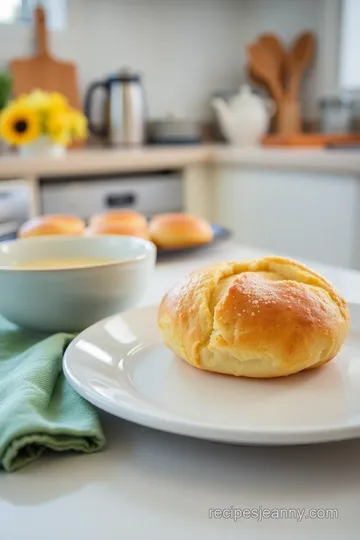
- Cool Like a Pro : Once baked, move your goodies to the cooling racks . Let them chill (literally) for a few minutes.
Expert Techniques
Okay, let’s get into some pro strategies. Here’s where you can really elevate your baking game.
Professional methods often involve using thermometer checks. for bread, you want a nice 190° f internal temp for that ideal bake.
Also, think about rotating your baking sheets halfway through baking to ensure even heat distribution. let’s not forget about timing—precision is key, so stick to the recipes initially, then adjust as you get comfortable.
And if something goes awry, don’t panic! Got cookies spreading too much? Maybe chill the dough longer before baking next time. Burnt bottoms? Try swapping your bakeware or adjusting shelf positions.
Success Strategies
Let’s wrap things up with a few common pitfalls to avoid. first off, never skip the parchment paper; it’s a lifesaver for baked treat presentation.
And always let those treats cool completely on the bakery racks before storing them to keep that moisture retention intact.
If you're preparing for a bake-ahead day, cookies can be frozen, then baked fresh when you need them! this also applies to dough; freeze it and pull it out to bake when you’re feeling like indulging.
Remember, baking is fun, and experimenting can lead to new favorites! So, go grab those bakery racks , and let’s start baking up some delightful treats.
Additional Information...
Feel free to explore various recipe variations and substitutions as you become more adventurous in the kitchen. whether you’re diving into gluten-free baking adventures or testing out different flavors with ingredients, the possibilities are endless.
So keep those baking tools handy, and don’t hesitate to pop into your kitchen whenever the craving hits! happy baking!
Elevate Your Baking: Essential Information on Using Bakery Racks
Let’s chat about how to take your home baking to a whole new level! bakery racks are the unsung heroes in the kitchen, often overlooked but super essential for achieving those dreamy treats.
Whether you’re whipping up a loaf of bread, some gooey cookies, or flaky pastries, understanding how to maximize these racks will totally change your game.
Pro Tips & Secrets
First things first, let’s dive into some insider secrets. chef’s insights here! one of the best things you can do is to ensure you’re using high-quality wire racks for baking.
They allow for even heat distribution and airflow in baking , which are key for getting that perfect texture.
And hey, about time-saving techniques ? if your cookies are a bit flat, try chilling the dough before baking. this helps maintain their shape and enhances that fabulous flavor.
Another trick? rotate your baking sheets halfway through! your goodies will bake evenly, which means no more burnt edges.
Now let’s talk flavor enhancement . a pinch of sea salt on top of cookies before they go into the oven? oh my gosh, you’ll get that perfect balance of sweet and salty! your taste buds will thank you.
And for presentation, try using fresh herbs or citrus zest as a garnish. you’d be surprised how a sprinkle of something fresh can level up your dish.
Perfect Presentation
Speaking of presentation, let’s not forget about making those baked goods visually stunning! an appealing plate can make all the difference.
When you're plating those cookies or pastries, try stacking them in a nice pyramid shape. it’s super simple, but it gives a nice height to your display.
Consider using garnishes that pop. for instance, a dusting of powdered sugar on cocoa cookies makes them look like a winter wonderland.
Try pairing colors too—like dark chocolate against a white plate. the contrast can really elevate your baked goods’ visual appeal.
Storage & Make-Ahead
So, what to do with those fabulous treats once they come out of the oven? storing baked treats properly is crucial.
Allow your cookies and pastries to cool completely on the bakery racks. this avoids that dreaded sogginess. once cooled, store them in airtight containers.
You can also wrap them individually in parchment paper for easy grab-and-go snacks.
If you’re looking to make-ahead , you can freeze most baked goods. just ensure they’re well-wrapped to prevent freezer burn.
You know that feeling of pulling out a frozen cookie dough ball and fresh baking them? total joy! when reheating, place them back on the baking sheet for a few minutes to refresh their warm, chewy glory.
Creative Variations
Let’s spice things up a bit! the beauty of baking is the endless recipe variations you can explore. feeling adventurous? try using different types of flour for your favorite baked goods.
Almond flour for gluten-free cookies, or swap in some whole wheat flour for a nutty taste.
And don’t be afraid to get seasonal with your ingredients. for summer, throw in some fresh berries, or in autumn, toss in pumpkin spice.
Mixing flavors also gives you completely fresh experiences with the same base recipe. you can create a new family favorite with just a few tweaks.
Complete Nutrition Guide
Are you curious about what you’re munching on? a quick nutritional breakdown is a smart idea. baking not only nurtures our creativity but can also be a pretty balanced addition to our diets.
Look for healthier swaps—use apple sauce instead of oil, or greek yogurt in place of butter for moisture without the added fats.
For portion control, especially when you whip up a batch of cookies, consider how many servings you typically enjoy and adjust the recipe accordingly.
Homemade treats can be guilt-free when made with love and good intentions!
Expert FAQ Solutions
Let’s address some common quandaries in baking. if your cookies are coming out flat, check the baking powder's freshness—it could be a game changer! or if your bread isn't rising during bread baking , don’t panic! it might be due to the yeast being old, or your kitchen could be too cold.
Don't forget— baking FAQs lead to experiences. Every baker has had “uh-oh” moments. Keep experimenting! Mistakes often lead to the best discoveries. Trust me on this one!
Wrapping It Up
Baking at home can feel like stepping into a whole new world. with the right tips, techniques, and, yes, those handy bakery racks , you’ll find that baking is not just a love but a science that you can master.
Remember, it’s all about having fun and being creative.
So go ahead, dive into your kitchen, and start whipping up some blissful baked goods. Each batch is a chance to learn something new. Happy baking!
Perfectly Baked Treats: Your Guide to Using Bakery Racks Card
⚖️ Ingredients:
- 4 cups all-purpose flour (480g)
- 1 cup granulated sugar (200g)
- 1 cup unsalted butter (226g), softened
- 2 tsp active dry yeast (7g)
- 1 cup warm water (240ml)
- 2 large eggs
- 1 tsp salt (6g)
- 1 tsp vanilla extract (5ml)
🥄 Instructions:
- Step 1: Preheat your oven to the required temperature for your recipe.
- Step 2: Line baking sheets with parchment paper or spray with non-stick cooking spray.
- Step 3: Combine dry ingredients in one bowl. Cream together butter and sugar in another bowl. Add eggs and vanilla, then mix well. Gradually combine wet and dry ingredients until fully incorporated.
- Step 4: Place your prepared baking sheets on the racks in the oven to allow for even airflow.
- Step 5: Keep an eye on baking times. Use visual cues like golden brown edges for doneness.
- Step 6: Once baked, transfer items to cooling racks to cool evenly without steaming.
Previous Recipe: Easy 2 oz Cups: My Grandmother's Mini Cheesecakes Bliss
Next Recipe: How to Make My Grandmother's Best Cinnabuns: Soft and Sweet Delight