Mini 2 Oz Cup Cheesecakes
Have you ever craved a sweet mini cheesecake? These 2 oz cups deliver creamy goodness with every bite. Perfect for any gathering—try them out!

- Sweet Success: The Joy of Mini 2 Oz Cup Cheesecakes
- Delving Into the Cheesecake World
- Why You'll Love These Mini Cheesecakes
- Moving On to the Good Stuff: The Ingredients
- Whip Up Happiness with Mini Cheesecakes in 2 Oz Cups
- Professional Cooking Method
- Cooking Insights for Mini 2 Oz Cup Cheesecakes
- Recipe Card
Sweet Success: The Joy of Mini 2 Oz Cup Cheesecakes
You ever have one of those days where you just need a little happiness? well, i had a rough week last month that left me craving something sweet.
So, i decided to whip up some mini 2 oz cup cheesecakes . oh my gosh, the moment i took that first bite, it was like a little party in my mouth! creamy, dreamy, and just the right size to feel indulgent but not overboard.
Seriously, who doesn’t love a sweet treat that fits in the palm of your hand?
Let’s be real: there’s something super magical about bite-sized desserts. they’re portable, customizable, and they look so darn cute on a dessert table! they are perfect for sharing but also great for sneaking a couple for yourself (not that i would ever do that.
.. wink ). so, buckle up! we're diving into the world of mini dessert cups where you can easily impress your buddies with these bite-sized cheesecakes.
Delving Into the Cheesecake World
Cheesecake has a long history, dating back to ancient greece—how cool is that? fast forward to today, these creamy cream cheese desserts have become a beloved staple in many american homes.
With everyone always looking for easy cheesecake recipes , these mini versions are now hitting the mainstream like never before!
Now, you might be wondering about the time and effort required. this recipe is a total breeze. you just need about 20 minutes of active prep time, a quick bake for 25 minutes , and a little chill time.
Before you know it, you’ve got 12 mini cheesecakes ready for your next gathering. plus, they’re incredibly budget-friendly, costing around $15 for all the ingredients.
You get so much joy for such a little price!
Why You'll Love These Mini Cheesecakes
First, let’s talk health. while we won’t be winning any health awards with these treats, the portion size helps keep those indulgences contained.
Plus, using quality ingredients like cream cheese and fresh toppings brings some fun nutrition to the table. highlights include the richness of the cream cheese filling paired with fruity toppings like berries or chocolate sauce.
But the real magic is how these mini cheesecakes fit into any occasion! birthdays, holidays, picnics—you name it, and they can shine.
They're versatile, so don’t feel boxed in! wander off the beaten path with creative cheesecake flavors or unique toppings. think flavored cheesecakes like salted caramel or lemon zest.
Trust me; they’ll be the star of any dessert buffet!
Also, these little wonders are perfect for mindful eating. since they’re pre-portioned, they're great for satisfying that sweet tooth without going overboard.
They make a fantastic addition to any party dessert ideas you might have in mind. just imagine showing up with a tray of these cozy delights; the compliments will come pouring in!
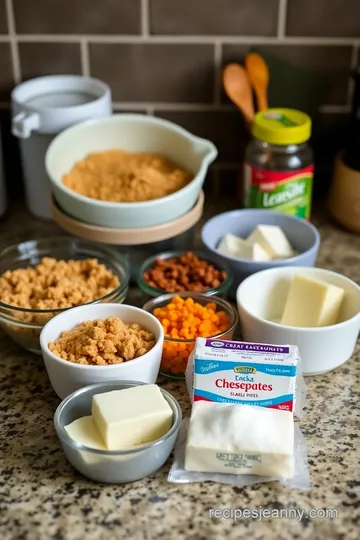
Moving On to the Good Stuff: The Ingredients
Alright, let’s move on to what you really came here for—the recipe! gathering up your ingredients for these homemade cheesecake cups is super straightforward.
You’ll need graham cracker crumbs for that buttery crust, and for the filling, just some simple staples like cream cheese and sugar.
Easy-peasy, right? just pick up some 2 oz cups , and you’re all set to dive into making some truly delightful mini dessert ideas .
Ready to create your own little slice of cheesecake heaven? Grab those ingredients, and let’s get started on this delectable journey! Your friends—and your sweet tooth—will thank you!
Whip Up Happiness with Mini Cheesecakes in 2 Oz Cups
Oh man, there’s just something about mini desserts that makes my heart sing! and when it comes to mini cheesecakes served in 2 oz cups , we’re talking about serious bite-sized happiness.
Perfect for parties, picnics, or just a cozy night in, these little gems will have everyone asking for seconds. trust me, once you tackle this easy cheesecake recipe , you’ll want to whip up a batch for every gathering!
Premium Core Components of Deliciousness
Before we dive into the actual recipe, let’s make sure we know our essentials.
-
Ingredients: in this case, we’re starting with the crust. grab 1 cup (100g) of graham cracker crumbs , and don’t forget 4 tablespoons (56g) of unsalted butter , melted enough to coat those crumbs.
Dust in 2 tablespoons (25g) of granulated sugar and mix.
-
Cheesecake filling: the heart and soul here is 16 oz (450g) of cream cheese , softened to room temp. combine it with ½ cup (100g) of sugar , a hit of vanilla extract, 1 teaspoon of lemon juice , and 2 large eggs .
Oh yeah!
-
Quality Indicators: Fresh ingredients are key. The cream cheese should be smooth and creamy, not dried out. And for the crust, make sure those graham cracker crumbs aren’t stale—don’t be that person, you know?
-
Storage Considerations: These mini cheesecakes do wonderfully in the fridge. If you find yourself with leftovers (not likely!), they’ll keep for about 5 days in a sealed container.
Signature Seasoning Blend
Okay, now let’s talk flavors. while the classic cheesecake is in fact dreamy, don’t be shy to mix it up.
Toss in some zest or maybe some mini chocolate chips if you’re feeling funky. got a flavor in mind? maybe mango or passion fruit ? those would make fantastic flavored cheesecakes—your guests won’t even know what hit ‘em!
Smart Substitutions
Now, let’s face it. Sometimes we run low on ingredients, or we want to tailor these little treats to suit everyone’s needs.
-
Common Alternatives: No graham crackers? No problem! Use vanilla wafers or even oatmeal cookies for a little twist.
-
Dietary Modifications: If you need a gluten-free option, look for gluten-free cookie crumbs. You can totally adapt this recipe to suit vegan diets with dairy-free cream cheese.
-
Emergency Replacements: If you don’t have sugar , honey or agave can work in a pinch, but remember to adjust the measurements—honey is sweeter!
Kitchen Equipment Essentials
Honestly, making these mini cheesecakes is straightforward if you have a few basic tools.
-
Must-have tools: you’ll definitely need small cups for baking —i recommend the 2 oz plastic or glass options. a good mixing bowl, an electric mixer or whisk, and measuring spoons will bring everything together.
-
Preparation Tips: Blend your cheesecake filling until just smooth—this keeps it creamy and avoids those pesky cracks!
-
Storage Solutions: Store your quintessential mini dessert cups in the fridge or wrap them up for a sweet on-the-go treat.
Wrapping It Up Sweetly
So there you have it! preparing homemade cheesecake cups isn’t just easy peasy; it’s also a delightful way to share desserts at gatherings.
Personalize them with your favorite cheesecake toppings —think fresh fruits, chocolate drizzle, or a dollop of whipped cream.
As we jump into the next section—yes, the hands-on instructions!—just remember the sheer joy that comes from biting into those luscious, creamy layers.
And if you nail these, i guarantee that you’ll have guests clamoring for your mini cheesecake variations . let’s get this delicious party started!
Professional Cooking Method
When it comes to whipping up mini 2 oz cup cheesecakes , there’s a whole world of professional cooking methods that can elevate your dessert game.
Let’s dive into the essentials, breaking it down so you can impress at your next gathering, picnic, or just a cozy night at home.
Grab your apron, and let’s get started!
Essential Preparation Steps
First things first— mise en place ! this french culinary term is simply about getting everything ready before you start cooking.
Measure out your ingredients—like those 2 oz cups for the cheesecakes, graham cracker crumbs, and cream cheese. you’ll thank yourself later, trust me!
Time management is key here. set a timer for every step, especially during baking. for our mini cheesecakes, aim for 20- 25 minutes in the oven.
Also, keep an eye on the clock while those cups are chilling in the fridge for at least 1 hour .
Organization is a game-changer. lay out your tools and ingredients in a tidy manner. this helps you focus on each task without panicking over missing ingredients.
Safety is equally important. always wear oven mitts when handling hot pans, and keep your workspace clean to avoid accidents.
Step-by-Step Process
Now, let’s break it down step-by-step, so you’re never left guessing.
-
Prep the crust by mixing graham cracker crumbs, melted butter, and sugar in a bowl. Press this mixture firmly into each mini dessert cup .
-
Time to make the cheesecake filling: beat the cream cheese until it’s smooth (about 2 minutes ). gradually mix in your sugar, and add the eggs one at a time—this keeps it silky.
-
Spoon the filling into your prepared crusts and level the tops.
-
Bake ! place those filled cups in a water bath and pop them in the oven at 325° f ( 163° c) for 20- 25 minutes .
Watch for the edges to be set but the middle to jiggle slightly.
-
Cool them down. Let the cups rest for 10 minutes at room temperature, then chill them for a good hour in the fridge. This is where the flavors really come together!
Expert Techniques
Here’s where i share some pro tips. firstly, always check the internal temperature with a kitchen thermometer if you're concerned.
It doesn’t hurt to aim for around 150° f ( 65° c) in the center for that perfect cheesecake texture.
As for quality checkpoints? if your cheesecakes crack during baking, they’re still going to taste amazing, but it pays off to mix gently and avoid air bubbles.
Keep your ingredients at room temperature for the best results.
Running into trouble? If your cheesecakes don’t set, it’s likely due to overmixing. You know how I always say, “less is more”? Well, it rings true here!
Success Strategies
We all make mistakes! common pitfalls include overfilling those 2 oz cups . stick to about three-quarters full to avoid messes.
For a foolproof result, keep the chilling time at 1 hour , but if you can wait longer, they’ll taste even better.
When it comes to quality assurance, a little tasting never hurt anyone. And who doesn’t love a sneaky bite of cheesecake filling?
Want some make-ahead options? You can prepare the crust and filling a day in advance. Just assemble them right before baking to achieve that perfect harmony of flavors!
Take these tips to heart, and before you know it, you’ll be whipping up creamy, delicious bite-sized cheesecakes that are sure to impress!
Want more tips? Stay tuned for more Additional Information…
Cooking Insights for Mini 2 Oz Cup Cheesecakes
Alright, friends! let’s dive deep into making these delightful mini cheesecakes that come in those adorable 2 oz cups . they’re not just easy to whip up — i mean, who doesn’t love a bite-sized cheesecake? let’s chat about pro tips , how to make them look super fancy, how to store them, and even some fun alternatives to try.
Pro Tips & Secrets
First things first, let’s talk prepping . room temperature ingredients are your best friends here, especially the cream cheese. it helps blend smoothly—nobody wants a lumpy filling, ya know? also, don’t go wild mixing.
Just blend until it’s combined to avoid cracks. trust me, i’ve learned this the hard way.
For a quick save, use a water bath while baking. it sounds fancy, but all you do is place your cups in a baking dish and fill it with water halfway up the sides.
This keeps the temperature even and gives you creamy cheesecakes instead of the dreaded dry ones.
And here’s a little secret: try adding a splash of lemon juice to give your cheesecake that extra zing ! You can also experiment with flavored cheesecakes; swapping in fruit purees can turn these into mini masterpieces!
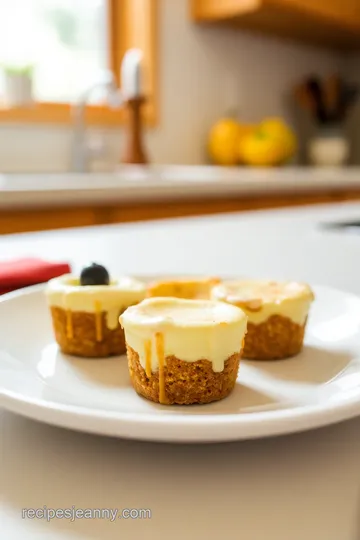
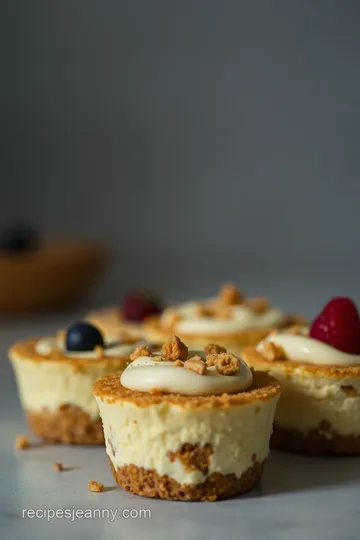
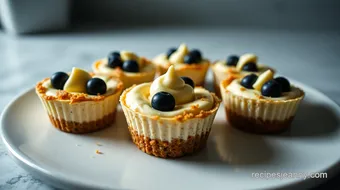
Presentation Perfection
Now, let’s get to the fun part: presentation ! honestly, it makes a huge difference. start with a solid base of graham cracker crust – it’s where the magic begins.
You can even use graham cracker crust alternatives like oreos or nut-based crusts if you’re feeling adventurous.
When it comes to toppings, fresh berries are a classic move. strawberries, blueberries, or even a drizzle of chocolate sauce transform these no-bake mini cheesecakes into wow-worthy treats.
Go wild with the color combinations ! it just makes it pop. you might find yourself gathering everyone around, saying, “look at my mini cheesecake variations!”
Storage & Make-Ahead Tips
Got leftovers? no worries! store these little beauties in the fridge in airtight containers. they can keep for about 5 days (if they last that long!).
For a longer stash, you can even freeze them! just wrap them tightly to avoid freezer burn. but do me a favor—if you freeze them, don’t forget to let them thaw in the fridge before serving.
Nothing worse than a frozen cheesecake surprise!
Creative Variations
Oh, and let’s not forget the fun part— variations ! if you’re looking to change things up, toss in some flavored cream cheese or throw in a dash of toffee bits for an unexpected crunch.
For fall vibes, pumpkin cheesecake is a hit! i mean, who doesn’t love a good pumpkin-spice anything ?
For your friends who are gluten-free, swap out the crust for crushed nuts or gluten-free cookies — no one will ever know! it’ll be a sneaky dessert that everyone can enjoy.
And for the lactose-free pals, there are some fantastic vegan cream cheese options out there that work just as well!
Complete Nutrition Guide
Let’s chat nutrition . these mini cheesecakes are about 150 calories each. they’ve got some protein from the cream cheese and a decent bit of fat, but hey, we’re not here to count every calorie, right? moderation! just make sure to serve these bite-sized wonders in sensible portions.
No one wants to feel sluggish after a dessert binge, although, who can blame ya? sometimes a sweet treat is just what the doctor ordered!
Common Questions & FAQs
Got questions about your cheesecake-making adventures? here’s a quick troubleshooting guide. if they crack, remember the overmixing rule and make sure you’re using room temperature ingredients.
Too jiggly? they probably need a touch more time in the oven—every oven is different, so just keep an eye on them!
Cooking can be full of surprises, but don’t sweat it! it’s all about enjoying the journey, experimenting, and creating sweet treats for gatherings.
So get your mini dessert cup game on and bring these little gems to your next party!
In closing, i hope you feel inspired to try these individual serving desserts out! the beauty of these cheesecake filling ideas is that they’re quick dessert recipes that please any crowd.
So gather those ingredients, grab some of those cute little 2 oz cups , and unleash your inner baking superstar.
You got this!
Mini 2 Oz Cup Cheesecakes Card
⚖️ Ingredients:
- 1 cup (100g) graham cracker crumbs
- 4 tablespoons (56g) unsalted butter, melted
- 2 tablespoons (25g) granulated sugar
- 16 oz (450g) cream cheese, softened
- ½ cup (100g) granulated sugar
- ½ teaspoon vanilla extract
- 2 large eggs
- 1 teaspoon lemon juice
- Fresh berries, chocolate sauce, or caramel (optional)
🥄 Instructions:
- Step 1: Combine graham cracker crumbs, melted butter, and sugar in a bowl. Mix until the crumbs are evenly coated.
- Step 2: Divide the mixture evenly among the 12 cups and press down firmly to form a crust.
- Step 3: In a mixing bowl, beat the softened cream cheese until smooth. Gradually add sugar, beating until well combined.
- Step 4: Mix in vanilla extract, eggs (one at a time), and lemon juice until just blended.
- Step 5: Spoon the cheesecake filling over the prepared crusts in each cup until nearly full. Smooth the tops with a rubber spatula.
- Step 6: Place the cups in a baking dish and fill with water until halfway up the sides of the cups. Bake in the preheated oven for 20-25 minutes or until the edges are set but the center is slightly jiggly.
- Step 7: Remove from oven and allow to cool for 10 minutes. Transfer to the refrigerator and chill for at least 1 hour before serving.
Previous Recipe: How to Make Outback Steakhouse Happy Hour Bloomin’ Onion Bites
Next Recipe: How to Achieve Bakery-Quality Treats Using Bakery Racks