Sweet Summer Delight: Vegan Chocolate Pops
Want a cool summer treat? Try my rich and creamy Freeze Vegan Chocolate Pops for Summer Bliss! They're a guilt-free delight the whole family will love.

- look into into Sweet Summer Delight
- Essential Ingredients Guide to Crafting the Perfect Vegan Chocolate Pops
- Sweet Summer Delight: Freeze Vegan Chocolate Pops for Summer Bliss
- Pro Tips & Secrets
- Perfect Presentation
- Storage & Make-Ahead
- Creative Variations
- Complete Nutrition Guide
- Expert FAQ Solutions
- Recipe Card
look into into Sweet Summer Delight
So, imagine this: it's a sizzling summer day, you’ve got the sun blazing, and all you want is something cool and scrumptious to beat the heat.
I used to chase after ice cream trucks, my heart racing for that sweet taste of chocolate pops. fast forward to today, and i’ve ditched the dairy for something even better! oh my gosh , have you ever tried to freeze vegan chocolate pops for summer bliss ? these little delights turned my hot days from drab to fab, and i can't wait to share how you can whip them up, too!
Recipe Rundown: A Choco-Treat with a Twist
Let’s get a little historical for a sec. popsicles have been around since the early 1900s—who knew a simple mix of ice and flavor would lead to our beloved frozen treats? now, fast forward to the present , and bam! vegan treats are taking over.
These plant-based popsicles are all the rage, and why not? they’re super simple to make and keep you feeling light and fruity all summer long.
What’s the time commitment, you ask? well, it’s just about 15 minutes of hands-on prep , a quick chill, and then toss them in the freezer for a few hours.
trust me , even the busiest bee can make these! and don’t let the words “vegan” or “dairy-free chocolate pops” scare you off; this recipe is easy-peasy .
You’ll be the chocolate-sorcerer of your backyard bbq in no time!
Benefits That Make You Go “Wow!”
Now, let’s talk health. these guilt-free summer snacks pack a punch with wholesome ingredients. instead of heavy cream and refined sugars, you’re looking at almond milk, pure maple syrup, and unsweetened cocoa powder.
It’s a healthy chocolate popsicle recipe that won’t have you second-guessing your decisions! with just about 100 calories per pop , enjoy a little indulgence without feeling guilty.
Plus, these popsicles are perfect for any occasion— birthday parties, family get-togethers, or just when you feel like treating yourself ! kids love them, and they’re a hit for adults, too.
What’s better than a creamy vegan treat shared under the summer sun? bonus: they’re an allergy-friendly dessert idea ! no dairy, gluten, or eggs, just pure joy on a stick!
Let’s Get to the Good Stuff: Ingredients Galore
Now that you are a little hyped about making your own frozen goodness, let’s dive into what you’ll need. You won’t believe how simple it is!
-
For the chocolate pop base:
- 1 cup unsweetened almond milk (or any plant-based milk you fancy)
- 1/2 cup pure maple syrup (hello, natural sweeteners for desserts )
- 1/3 cup unsweetened cocoa powder (for that rich chocolate goodness)
- 1 teaspoon pure vanilla extract (because yum)
- A pinch of sea salt (gotta have that balance!)
-
Optional add-ins just to jazz it up:
- 1/4 cup melted coconut oil for creaminess
- 1/4 cup nut butter like almond or peanut for a little extra richness (because why not? )
With a few essentials and a blender, you’re all set to create these homemade frozen treats that’ll have you dreaming of cool summer nights.
Honestly, you just blend it all up, pour it into molds , and freeze. It’s truly that simple.
So, gather your ingredients and let’s create a summer memory with these vegan chocolate pops! they’re the perfect treat to share, and who knows? you might just find yourself making them over and over again.
Stay tuned for how to bring these pops to life!

Essential Ingredients Guide to Crafting the Perfect Vegan Chocolate Pops
Premium Core Components
When it comes to making decadent Vegan Chocolate Pops , you gotta start with the best ingredients. Here’s the scoop on what you need:
-
Measurements matter:
for our pops, you'll want 1 cup (240 ml) of unsweetened almond milk, 1/2 cup (120 ml) of pure maple syrup, 1/3 cup (40 g) of unsweetened cocoa powder, and a dash of sea salt.Don’t sweat it if you need to convert to metric – just pop into a converter app, and you’re good to go!
-
Quality Indicators:
Look for almond milk without additives, a rich maple syrup that has a deep color, and cocoa powder that’s dark and aromatic. Trust me, it makes a difference! -
Storage guidelines:
store your ingredients in a cool, dry place. maple syrup can last for about a year, but once opened, keep it in the fridge.Cocoa powder? that’ll stick around for a while too – up to two years.
-
Freshness tips:
keep an eye on the expiration dates, and if your almond milk smells funky, it’s time to toss it.When selecting bananas for add-ins, make sure they’re spotty but not too brown.
Signature Seasoning Blend
For our chocolate pops, the real star is the chocolate itself, but there are some essential flavor boosters you can use:
-
Essential Spice Combinations:
You might want to try adding a pinch of cinnamon or a sprinkle of instant coffee to intensify that chocolaty goodness. -
Herb Selections:
Although not the classic route for chocolate pops, a hint of fresh mint extract can give your pops a refreshing twist. Mint and chocolate? Yes, please! -
Flavor Enhancers:
Vanilla extract is your friend here. A little dash brings depth to the flavors that’ll have your mouth watering.
Smart Substitutions
Sometimes, life throws a curveball, and you don’t have everything on hand. No worries! Check out these smart swaps:
-
Common Alternatives:
If you’re out of almond milk, oat milk or soy milk can do the trick! -
Dietary Modifications:
Maple syrup can be swapped with agave syrup. Just remember that agave is sweeter, so adjust accordingly! -
Emergency Replacements:
Caught without cocoa powder? You can use carob powder instead, but the taste will change a little.
Kitchen Equipment Essentials
Before you dive into making these lovely pops, let’s chat about your kitchen gear:
-
Must-have tools:
you absolutely need popsicle molds – silicone ones are my favorite because they make releasing the pops a breeze.A blender is essential too, so you can get that creamy texture just right.
-
Alternative Equipment Options:
Don’t have a blender? You could use a whisk and a bowl, but your pops might be a bit lumpier. Totally your call! -
Preparation Tips:
Always prep your molds by making sure they’re clean and dry. And a little spray of non-stick oil can help with removal, especially with plastic molds. -
Storage Solutions:
Once your pops are ready, wrap them in parchment paper or store them in an airtight container to keep them fresh in the freezer.
Now that you're geared up with all the culinary basics and that essential ingredient knowledge, it’s time to freeze vegan chocolate pops for summer bliss .
Let’s get into these easy vegan popsicle recipes that are sure to beat the heat and give you those guilt-free summer snacks you crave.
🍦
This healthy chocolate popsicle recipe is just the thing you need to whip up for hot days. Plus, your kids will love them! So, get your blender ready and let’s jump into the instructions!
Sweet Summer Delight: Freeze Vegan Chocolate Pops for Summer Bliss
Ah, summer! the season of sun, fun, and those guilt-free treats that make beating the heat a bit sweeter. you know what i’m talking about— vegan chocolate pops ! seriously, if you haven’t tried making these yet, you’re in for a delicious surprise.
They’re creamy, dreamy, and super easy to whip up. trust me; you don’t want to miss out on this easy vegan popsicle recipe .
Essential Preparation Steps: Setting the Stage
Before we dive into the actual popsicle magic, let’s talk about getting organized. ever heard of mise en place ? it’s just a fancy way of saying “everything in its place.
” you gotta gather your ingredients first. for these chocolate pops, that means unsweetened almond milk, pure maple syrup, unsweetened cocoa powder, vanilla extract, and a pinch of sea salt.
Oh, and if you want that creamy texture, grab some coconut oil or nut butter too.
Now, here’s a pro tip: time management is key! set aside about 15 minutes for prep. trust me; it’ll feel like a breeze when you know your mixing bowl and blender are ready to go.
And don’t forget about safety—when using blenders, be cautious! always turn it off before removing the lid, unless you want cocoa powder explosions everywhere (been there, done that!).
Step-by-Step Process: Creating Chocolate Heaven
Okay, let’s get to the fun part—making those pops! Here’s how you do it:
-
Prepare the mixture: in your blender, toss in 1 cup (240 ml) of almond milk, ½ cup (120 ml) of maple syrup, ⅓ cup (40 g) cocoa powder, 1 teaspoon vanilla, and that pinch of salt.
Blend until it’s silky smooth.
-
Add Creaminess (optional): If you’re feeling adventurous, throw in ¼ cup (60 ml) of melted coconut oil or nut butter for a richer bite and blend again.
-
Pour Into Molds: Carefully pour your decadent chocolate mix into popsicle molds. Leave a tiny bit of space at the top—this is crucial for expansion when freezing.
-
Insert Sticks: Pop those sticks into the molds and freeze for at least 4- 6 hours . You really want them fully solid; half-melted pops aren’t cute.
-
Unmold & Enjoy: To get those pops out, run warm water over the mold for a few seconds, then gently pull! Voilà, your creamy vegan treats are ready.
Expert Techniques: When You Want to Level Up
Feeling fancy? Here are some expert techniques to make your Vegan summer treats even better.
-
Quality Checkpoints: Make sure there are no lumps of cocoa powder. Blend until it’s smooth, my friends!
-
Timing Precision: Freeze for that solid 4- 6 hours , but if you can wait overnight, even better!
-
Flavor Boost: Experiment with mint extract for a cool twist or a sprinkle of sea salt before serving for an extra zing.
And if you mess up? No worries! Just re-blend or add more sweetener. It’s all part of the fun!
Success Strategies: Avoiding the Rookie Mistakes
When it comes to these pops, don’t sweat the small stuff too much. Still, there are some common mistakes you can avoid:
-
Don’t overfill your molds! You need space for those pops to expand as they freeze.
-
Always taste your mixture before freezing. Adjust that pure maple syrup to suit your desired sweetness.
-
Want to get wild? Stir in fruit chunks or nuts! Just remember to chop them up small so they fit.
And hey, these are perfect for summer parties too. Just make sure to make more than you think you’ll need , ’cause they’re gonna disappear fast!
Additional Information: More Vegan Bliss Awaits
Now that you’ve mastered the art of freeze vegan chocolate pops for summer bliss , take a moment to revel in your creation.
These dairy-free chocolate pops are perfect for those hot days, satisfying a sweet tooth without the guilt. plus, you can always customize them with whatever add-ins you love, like fresh fruits or nut butter toppings.
So, next time the sun’s beating down, pull these out and enjoy! and remember: all it takes is a little prep and a blender to create your new favorite healthy chocolate popsicle recipe .
Happy blending!
Pro Tips & Secrets
Oh my gosh, making freeze vegan chocolate pops for summer bliss is such a joy! but let’s sprinkle in some pro tips to make your experience even smoother.
First, keep it simple—don’t stress over the little things. this recipe is all about convenience.
When it comes to time-saving techniques , use a high-speed blender. you want that mixture super smooth, so skipping the manual whisking saves precious moments.
And if you really want to kick up the flavor? toss in a tiny pinch of sea salt. it enhances the chocolate flavor, trust me on that!
For that perfect presentation, think about serving your pops on colorful plates or in fun bowls. A little decor can turn those dairy-free chocolate pops into a centerpiece for summer gatherings!
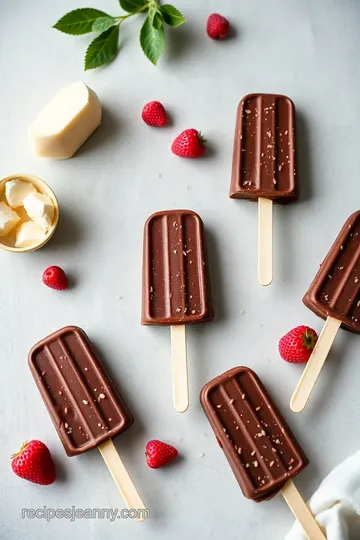
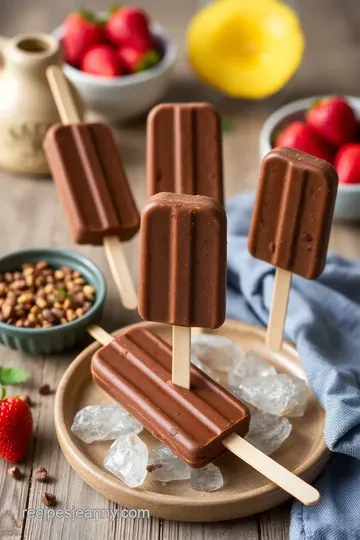
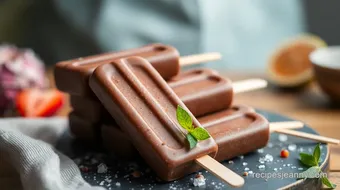
Perfect Presentation
Let's chat about making these pops not just tasty but also super pretty! plating techniques matter here. try using a white plate—it makes those rich chocolate pops stand out.
You can get fancy by adding colorful fresh fruit around the pops, like strawberries or blueberries.
As for garnish ideas , a sprinkle of shredded coconut adds a tropical flair, or maybe some crushed nuts for a nice crunch.
And don’t forget about color combinations ; the dark chocolate with bright fruit makes for a dreamy vibe!
Want a quick tip for visual appeal ? Drizzle a bit of melted dark chocolate over the pops before serving. It’s simple, but you’ll feel like a gourmet chef!
Storage & Make-Ahead
Now, let’s talk about storage . if you have leftovers—lucky you! just pop these bad boys back in the freezer. they can last for about 3 weeks if stored in an airtight container.
For preservation methods , i usually keep mine in a freezer bag. remember to label it. trust me, you don't want to be guessing what icy treat is hiding in there a month later.
When it comes to reheating , well, there’s none here—these are meant to be enjoyed frozen! just run warm water over the molds briefly to help them slide out easily.
The pops are good for about 5 days once they're out and sitting at room temp, but who are we kidding? they won't last that long!
Creative Variations
Feeling adventurous? let’s mix things up a bit! you can switch up flavors easily. for seasonal twists , add some pumpkin spice in the fall or fresh mint in summer.
How about a delightful peanut butter swirl ? just dollop in some pb before freezing for an extra richness!
If you’re looking at dietary modifications , swap out maple syrup for a low-calorie sweetener or use oat milk for nut-free friends.
And of course, get creative with those regional variations . think tropical—add some coconut milk or tropical fruit puree.
Complete Nutrition Guide
Okay, let’s break down the nutrition . each pop is about 100 calories —not too shabby for a cool dessert! you’ve got plant-based protein, fiber, and plenty of flavor.
What’s more, these pops are guilt-free summer snacks , perfect for kids and adults alike.
Keep an eye on sugar intake, though. While maple syrup is a healthier option, you can customize the sweetness. Maybe experiment with natural sweeteners for desserts if you're feeling innovative!
Expert FAQ Solutions
Here’s a little troubleshooting guide . If your chocolate pops aren’t coming out smooth, blend a bit longer. Texture is key! Not sweet enough? Add more syrup. It’s easy-peasy!
And if your pops are too icy, try adding a bit of nut butter to the mix next time. It brings that creamy texture everyone loves.
So there you have it! with all these tips and tricks, you're ready to whip up these homemade vegan treats that will not only keep you cool but will also impress your friends and family.
Honestly, freeze vegan chocolate pops for summer bliss are a fun project that’s simple and oh-so-satisfying.
Enjoy the process, share the love, and watch those smiles blossom with every lick of these creamy plant-based popsicles ! Happy summer snacking!
Sweet Summer Delight: Vegan Chocolate Pops Card
⚖️ Ingredients:
- 1 cup (240 ml) unsweetened almond milk
- 1/2 cup (120 ml) pure maple syrup
- 1/3 cup (40 g) unsweetened cocoa powder
- 1 teaspoon pure vanilla extract
- A pinch of sea salt
- 1/4 cup (60 ml) melted coconut oil (optional)
- 1/4 cup (60 g) nut butter (optional)
🥄 Instructions:
- Step 1: In a blender, combine almond milk, maple syrup, cocoa powder, vanilla extract, and sea salt.
- Step 2: Blend on high until the mixture is completely smooth and well combined.
- Step 3: If using, add melted coconut oil or nut butter to the blender and blend again until fully incorporated.
- Step 4: Carefully pour the chocolate mixture into popsicle molds, leaving a small space at the top for expansion.
- Step 5: Insert popsicle sticks into the center of each mold.
- Step 6: Freeze for at least 4-6 hours, or until fully solid.
- Step 7: To remove pops, run warm water over the outside of the molds for a few seconds, then gently pull the pops out.
Previous Recipe: How to Make Churned Coffee Ice Cream with Chocolate Swirl: A Delicious Indulgence
Next Recipe: How to Bake Crispy Cookies with Chocolate Chips: 5 Easy Tips!