Sweet Packaged Brownies
Looking for the perfect gift? Discover how to make sweet brownies packaged beautifully! Explore tips, variations, and more for homemade gifts. Try it now!

Are You Ready to Make the Ultimate Brownie?
Have you ever wondered what makes a brownie truly unforgettable? is it the gooey center that melts in your mouth, or that perfect balance between chewy and fudgy? well, get ready to uncover the secrets of creating sweet brownies packaged just to thrill your tastebuds.
This delightful recipe will have you in and out of the kitchen in under an hour, making it approachable even for those who usually shy away from baking.
It's as easy as pie—well, brownies aren’t pie, but you get the idea!
A Bit of Brownie History
Now, let’s dive into a little history because what's a signature dessert without a story? brownies have been delighting palates for over a century, with their origins traced back to the united states in the late 1800s.
They were likely born from a happy accident when someone forgot to add baking powder to a chocolate cake recipe.
Honestly, things don’t get much better when a little mishap results in an iconic dessert!
These sweet treats quickly became popular for their rich flavor and easy preparation, fitting seamlessly into american culture. fast forward to today, and brownies are everywhere—from bake sales to fancy dessert menus.
What makes this homemade brownie recipe special is its perfect blend of semi-sweet chocolate and butter, combined into a batter that bakes into heavenly squares of goodness.
This recipe will yield a batch of brownies that’s not only utterly delicious but also quick to whip up!
The Magic Behind This Recipe
What sets these brownies apart? for starters, the unique flavor combinations you get from the mixture of granulated and brown sugars give them a depth that’s simply divine.
And i swear by the technique we’ll explore, which guarantees a soft, melt-in-your-mouth experience. over the years, i've learned that the key to a great brownie lies in underbaking them just a tad, so prepare yourself for a little trial and error, but it’s all part of the fun!
These brownies are not just a dessert—they carry a rich culinary heritage . people from all over the world have added their twists, from chocolate chip brownies to vegan variations.
They have firmly secured their place in the hearts (and stomachs!) of many, and you can easily understand why anyone would want to bake a batch at home.
Health and Nutrition Highlights
Now, let’s chat about the healthier aspects of these brownies before i get too lost in sweet nostalgia. while they may not exactly win any health awards, they do give you some decent nutritional benefits.
For example, chic dessert ensoiasts can enjoy the balance of some dietary fiber thanks to cocoa powder. plus, using high-quality chocolate chips can offer a more satisfying experience than the overly-sweet varieties available at the store.
And for those of us juggling busy lives, these brownies can also be made gluten-free or even vegan with just a few simple swaps.
Recipe at a Glance
Ready to get started? Here’s a quick snapshot of what you can expect:
- Total Preparation Time : 20 minutes
- Cooking Time : 30 minutes
- Total Time : 50 minutes
- Serving Size : 12 brownies
- Difficulty Level : Easy
If you’re looking to impress friends or simply treat yourself—these sweet brownies are the way to go!
Now, without further ado, let’s get into the nitty-gritty and chat about the ingredients you’ll need to whip up these delectable brownies that will make your kitchen smell amazing.
You’re just a few steps away from tasting the best brownie recipe you’ve ever made!
Premium Ingredients Guide
Premium Core Ingredients
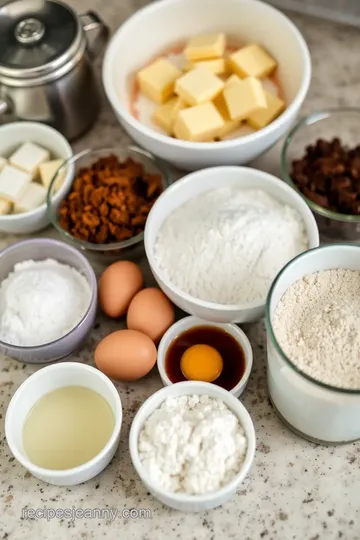
When you're about to set sail on your brownie-making adventure, having the right core ingredients makes all the difference. For our Sweet Packaged Brownies , you'll want:
- 1 cup (226 g) unsalted butter : Melted, of course! You can tell it's good butter if it smells rich and creamy. Look for brands that promise grass-fed, as they often produce a more flavorful butter.
- 2 cups (400 g) granulated sugar : Look for very fine sugar that gleams like freshly fallen snow—this will help your brownies rise properly.
- 1 cup (200 g) brown sugar : This adds that delicious chewiness! Go for dark brown sugar if you want a hint of molasses flavor.
- 4 large eggs : Room temperature is key here. They should feel slightly warm to the touch—this helps with the blending process.
Storage Tip: Keep your eggs in the fridge, but take them out about half an hour before you start cooking.
Signature Seasoning Blend
Now, let’s jazz things up a bit with our signature seasoning blend . The right spice combinations can elevate those sweet brownies packaged perfectly for gifting.
- 2 teaspoons vanilla extract : Pure vanilla is always best; if it smells like heaven, you’ve got a winner. Try to avoid synthetic blends!
- ½ teaspoon salt : You might think salt doesn’t belong in a dessert, but it amplifies the sweetness remarkably. Trust me.
- 1 teaspoon baking powder : Make sure it’s fresh; look for the expiration date. Old baking powder can lead to sad, flat brownies!
Smart Substitutions
We all have our moments when we find ourselves out of an ingredient. Here are a few smart substitutions for when life throws you a curveball:
- Butter : If you need a dairy-free option, coconut oil works wonders. Melt it down and use an equal measurement.
- Sugar : For a healthier swap, consider using honey or maple syrup (but you’ll need to reduce the liquid slightly).
- Flour : Swap all-purpose flour for gluten-free flour if your friends have dietary restrictions.
Kitchen Equipment Essentials
Now, let’s have a quick kitchen inventory check . Here are the must-have tools that will make your brownie journey smooth sailing:
- Mixing Bowls : A large mixing bowl is a must, but also have a medium-sized one for your dry ingredients.
- Whisk : A good, sturdy whisk will make blending wet ingredients a breeze.
- Silicone Spatula : This is my go-to for scraping down every last bit of brownie batter. No brownie left behind!
- 9x13-inch baking pan : I love glass or metal for even baking. Remember to line it with parchment for easy removal.
- Cooling Rack : Essential for cooling those fabulous brownies once they’re conquered the oven.
Pro Ingredient Tips
Here are some pro ingredient tips I’ve picked up along the way:
- Quality Markers : When buying chocolate chips, look for those made with real cocoa. If they don’t have that deep, rich color, they might not deliver that chocolatey kick you crave.
- Storage Solutions : Keep your cocoa powder and flour in airtight containers to avoid the grim specter of weevils haunting your baking fantasies.
- Money-Saving Tips : Buy in bulk! Whether it’s sugar or flour, stocking up can help you save some coins in the long run.
As we gear up for the next part of our brownie expedition, let's get ready to put these delightful ingredients to work! you’ve got the know-how, the right tools, and a sprinkle of creativity to whip up those sweet brownies packaged beautifully for all occasions.
Grab your apron, and let’s dive into the instructions!
Perfect Cooking Technique for Sweet Packaged Brownies
When it comes to baking a batch of brownies that could make anyone swoon, having a solid technique is key.
Let’s dive into the essential preparation steps and professional cooking methods to make sure those sweet brownies packaged up nice and tidy for sharing (or hoarding—no judgment here).
Essential Preparation Steps
Mise en place: before you even think about mixing anything, let’s set up our kitchen like a well-oiled machine. gather all the ingredients: melted butter, sugars, eggs, flour, cocoa powder, baking powder, salt, and those chocolate chips if you’re feeling fancy.
Measure them out so you’re not scrambling mid-recipe. trust me, a prepped kitchen avoids a lot of “uh-oh, where’s the baking powder?” moments.
Prep Techniques:
- Use a large mixing bowl for your wet ingredients and a medium one for the dry. This keeps the chaos to a minimum.
- Always sift your cocoa powder and flour—no one wants brownie lumps unless you’re into that kind of thing.
Time management: preparation takes about 20 minutes. while those brownies bake for 30 minutes , you can tidy up or just take a well-deserved break (i won’t tell if you sneak in a bite of chocolate).
Organization tips: keep your workspace clean and lined with parchment paper to avoid sticky situations later. the parchment not only makes cleanup easier, but it’s also great for lifting out the brownies once they’re cool.
Professional Cooking Method
Step-by-Step Process:
- Preheat the oven to 350°F (175°C) and line your 9x13-inch baking pan with parchment paper.
- In a large bowl, mix the melted butter and sugars until well combined. Add your eggs, one at a time, whisking it like you’re trying to impress someone.
- In another bowl, sift together the dry ingredients. Don’t skip the sifting—this helps create that perfect fudgy texture.
Temperature Control: Keeping the oven temperature at 350°F ensures that your brownies bake evenly. Too hot, and they’ll dry out.
Timing Precision: Bake for 25-30 minutes. I usually check at the 25-minute mark. The toothpick test is golden: when inserted, it should come out with a few moist crumbs.
Success indicators: you know they’re done when the edges pull away from the pan slightly and the center isn’t jiggly.
Let them cool in the pan for about 15 minutes before lifting them out.
Expert Techniques
Professional Methods:
- Use room temperature eggs; it helps everything mix in better and results in a fluffier texture.
- Sifting flour and cocoa powder not only incorporates air but ensures that no lumps ruin your brownie vibes.
Critical Steps: When adding the flour mixture, fold instead of stir. This gentle technique prevents gluten formation, making sure you have soft and chewy brownies rather than tough ones.
Precision Points: Using a kitchen scale can take your baking to the next level—baking is a science after all. It ensures accurate measurements, especially with something like flour.
Quality Checks: Always taste your batter (raw eggs and all), adjust sweetness if needed. If it tastes good uncooked, it’s going to be fantastic baked!
Success Strategies
Troubleshooting tips: if your brownies come out too dry, it means you might have overbaked them. next time, try checking them a couple of minutes earlier.
Trust me; the brownies will continue cooking after removal.
Quality Assurance: Ensure your ingredients are fresh! Old baking powder or flour can lead you down a path of disappointment.
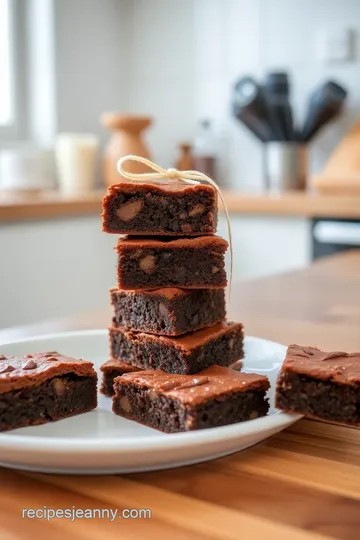
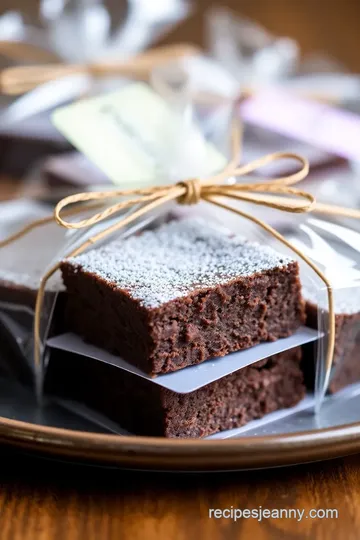
Perfect results guide: for stacking and gifting, let the brownies cool completely. this makes them easier to cut and results in neat squares that look as good as they taste.
Wrapping them up in clear plastic or cute parchment can make your homemade gift idea recipes look presentable and delightful.
And there you have it! once those brownies are nestled in their packaging, you’ll have a glorious treat ready to be shared.
Your friends and family might thank you, or they might just dive into the brownies with wild abandon.
Now, let's explore some fun variations on these brownies, because who doesn’t love a twist on a classic? There are so many brownie ideas just waiting to be discovered!
Game-Changing Tips
Professional Insights
Let me tell you, brownies are more than just a sweet treat; they're an identity of home-baking! i learned a lot about brownie making not just from websites but from trial and error—like that time i thought i could cut corners by using cold butter.
Never again! always, and i mean always, use melted butter for that luscious fudginess.
Expert Techniques
If you want the best brownie recipe out there, using the right technique is key. for that gooey texture everyone raves about, try folding the flour in instead of mixing briskly.
Overmixing can lead to chewy brownies rather than fudgy delights .
Kitchen Wisdom
Here’s a little nugget of wisdom: keep your eggs at room temperature! it makes mixing a breeze and helps your batter come together perfectly.
Plus, don’t skip on the baking powder; a tiny half-teaspoon can make a massive difference!
Success Guarantees
Here’s my promise—if you stick to this recipe, there's no way you can mess it up. and if you do, i want to hear about it! lightly baking those perfect brownies is completely possible.
Don't stress too much; remember, brownies aren’t just about the taste—they’re about the love you put into them .
Perfect Presentation
Plating Techniques
Now, let’s chat about presentation . I love serving these sweet brownies on a rustic wooden board with loose parchment paper piled up like I made a heroic mess—makes it look casual, but oh-so-chic!
Garnish Ideas
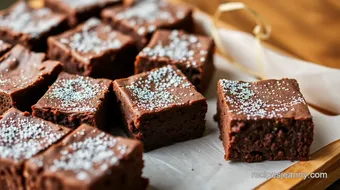
A light dusting of powdered sugar adds a delightful touch, or drizzle some melted chocolate on top for that ‘wow’ factor.
Even a sprinkle of sea salt can elevate the sweetness and play with flavors. trust me; it’ll make those delicious brownie desserts 10 times more enticing!
Serving Suggestions
These brownies do well in many settings! slice them up and serve plates of them at a gathering or, let’s be honest, keep them all to yourself at home.
They pair excellently with coffee or a nice ice cream scoop on the side—like a mini brownie sundae!
Visual Appeal Tips
Think about your brownie’s appeal! The contrasting colors of chocolate, cream, or even colorful toppings can make them pop. A few berries on the side could add some color—it’s all about the aesthetics, right?
Storage and Make-Ahead
Storage Guidelines
Here’s how to keep your sweet brownies packaged in top form. After cooling, keep them in an airtight container. They’ll stay fresh for about 5 days—if they even last that long!
Preservation Methods
For longer storage, consider freezing them. Just wrap each brownie individually in plastic wrap and pop them in a freezer bag. Perfect for those sweet cravings that strike out of nowhere!
Reheating Instructions
When you’re ready to indulge again, just microwave for about 10 seconds. It’ll feel like they just came out of the oven!
Freshness Tips
A little secret: place a slice of bread in the container to help keep the brownies moist. I learned that trick the hard way when chunks went stale in a rush!
Creative Variations
Flavor Adaptations
Don’t be afraid to change things up! Switch semi-sweet chocolate chips for dark chocolate or even mint chips if you're feeling adventurous.
Dietary Modifications
For those who prefer a vegan brownie recipe, swap eggs for applesauce or flaxseed meal mixed with water. It's surprisingly effective and adds a yummy twist .
Seasonal Twists
In the fall, why not try adding some spices like nutmeg or cinnamon? It’ll give a whole new holiday vibe that warms the soul.
Regional Variations
I’ve tried making classic brownie flavors mexican-style with a hint of cinnamon, and let me tell you—lifelong game changer! there’s so much you can do with just a little sprinkle of your own heritage.
Complete Nutrition Guide
Detailed Breakdown
These brownies do pack a caloric punch, but they also come with nutritional benefits. Each brownie brings a cozy comfort with a nurturing feel—thank you, chocolate!
Health Benefits
Dark chocolate can actually be good for the heart, and let’s be real—we all need a little indulgent therapy now and again.
Dietary Information
For those watching sugar intake, consider reducing granulated sugar or using alternatives like stevia. They still taste incredible while being easier on the waistline!
Portion Guidance
Let’s not kid ourselves; one brownie rarely satisfies the craving! But try to stick to one or two; they’re best enjoyed in moderation—no one wants a brownie regret!
Expert FAQ Solutions
Common Concerns
“Why are my brownies too cakey?” This is usually the result of overmixing, so take it easy!
Expert Answers
If you want fudgier brownies, consider decreasing the flour by a couple of tablespoons. Swing it one way or the other for different textures.
Troubleshooting Guide
In case they turn out too thin, check your oven temperature; it may be running hot. Ovens can be tricky; every home has its quirks.
Success Tips
Remember, patience is key! Let them cool completely before cutting—warm brownies might crumble.
I hope these tidbits inspire you in your baking adventures. If anything, brownies are meant to be delicious moments of joy—so embrace the imperfections and enjoy the ride.
As I often say, if baking doesn't involve a little bit of mess and plenty of laughter, then are you really doing it right? Enjoy baking those sweet brownies packaged with love, and don’t forget to share a few; everyone deserves a piece of happiness!
Sweet Packaged Brownies Card
⚖️ Ingredients:
- 1 cup (226 g) unsalted butter, melted
- 2 cups (400 g) granulated sugar
- 1 cup (200 g) brown sugar, packed
- 4 large eggs
- 2 teaspoons vanilla extract
- 1 cup (130 g) all-purpose flour
- 1 cup (90 g) unsweetened cocoa powder
- 1 teaspoon baking powder
- ½ teaspoon salt
- 1 cup (175 g) semi-sweet chocolate chips, optional
🥄 Instructions:
- Step 1: Preheat your oven to 350°F (175°C). Grease and line a 9x13-inch baking pan with parchment paper.
- Step 2: In a large mixing bowl, combine the melted butter, granulated sugar, and brown sugar. Whisk until smooth.
- Step 3: Add in the eggs one at a time, mixing well after each addition. Stir in the vanilla extract.
- Step 4: In a separate bowl, sift together the all-purpose flour, cocoa powder, baking powder, and salt.
- Step 5: Gradually add the dry mixture to the wet mixture, folding gently until just combined.
- Step 6: Gently fold in the chocolate chips, if using.
- Step 7: Pour the brownie batter into the prepared pan and bake for 25-30 minutes.
- Step 8: Once baked, cool in the pan for 15 minutes, then let cool completely on a wire rack before cutting.
- Step 9: Cut the brownies into 12 squares and package them individually for gifting.
Previous Recipe: Salted Nut Roll Shot: 5 Easy Steps to a Sweet Delight
Next Recipe: Simple Recipe for Cheez It Peanut Butter and Chocolate: 10 Amazing Bites for Any Occasion!