Soft and Fluffy Milk Yeast Rolls
Looking for the ultimate comfort food? These Soft and Fluffy Milk Yeast Rolls are my grandmother's secret—perfect for dinner or breakfast! Let's bake together!

Oh my gosh, let me take you back to a cozy family dinner from my childhood. it was one of those chilly nights where everyone gathers around the table with steaming plates of food.
As the aroma of my grandma's cooking filled the air, i would eagerly await her soft and fluffy milk yeast rolls .
They weren’t just a side dish; they were the main attraction! picture fluffy rolls beckoning for a slather of butter.
You know the kind of bread that just calls your name, right? that’s what these rolls are all about.
Now, let’s dive into the scoop on these soft and fluffy milk yeast rolls . originating from traditional recipes, these rolls hold a special place in many american kitchens.
They are more than just a simple homemade dinner roll ; they bring families together. and honestly, who doesn’t love a warm, pillowy texture roll to pair with their favorite soup?
When it comes to time, you’re looking at about 3 hours total . but don’t panic! most of that is just waiting for the yeast to work its magic.
The ingredient list is simple, and the cost is low . i mean, it’s all basic stuff you likely already have.
And trust me, the yield—about six rolls—is perfect for sharing (or not!).
Recipe Overview
Let’s chat a little more about why these rolls are so special. First off, have you ever noticed how the smell of baking bread can instantly lift your spirits? That sweet aroma of Milk Dough baking in the oven is like a hug for your heart!
While they might seem fancy, these rolls are actually beginner-friendly . if you’re new to baking with yeast , don’t sweat it! you'll learn handy techniques like proofing yeast dough and kneading as you go.
And trust me, once you master these skills, you'll want to whip up these easy yeast rolls on repeat.
Did i mention that everyone can enjoy them? if you're hosting a family gathering or just want to impress a date, these fluffy yeast rolls are perfect.
You could even make savory roll variations by adding herbs or spices—think rosemary or garlic—just to jazz things up!
Key Benefits
Now, let’s get to those benefits! first off, these rolls are not just a treat for the taste buds—they’re packed with some nutrition, too.
Using nutritional yeast or powdered milk , they provide a bit of protein and calcium. also, they're a great option for using up those extra pantry ingredients.
These rolls also shine at special occasions. they’re marvelous for thanksgiving , christmas, or a cozy family sunday dinner. you know, the ones where everyone lingers at the table just a bit longer? serve them with soup, like a creamy tomato or hearty chicken noodle, and watch them disappear.
One of the coolest things about these rolls? they’re the best bread for sandwiches ! the soft, fluffy texture makes each bite delightful.
Imagine that grilled cheese or pulled pork you could whip up— pure bliss !
I found that making rolls at home brings a certain joy you just can’t buy from the store. plus, it’s a fun project for the whole family.
Get the kids involved! they’ll love rolling the dough into cute little balls. it's a great way to bond. trust me, the memories you create will be priceless.
Alright, now that we’re drooling over the thought of those sweet aroma rolls , let’s move on to the ingredients. You'll be needing a few simple staples to get started…
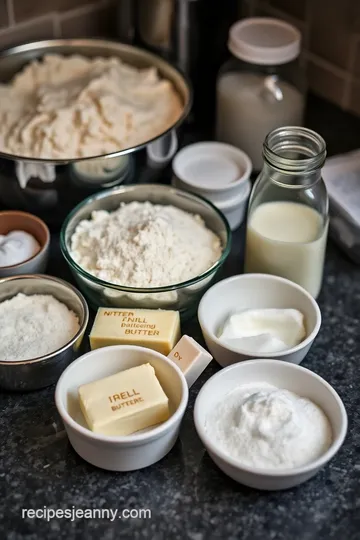
Your Ultimate Guide to Essential Ingredients
When you're diving into the world of baking, there's nothing quite like knowing what goes into your recipe. so let's chat about the essential ingredients you'll want for those soft and fluffy milk yeast rolls and beyond! trust me, having the right stuff on hand makes all the difference.
Premium Core Components
First off, we’ve got to get the measurements down. for my friends across the pond, 2 cups of all-purpose flour is around 250 g .
Simple, right? and don’t forget , quality matters! you want to look for flour that's finely milled with a good protein content for those light and airy rolls .
Now, once you’ve got your ingredients, how do you store them? here’s the lowdown: keep your flour in a cool, dry place, ideally in an airtight container.
It lasts around 6-12 months if you treat it right. for perishables like butter , store it in the fridge, and it should stick around for about a month.
And a little freshness tip? Always check for packaging dates. When picking flour or yeast, make sure it’s fresh—nothing worse than flat rolls due to old yeast!
Signature Seasoning Bliss
Next up, let’s sprinkle in the signature seasoning blend . the best spice combinations for your rolls? think salt and sugar —simple but effective.
And if you're feeling adventurous, toss in some herbs like rosemary or thyme for a savory touch. these can transform your rolls into something special!
Ever try a squeeze of garlic in your dough? oh wow. that's a whole new ballgame, especially if you're pairing it with soups or savory dishes.
Those sweet aroma rolls that waft around the kitchen? that’s the goal!
Smart Substitutions for Every Baker
Now, let’s be real—sometimes you don’t have exactly what you need. but no worries! there are plenty of common alternatives .
Out of eggs? use flaxseed meal with water. want dairy-free? replace milk with almond or coconut milk—it works wonders in that milk dough recipe .
Also, if you’re missing butter , coconut oil can totally step in. Just make sure it’s melted. When you’re baking with yeast, you want to keep things light and airy, but it's always nice to have options when you're experimenting!
Must-Have Kitchen Equipment Essentials
Alright, we can't forget about the gear! for my home bakers, the must-have tools include a mixing bowl and a whisk—seriously, these are your best friends.
A sieve for sifting flour will ensure you’re off to a good start, and trust me, a pastry brush for your egg wash? total game-changer!
But if you don’t have a stand mixer, don't throw in the towel. you can use your hands to knead that dough just as effectively.
Just make sure your counters are clean—baking feels a lot less messy with a tidy workspace!
Transitioning to Your Delicious Rolls
So there you have it—the essentials you need to dive into baking your own soft milk rolls . with these tips in hand, plus some awesome substitutions up your sleeve, you’ll be well on your way to pulling off those homemade dinner rolls that’ll impress everyone at the dinner table.
Now, let’s roll into some step-by-step instructions so you can whip up those fluffy yeast rolls in no time! trust me, it's easier than you think and totally rewarding.
Ready to get baking?
Unlocking the Art of Professional Cooking: Mastering Soft and Fluffy Milk Yeast Rolls
Professional cooking can sound intimidating, but it’s really just about getting organized and understanding each step along the way. honestly, anyone can whip up a batch of soft and fluffy milk yeast rolls —yes, even you! let’s talk about some essential preparation steps to get you rolling.
Essential Preparation Steps
A Little On Mise en Place
First things first— mise en place . it’s a fancy french term that simply means "everything in its place." before you start, gather all your ingredients and tools.
There's nothing worse than diving in and realizing you’re missing the unsalted butter or that essential pastry brush . trust me, it can throw off the whole vibe.
Time is of the Essence
Next up, time management. give yourself about 30 minutes to prep . you’ll want to spend about 15 minutes actively measuring and mixing, then let the yeast dissolve for another 15 minutes .
Proper timing is crucial; your rolls thrive on it.
Organizing Your Space
Keep your workspace tidy. i like to keep a trash bowl handy for scraps because no one likes a messy counter when you're trying to create fluffy goodness.
And don't forget safety! use oven mitts and be aware of hot surfaces. safety first, right?
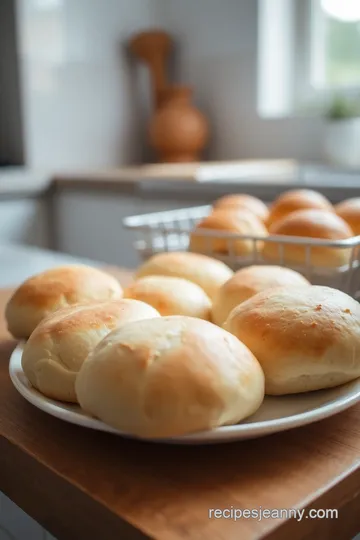
Step-by-Step Process
Now, let’s get into the nitty-gritty of how you can turn ingredients into magical soft milk rolls .
-
Activate yeast :
sprinkle 2 teaspoons of active dry yeast into 150 ml warm water (about 100° f/ 38° c ) and let it dissolve until frothy, about 15 minutes .It’s like waking up the little soldiers!
-
Prepare dough :
in a mixing bowl, combine 250 g sifted all-purpose flour , 2 teaspoons sugar , and 1/8 teaspoon salt .Mix it up, then add your yeast mixture. knead for 5 minutes and then incorporate 40 g softened butter .
Continue kneading for about 8 minutes until everything feels smooth.
-
First Proof :
Put that dough in a greased bowl, cover it, and let it rise until it doubles—about 1 hour . This part is like watching magic happen! -
Shape rolls :
punch that dough down (don’t be shy!) and knead it for another 8 minutes . divide it, shape it into balls, and place on a floured tray.Cover it and let these beauties rise for another hour .
-
Prepare for Baking :
Preheat your oven to 375° F ( 190° C) and give it about 15 minutes . Then, brush those rolls with an egg wash for that golden finish! -
Bake :
Finally, pop them in the oven for 15- 20 minutes until they're golden brown. Pro tip: they should reach about 190° F internally to be fully cooked.
Expert Techniques
You’re not just making rolls—you’re mastering yeast dough techniques . first off, always check the temperature of your water; it should be warm, not hot, or you’ll risk killing your yeast.
And when it comes to kneading, go for that smooth and elastic feel—this is key to achieving that light and airy roll texture.
If things go sideways, don’t sweat it! If your dough isn’t rising, maybe it was a little too cold or too hot. Remember, proofing is essential.
Success Strategies
Avoid common pitfalls! don’t rush through your roll dough proofing process; that’s where the magic happens. if you want to ensure a moist dough, cover it while it rises.
And here’s a cool trick: brush with melted butter post-baking to kick that flavor up a notch.
Want to make your rolls ahead of time? Shape them, freeze, and bake whenever you need a comforting side for your soup or stew .
From My Kitchen to Yours
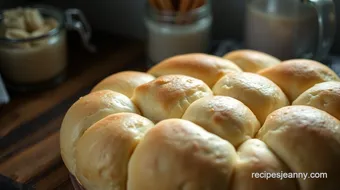
Baking these fluffy yeast rolls isn't just about food; it’s about creating memories. picture this: you take the rolls out of the oven, the sweet aroma wafting through your home.
Breaking them open to spread some butter? pure bliss!
So go on, gather your ingredients, roll up your sleeves, and get baking! whether it’s for a holiday feast or just because you want a warm bite at dinner, these soft and fluffy milk rolls will surely impress—everyone will be asking for your bread recipe with milk .
Ready for more tips and tricks? Let’s dive into some additional information to continue your baking journey!
Additional Recipe Information for Soft and Fluffy Milk Yeast Rolls
Making soft and fluffy milk yeast rolls is a journey full of little tips and sweet secrets. trust me, i’ve learned a thing or two in the kitchen over the years, and these are my go-to pieces of advice to make your rolls absolutely divine .
Pro Tips & Secrets
Oh my gosh, let’s talk secrets! When you're working with yeast, it’s all about the right temperature . That warm water should be around 100° F ( 38° C) —hot enough to wake up the yeast, but not so hot that it sends those little guys to a permanent sleep!
For time-saving techniques, prep your dough the night before. let it proof in the fridge overnight. that way, you’re ready to bake fresh warm bread recipes in the morning and enjoy that sweet aroma.
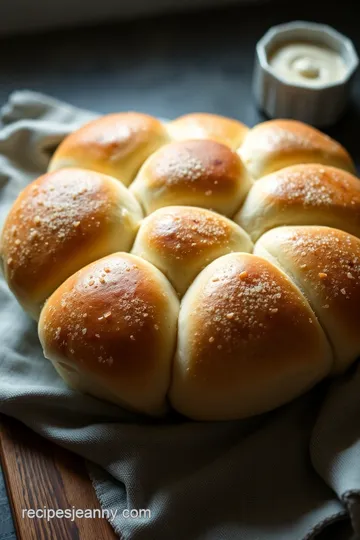
Use an egg wash before baking. it gives your rolls that lovely golden color and a shiny finish—who wouldn’t want to dig into those beautiful buns?
Perfect Presentation
Now, let’s talk about how to make your rolls look like something outta a food magazine. the plating is so easy—but it does require a touch of finesse.
Arrange your rolls in a nice circle on a serving platter. then, sprinkle some herbs or even a bit of sea salt on top.
Color is important too! think about adding a pop of green with parsley or fresh thyme. just like that, your rolls will go from tasty to wow !
Storage & Make-Ahead
Wondering how to keep those pillowy treats fresh? store them in an airtight container—easy peasy. if you want them to last longer, freeze them! just wrap each roll in plastic wrap and toss them in a freezer bag.
They’ll stay fresh for about 3 months . when it’s time to enjoy, thaw them overnight in the fridge and warm them in the oven.
Creative Variations
Let’s get funky with this milk dough recipe ! you can swap out the plain flavor for something a bit more daring.
How about giving them a twist with some cinnamon sugar for cinnamon swirl rolls ? or add some grated cheese into the dough for cheesy goodness.
You can even play around with seasonal ingredients. Think about incorporating herbs from your garden in the spring or spices in the fall. The sky’s the limit with these rolls!
Complete Nutrition Guide
Now, i know we all want to indulge, but it’s good to keep an eye on what we’re eating. each soft and fluffy milk yeast roll serves up about 160 calories .
They’ve got 4 grams of protein, too, making them a nice addition to your dinner plate. and don't forget about the fiber—you’re not just filling up; you’re nourishing your body!
Expert FAQ Solutions
You might be thinking, “why didn't my rolls rise?” first off, let's make sure your yeast was alive and kicking ! if it didn't foam up in the warm water, it may be old.
Always check your yeast's expiration date.
If you're dealing with a dough that isn’t coming together, trust the kneading process. you want it to be smooth and a little tacky but not sticky.
Knead it for about 8 minutes —your arms might thank me later!
Encouraging Conclusion
So there you have it! from perfect presentation to storage tips, making soft and fluffy milk yeast rolls can be super simple.
Give yourself grace as you learn; remember, baking is as much about fun as it is about perfection. your kitchen will smell incredible, and trust me, everyone will love these rolls.
Look into in, experiment, and enjoy the warm, fluffy goodness you create!
Soft and Fluffy Milk Yeast Rolls Card
⚖️ Ingredients:
- 250 g (2 cups) all-purpose flour, sifted
- 40 g (3 tablespoons) unsalted butter, softened
- 2 teaspoons granulated sugar
- 2 teaspoons active dry yeast
- 1 tablespoon powdered milk
- 150 ml (2/3 cup) warm water
- 1 tablespoon vegetable oil
- 1 large egg
- 1 teaspoon milk flavoring (optional)
- 1/8 teaspoon salt
🥄 Instructions:
- Step 1: Sprinkle the yeast into warm water and let it dissolve for 15 minutes until frothy.
- Step 2: In a mixing bowl, sieve the flour. Stir in sugar, powdered milk, and salt.
- Step 3: Add the dissolved yeast mixture to the dry ingredients and knead for 5 minutes.
- Step 4: Incorporate softened butter and knead for an additional 8 minutes until smooth.
- Step 5: Add milk flavoring and knead briefly to combine.
- Step 6: Swirl vegetable oil in a clean bowl, place the dough inside, cover, and let it rise until doubled in size, about 1 hour.
- Step 7: Punch down the risen dough and knead for 8 minutes. Divide into portions and shape into balls.
- Step 8: Place them on a floured tray, cover, and let them rise for another hour.
- Step 9: Grease a baking tray and preheat the oven to 375°F (190°C) for 15 minutes.
- Step 10: Brush the tops of the rolls with an egg wash.
- Step 11: Bake in the preheated oven for 15-20 minutes or until golden brown and cooked through.
Previous Recipe: Ultimate Crunchy Salted Potato Chips: 5 Easy Techniques for Snacking
Next Recipe: How to Make Delicious Gluten-Free Phyllo Dough: My Secret Recipe!