Philadelphia Cheesecake Bars
Craving a creamy, luscious dessert? Discover how to make Philadelphia cheesecake bars with a graham cracker crust, perfect for every occasion!

- Have You Ever Wondered Why Some Desserts Make the Heart Sing?
- Philadelphia Cheesecake Bars: A Culinary Journey
- Why You'll Love This Version
- Health and Nutrition Highlights
- Recipe at a Glance
- Essential Components Guide
- Professional Cooking Guide: Philadelphia Cheesecake Bars
- Game-Changing Tips
- Perfect Presentation
- Storage and Make-Ahead
- Creative Variations
- Complete Nutrition Guide
- Expert FAQ Solutions
- Recipe Card
Have You Ever Wondered Why Some Desserts Make the Heart Sing?
Imagine a sweet treat that doesn’t just satisfy your cravings but also brings a smile to your face with every bite.
Sounds enticing, right? these philadelphia cheesecake bars are not just any dessert; they're a creamy, dreamy escape from the hustle and bustle of life.
With a prep time of just 20 minutes and a cooking time of 30 minutes, this easy cheesecake recipe is perfect for those evenings when you want to whip something delightful without spending hours in the kitchen.
And let’s not kid ourselves; while baking can be therapeutic, sometimes you just want a quick dessert idea that doesn’t assume you’re a culinary wizard.
Spoiler: this one is as easy as pie!
Philadelphia Cheesecake Bars: A Culinary Journey
The story of cheesecake is as rich as its flavor, dating back to ancient greece when it was served to athletes during the first olympic games.
Fast forward to modern times, and we find the cheesecake evolving into all sorts of variations, yet nothing quite matches the classic flavor brought to life by philadelphia cream cheese.
These bars embody that timeless charm while being remarkably easy to make, capturing that creamy goodness we love.
Not only do these cheesecake bars taste heavenly, but their cultural significance is also quite compelling. cheesecake is often the star of celebrations, from birthdays to weddings, thanks to its rich, velvety texture that pleases the masses.
These bars have become popular not just for their flavor, but also for their portability—perfect for sharing at gatherings or simply indulging during a cozy night in.
Why You'll Love This Version
What makes my take on cheesecake bars special? well, for starters, it’s all about those unique flavor combinations . the creaminess of philadelphia cream cheese harmonizes beautifully with the crunchy graham cracker crust.
Plus, i promise you’ll find this method foolproof—i’ve tested it multiple times, and trust me, no one will suspect you had any trouble at all.
And if you’re anything like me, you'll appreciate those time-saving tips . you won't need to break a sweat while serving up a dessert that looks and tastes like you spent all day in the kitchen.
Health and Nutrition Highlights
Now, before you roll your eyes and say, “there’s nothing healthy in desserts,” let’s talk about some nutritional benefits. each bar has about 220 calories, and while they do pack in a bit of sugar, remember that they’re also a source of protein thanks to the cream cheese.
Whether you're serving them to family or bringing them along for a dessert sharing event, these bars can still be part of a balanced diet when enjoyed in moderation.
Plus, if you fancy yourself a bit health-conscious, i’ll also sprinkle in some ideas for gluten-free cheesecake variations so everyone can indulge without worry.
Recipe at a Glance
- Total Preparation Time: 20 minutes
- Cooking Time: 30 minutes
- Total Time: 50 minutes
- Serving Size: 12 bars
- Difficulty Level: Easy
Now that we've set the stage for a delicious dive into these no-bake cheesecake bars , let's get to what you need to make them.
After all, whether you’re a novice or a seasoned pro, having everything in front of you is half the battle won.
So, roll up your sleeves, and let's gather our ingredients because you won’t want to miss out on this treat!
Are you ready? Let’s flip over to the ingredients section , where the magic begins!
Essential Components Guide
When it comes to crafting philadelphia cheesecake bars , it's all about the ingredients. these bars hold a special place in my heart, reminding me of cozy family gatherings where sweet treats were shared over laughter.
Getting the ingredients just right makes a world of difference, so let's dive into what you'll need!
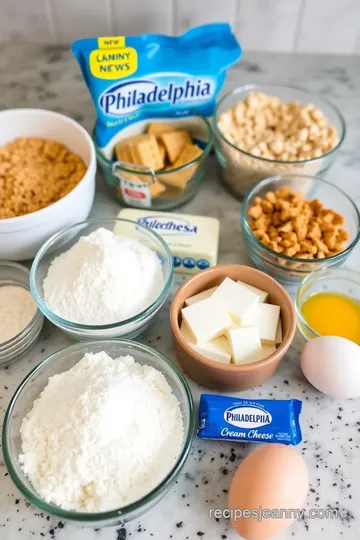
Premium Core Ingredients
Here’s a breakdown of my go-to ingredients for the crust and filling of our cheesecake bars.
- Graham Cracker Crumbs: You’ll need 1 ½ cups . The quality of these can really change the flavor, so grab a brand that’s not too sweet. If you’re feeling adventurous, try making your own by crushing whole graham crackers.
- Unsalted Butter: ½ cup melted butter binds everything together; use a good quality one. It can bid farewell to store-brand butters underperforming in flavor.
- Granulated Sugar: Just ¼ cup for the crust and ½ cup for the filling . This is mainly for sweetness. Take a few moments in the baking aisle and look for sugar that's fine in texture, as it mixes better.
- Salt: Just ½ teaspoon . It’s essential, like a sprinkle of fairy dust that enhances flavors, so don’t skip it!
When it comes to storage, keep your cheesecake bars in an airtight container in the fridge. They’ll last about 5 days, but let’s be real—they probably won’t last that long!
Signature Seasoning Blend
Now, let’s talk about the secret sauce —or blend, if you will—that makes these bars pop!
- Vanilla Extract: You’ll want 1 teaspoon . I use pure vanilla extract instead of imitation; the flavor is just so much richer.
- All-Purpose Flour: Only 1 tablespoon ? Yup! It helps the filling set nicely without being too dense.
A little hint: You can sprinkle a touch of cinnamon for a warming kick , or even toss in a bit of lemon zest if you’re feeling fancy.
Smart Substitutions
Life happens, and sometimes you just can’t get the specific ingredients you want. Here’s where substitutions come in handy:
- Butter Alternatives: If you’re dairy-free, coconut oil works well instead of unsalted butter. It adds a subtle taste.
- Cream Cheese Substitutes: If you're not a fan or have allergies, vegan cream cheese can stand in, but I find nothing beats that Philadelphia cream cheese for these cheesecake bars.
- Crust Options: Can’t find graham crackers? Digestive biscuits or those chocolate sandwich cookies can work wonders. The chocolate version brings a twist, almost like a brownie base!
Kitchen Equipment Essentials
Before you dive into this delightful recipe, make sure you have the right tools!
- Mixing Bowls: A set of mixing bowls is a must. You’ll need a larger one for the filling and a smaller one for the crust. Luckily, any ol' bowl will do in a pinch.
- Electric Mixer: If you don’t have one, a whisk works too, but boy, your arm will get a workout! Seriously, though, using an electric mixer can make the cheesecake filling beautifully creamy.
- Baking Dish: A 9x9-inch or 8x8-inch dish is preferred, especially lined with parchment paper for easy removal. Don’t skimp on this step, trust me!
Pro Ingredient Tips
Alright, here are some of my little secrets that have saved many a bake:
- Room Temperature Cream Cheese: If you forget to take it out of the fridge early, toss it in the microwave—the trick is only for a few seconds to soften it. This way, you’ll avoid that lumpy texture!
- Eggs at Room Temperature: Similar to cream cheese, room temp eggs incorporate more smoothly, making your filling airy and light.
You know, i once forgot the sugar in a batch of cheesecake bars and had to salvage it by adding whipped cream on top.
Not my finest hour, but hey—it was a lesson learned!
The journey to making Philadelphia cheesecake bars doesn’t have to be daunting but should be an adventure filled with flavor and fun.
Now that we've covered our essential ingredients and tips, let’s turn our attention to the fun part: the instructions! Hold on tight; we’re about to whip up something truly delightful.
Professional Cooking Guide: Philadelphia Cheesecake Bars
Let’s dive into making these really scrumptious philadelphia cheesecake bars! i remember the first time i whipped up this recipe—it was for a friend’s birthday, and the smile on their face was priceless when they took that first bite.
Now, let’s get ready to recreate that magic!
Essential Preparation Steps
Mise en place : the french term "mise en place" means "everything in its place," and it's vital for a smooth cooking experience.
Before you even think about getting that oven going, gather all your ingredients. you’ll need graham cracker crumbs, unsalted butter, granulated sugar, philadelphia cream cheese, and a couple of eggs.
For the crust, melt your butter, and don’t forget to soften your cream cheese beforehand. room temperature ingredients mix better and prevent lumps—your future self will thank you!
Prep techniques : there’s nothing fancy here, just good old-fashioned measuring and mixing. for the crust, crush your graham crackers (a rolling pin can be your best buddy here), and remember, a good crust is all about the texture.
Time Management : The total prep is about 20 minutes, so let’s stay focused. Getting the oven preheated while you prepare the crust and filling will save you precious minutes.
Organization tips : set up your work area like a seasoned chef! keep your mixing bowls, measuring cups, and spatulas on hand, and clean as you go.
It’ll make the process so much nicer.
Professional Cooking Method
-
Prepare the oven and baking dish : first things first, preheat your oven to 325°f (160°c) . line a 9x9-inch or an 8x8-inch baking dish with parchment paper, letting it hang over the edges for easy removal later.
If you’re feeling lazy like i sometimes do, a quick spray of cooking oil works too.
-
Make the crust : toss graham cracker crumbs, melted butter, granulated sugar, and a bit of salt into a bowl.
Mix until it looks like wet sand. press this mixture into the bottom of your prepared pan. a solid crust is key! bake it for 8 minutes and let it cool for a bit.
-
Prepare the cheesecake filling : in a big bowl, beat the softened philadelphia cream cheese until it's nice and creamy—about 1-2 minutes .
Add your sugar and mix until blended. then, mix in your eggs one by one, just like adding a touch of joy to life! add vanilla extract and flour last, but don’t overdo it; you want that dreamy texture.
-
Combine and bake : pour that wonderful filling over the cooled crust and spread it evenly. bake for 20-25 minutes .
The edges should be solid while the center jiggles just a bit. it’ll firm up as it cools—sort of like life, right?
-
Cool and slice : once baked, let it cool in the pan for about an hour , then chill it in the fridge for at least 2 hours .
This is the toughest part—waiting! but trust me, it’s totally worth it.
-
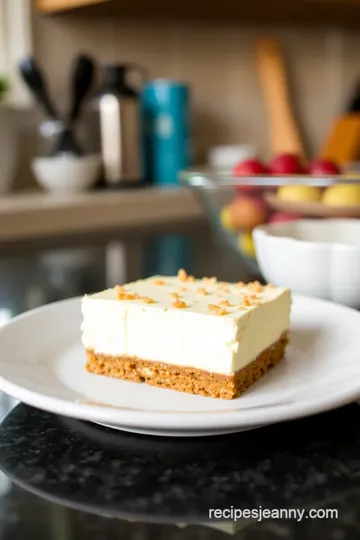
Serve : Lift those cheesecake bars out using the parchment paper and slice ‘em up into 12 delicious squares. Serve them chilled and get ready for the compliments!
Expert Techniques
Professional chefs often focus on small details that make a big difference. keep an eye on temperature control . baking is as much an art as it is science—invest in a good oven thermometer if you think your oven runs hot or cold.
As for timing precision, when you feel that subtle jiggle in the center of the cheesecake, you’re in the sweet spot! if it puffs up too much or cracks, you may have overbaked it.
Success Strategies
Now, if you run into any hiccups, don’t fret! if your cheesecake looks a bit too soft after chilling, don’t despair.
Refrigerate it longer or try popping it in the freezer for about 15 minutes before serving.
Quality assurance is all about the taste test. If it doesn’t taste as rich and creamy as you imagined, you might need to go a little heavier on the sugar next time.
In addition to that, remember that there are ways to switch it up! for instance, i like adding some mini chocolate chips or a zest of lemon to my filling for a fun flavor twist.
As we wrap up this section, the world of cheesecake is a minefield of delicious variations waiting to be explored.
Whether you want to go decadent with chocolate or something lighter with lemon, the possibilities are endless. stick around for the additional tips and ideas that will elevate your cheesecake game even further!
Game-Changing Tips
When it comes to baking these philadelphia cheesecake bars , there are a few pro tips that can make all the difference.
First off, start with room temperature cream cheese. i learned the hard way that creamy filling doesn’t come from cold cream cheese—trust me, lumpy batter is not a good look! beat it at medium speed for that smooth consistency you’re aiming for.
Next, try to avoid overmixing once you add the eggs. i know it’s tempting to whip it till the cows come home, but treating your eggs gently will keep your cheesecake light and fluffy.
Oh, and do remember that slight jiggle in the center—this means your bars will set perfectly as they cool. it’s almost like a little dance…
Perfect Presentation
Alright, let's talk plating! after you're done baking and your cheesecake bars are beautifully chilled, the way you serve them can really elevate the dessert experience.
For that pinterest-worthy touch, slice them into neat squares and arrange them on a simple white platter.
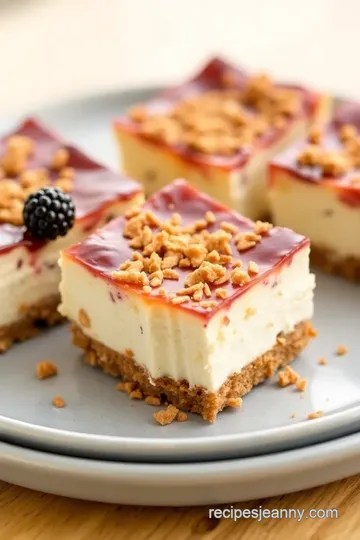
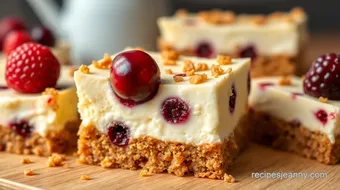
Now, how about a garnish? a sprinkle of fresh berries can make the colors pop, and who doesn't love that fruity burst with creamy cheesecake? alternatively, a dollop of whipped cream – perfectly swirled, of course – can add an indulgent touch.
And if you're feeling adventurous, why not drizzle a bit of chocolate or caramel sauce? people will be taking photos of your food—just don’t take all the credit; tell them it’s the recipe’s fault!
Storage and Make-Ahead
Need to prep ahead of time? these cheesecake bars are fantastic for make-ahead desserts. here’s the scoop: store leftovers in the fridge for up to five days, but i doubt they'll last that long! use an airtight container to keep them fresh.
If you’re planning a big gathering, you can also freeze them! just make sure they’re wrapped tightly in plastic wrap and then in foil.
When you’re ready to serve, simply let them thaw in the fridge overnight. oh, and be sure to keep those toppings separate until serving! those delicate flavors deserve their own time to shine, don’t you think?
Creative Variations
One of the best things about this recipe is its versatility. flavor adaptations are so fun! for chocolate lovers, you could mix cocoa powder into your filling or fold in some chocolate chips—chocolate cheesecake bars anyone? maybe you're looking for a zingy twist? a lemon cheesecake recipe would be perfect.
Just add lemon juice and zest to the filling, and your taste buds will sing!
For those experimenting with dietary needs, gluten-free options are available too. swap the graham cracker crust for a nut-based crust made of ground almonds or gluten-free cookies.
It’s amazing how one recipe can shift and change while keeping that core cheesecake goodness!
Complete Nutrition Guide
Now let’s break it down a bit, shall we? each serving of these philadelphia cheesecake bars rings in at about 220 calories, but don’t let that fool you.
They pack a flavorful punch without the guilt of devouring a giant slice of classic cheesecake. you’re looking at 14g of fat, which gives it that creamy richness, while the 3g of protein helps balance the indulgence.
But here's a little kitchen wisdom—portion control is key! slice those bars into smaller squares if you're serving guests, and watch those smiles grow.
You can even swap out sugar with a sweeter alternative if you're keen on reducing calories.
Expert FAQ Solutions
Let’s tackle some common concerns i’ve encountered while baking these bars. “what if my cheesecake cracks?” don’t stress! a little crack just shows you baked it—a badge of honor, if you will.
To avoid cracks next time, bake on a lower temperature and let the bars cool gradually.
“what do i do if they seem too soft?” you may just need a bit more chilling time in the fridge.
Wrap them up and give them a few extra hours—thank me later.
And, while I’m at it, don’t forget to take notes! Learn from each bake. You might find a new “perfect” cheesecake technique you didn’t know existed!
In conclusion, these philadelphia cheesecake bars are not just a dessert; they are a canvas for creativity and personal touch.
From garnishing to experimenting with flavors, they can be the star of your dessert table. so roll up those sleeves, grab your ingredients, and enjoy the delightful journey of baking! happy dessert-making, friends!
Philadelphia Cheesecake Bars Card
⚖️ Ingredients:
- 1 ½ cups graham cracker crumbs
- ½ cup unsalted butter, melted
- ¼ cup granulated sugar
- ½ teaspoon salt
- 16 oz Philadelphia cream cheese, softened
- ½ cup granulated sugar
- 2 large eggs
- 1 teaspoon vanilla extract
- 1 tablespoon all-purpose flour
🥄 Instructions:
- Step 1: Preheat your oven to 325°F (160°C) and line a 9x9-inch (or 8x8-inch) baking dish with parchment paper.
- Step 2: In a mixing bowl, combine graham cracker crumbs, melted butter, granulated sugar, and salt. Mix until resembling wet sand.
- Step 3: Press the mixture into the bottom of the baking dish. Bake for 8 minutes and set aside to cool.
- Step 4: In a large mixing bowl, beat softened cream cheese until creamy. Add ½ cup granulated sugar and mix until smooth.
- Step 5: Beat in the eggs one at a time. Then add vanilla extract and flour, mixing until just combined.
- Step 6: Pour cheesecake filling over the cooled crust and spread evenly. Bake for 20-25 minutes until edges are set.
- Step 7: Allow the bars to cool for about 1 hour at room temperature, then chill in the refrigerator for at least 2 hours.
- Step 8: Lift the cheesecake bars from the baking dish, cut into squares, and serve chilled.
Previous Recipe: Soda Bakery: 7 Amazing Honey Vanilla Soda Scone Variations
Next Recipe: Mini Chocolate Chips: 7 Best Recipes for Cookies That Wow