Iced Raisin Bread Recipe
Looking for a delightful iced raisin bread recipe? Discover how to make homemade iced raisin bread with creamy icing today for a sweet treat!

- Is Your Morning Breakfast Missing Something Truly Special?
- A Taste of History
- Master the Art of Icing It Up!
- Why You’ll Love This Version
- Health and Nutrition Highlights
- Recipe at a Glance
- Quality Ingredients Breakdown
- Kitchen Equipment Essentials
- Delightfully Iced Raisin Bread: A Sweet Temptation
- Essential Preparation Steps
- Professional Cooking Method
- Baking Time
- Expert Techniques
- Professional Secrets
- Perfect Presentation
- Storage and Make-Ahead
- Creative Variations
- Complete Nutrition Guide
- Expert FAQ Solutions
- Recipe Card
Is Your Morning Breakfast Missing Something Truly Special?
Oh my gosh, have you ever bitten into a slice of bread so fluffy and sweet that it turns your entire day around? imagine waking up on a cozy weekend morning, the sun gently streaming through the window, and that delightful aroma of iced raisin bread wafting through your home.
Just think about it — could anything really be better than a slice of this fluffy goodness topped with a rich, creamy icing? today, i’m here to share a homemade sweet bread recipe that is sure to become a cherished staple in your breakfast rotation.
This isn’t just any old bread; it’s a recipe that melds nostalgia with modern flavors. we’re diving into the world of iced raisin bread , which is surprisingly simple yet requires just a smidge of patience.
You’ll need around two hours in total, including rising time, but don’t fret! the actual active prep is about 15 minutes .
And while i’d say it’s got a bit of a medium difficulty level, trust me, if i can nail it, you definitely can too!
A Taste of History
Bread making goes way back, right into the heart of our ancestors’ lives. flour can be traced as a staple in food since ancient times, and combining it with yeast changed the game forever.
Fast forward to the 19th century, and you find cute little bakeries filled with the scent of baked goods that also incorporated rich, warm spices.
This exact blend of flavors found its way into our beloved cinnamon raisin bread , a cozy comfort that speaks to the heart of a true english tea time.
The beauty of iced raisin bread lies not only in its rich culinary heritage but also in its ability to evoke happy breakfasts and lazy sundays.
This isn’t just bread; it’s a canvas for memory, made better when you use quality ingredients. it's funny to think how something so simple can hold so much joy, right?
Master the Art of Icing It Up!
When you look at iced raisin bread , remember: you’re not just making any loaf. you’re mastering a dish that captures the spirit of comfort food recipes loved by so many! its origins remind us to appreciate the plump raisins suspended within a fluffy, cinnamon-infused dough.
What i absolutely adore is how this sweet bread has been lovingly passed down through generations, evolving alongside our ever-changing tastes.
In contemporary kitchens, people have embraced this tradition, whipping up easy raisin bread that can accompany morning coffee or stand as the star of your brunch spread.
Seriously, you’ll impress everyone — friends, family, or that cute neighbor you want to woo over sunday brunch!
Why You’ll Love This Version
Let’s talk about what makes this version special. the unique flavor combinations of warm cinnamon and soft, sweet raisins are simply divine.
You’re also going to love the foolproof techniques i’m sharing; no one wants a baking disaster, right? plus, i’ve tested every step to make sure it’s spot-on.
You’ll find handy time-saving tips for dough rising if you’re in a hurry (because sometimes life happens!).
Health and Nutrition Highlights
Now, let’s not forget the nutritional benefits tucked into those delightful slices, shall we? our homemade iced raisin bread offers a good source of energy, especially when you consider its carbs from the flour and natural sugars from those plump raisins.
If you’re mindful of dietary considerations, you can easily adapt this recipe. for those craving healthier options, swapping all-purpose flour for a whole wheat flour recipe can make a pleasant difference, while still yielding that fluffy bread texture.
Recipe at a Glance
- Total Preparation Time: About 2 hours (prep, rise, bake, and cool).
- Skill Level Required: Medium — a bit of kneading and yeast understanding is all you need!
- Serving Size: This recipe yields one loaf, which is roughly 10-12 slices .
- Cost Efficiency: A little investment in some staple kitchen ingredients yields a treasure trove of delicious breakfast possibilities!
So, are you excited yet? Trust me, this iced raisin bread will soon become your go-to weekend baking project. And now that I’ve whet your appetite with all this storytelling, let’s delve into the ingredients section to get you started on your baking adventure!
Quality Ingredients Breakdown
Ah, the beauty of baking! it all starts with the ingredients , doesn’t it? when i think about homemade iced raisin bread , i can almost smell the sweet aroma wafting through the kitchen.
Let's dive into the must-have quality ingredients that can really elevate your sweet bread recipe to something special.
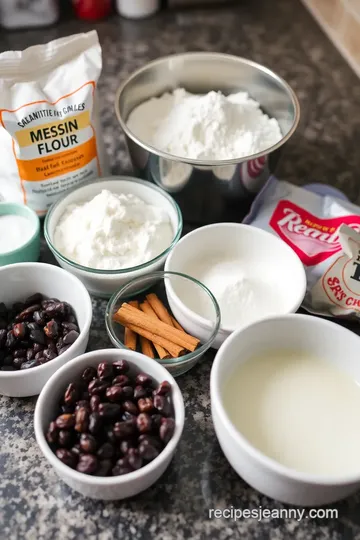
Premium Core Ingredients
First off, let’s break down those essential ingredients.
- 3 ½ cups all-purpose flour (420g): Use a high-quality brand. You want that fluffy bread texture, right? Look for something that feels soft and finely milled.
- 1 packet (2 ¼ teaspoons) active dry yeast: Make sure it’s fresh! You’ll know it’s good if it bubbles up when you dissolve it in warm liquid.
- ½ cup granulated sugar (100g): Not all sugars are created equal. I usually go for finer granulated sugar for that smooth sweetness throughout.
- 1 teaspoon salt: Be careful! This is essential for flavor balance.
- 1 teaspoon ground cinnamon: Can you say spice magic ? Go for Ceylon cinnamon if you can find it; it's softer on the palate than the regular stuff.
Storage Guidance: Keep your flour and sugars in airtight containers, especially if you live in a humid area!
Signature Seasoning Blend
Next up: The seasoning blend !
- Spice Combinations: Besides the cinnamon, you might wanna add a pinch of nutmeg or allspice for a flavor twist that dances on your palate.
- Herb Selections: If you're feeling adventurous, some fresh herbs can add a unique touch, although, in this case, keep it classic.
- Flavor Enhancers: A splash of vanilla in your icing can really up the ante.
Aromatic Additions: Just imagine that scent of fresh bread with cinnamon wafting through your home—it’s pure comfort food!
Smart Substitutions
Sometimes, life throws a curveball, and you find yourself missing an ingredient. No sweat! Here’s where smart substitutions come in.
- Alternative Options: No raisins? Go for dried cranberries or chopped dates! Trust me, they're delicious too.
- Dietary Swaps: Want a dairy-free version? Swap the milk for almond or coconut milk, and use coconut oil instead of butter.
- Emergency Replacements: No eggs? You can use applesauce or a flaxseed mixture for binding.
- Seasonal Variations: Use fresh berries in summer instead of raisins for a fruity twist.
Kitchen Equipment Essentials
Now, let’s chat about the real unsung heroes of the kitchen: the tools!
- Must-Have Tools: You’ll need a large mixing bowl, a loaf pan, and measuring cups. The basics work best here!
- Recommended Appliances: A stand mixer can be a lifesaver for kneading if you're making a lot of bread.
- Helpful Gadgets: A dough thermometer for monitoring rising will help ensure you're achieving that perfect fluffy bread texture.
- Home Alternatives: Don’t own a rolling pin? A wine bottle works just as well! Just make sure it’s clean—sorry, no empty bottles allowed!
Pro Ingredient Tips
Here are some of my little insider secrets!
- Selection Secrets: Always check the expiration dates on your yeast; fresh is key!
- Quality Markers: Look at your flour. Is it finely ground and free from lumps? Grab it!
- Storage Solutions: Store your yeast in the fridge or freezer if you don’t bake often. It’ll stay good for ages.
- Money-Saving Tips: Buy in bulk! Flour and sugar are usually cheaper this way, especially if you're diving into the world of weekend baking .
So, now that we've broken down and established a solid foundation of ingredients and tools, let’s move on to what we really love— the simple step-by-step instructions that’ll lead you to that heavenly loaf of iced raisin bread .
Your home will smell divine, and you'll have a fantastic treat to enjoy!
Delightfully Iced Raisin Bread: A Sweet Temptation
Oh my gosh, there's just something about homemade iced raisin bread that brings back all those warm, cozy memories from childhood! picture this: a cool saturday morning, the house filled with cinnamon-spiced aromas as the bread steadily rises.
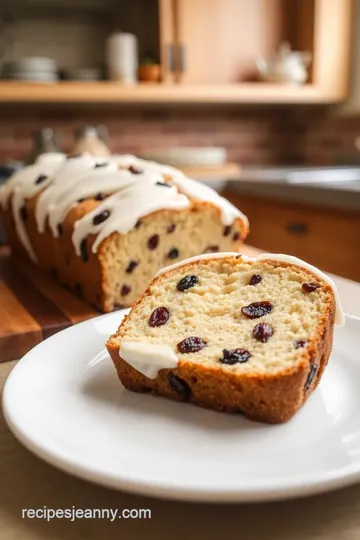
Honestly, there’s nothing quite like the soft, fluffy texture of this rich bread, studded with sweet, plump raisins and finished off with a dreamy, creamy icing.
You can make this iced raisin bread as a treat for breakfast or just as a comforting afternoon snack. trust me; it will be a crowd-pleaser every time!
So, let’s break it down step-by-step so you can whip this up with ease.
Essential Preparation Steps
First off, mise en place , my friends! gather all those ingredients and tools. you’ll need 3 ½ cups of all-purpose flour, some active dry yeast, sugar, cinnamon, and more.
Oh, and don’t forget that loaf pan!
Before diving into mixing, take a moment to warm the milk. this is super important for activating the yeast; it should be around 105°f (think warm bath, not scalding hot).
Next, let’s talk prep techniques —mix your flour, sugar, salt, and cinnamon in a large bowl and make a well for the wet ingredients.
Time management? let’s spice things up! you’ll be kneading for about 8-10 minutes. it sounds like a workout, but trust me, your arms will thank you later when you have that fluffy bread to munch on.
One organizational tip i swear by is using a clean kitchen towel or plastic wrap to cover the dough while it rises.
It keeps that nice warm air in and helps the yeast do its thing!
Professional Cooking Method
Now, let’s get this show on the road with the step-by-step process . once your yeast gets frothy in the warm milk (about 5-10 minutes), you’ll mix it with melted butter and eggs.
Combine that with your dry mix until you get a decent dough. when you’re kneading on a floured surface, remember: the dough should be tacky but not super sticky.
If it feels too tacky, add a little extra flour.
For timing precision , here’s the scoop: let the dough rise for about 1 hour or until it’s doubled in size.
You could catch up on that new series you've been binging during this time!
After the first rise, gently punch down the dough to release the air. now comes the fun part: roll it out and sprinkle on those luscious raisins and a bit more cinnamon for that extra flavor kick.
Then, roll it up tightly and place it in that greased loaf pan. another rise for about 30-45 minutes until it’s looking plump.
Baking Time
Preheat your oven to 350°f (175°c) because we’re about to make some bread magic happen! bake it for 25-30 minutes, and keep an eye on it.
The best success indicators ? you want that golden brown crust, and a quick check with a thermometer should reveal an internal temp of around 190°f (88°c).
When it’s out of the oven, let it cool for about 10 minutes right in the pan, then move it to a cooling rack.
That’s when the icing comes into play! mix up that creamy icing with powdered sugar, milk, and a dash of vanilla until it’s smooth and drizzle it over the cooled loaf.
Expert Techniques
Let’s get a bit technical for a moment, shall we? for quality checks , ensure your dough is elastic and doesn’t tear easily when you stretch it.
This indicates the gluten has developed beautifully.
If you happen to see the bread sinking after baking, fear not! that usually means the dough over-risen. but for quick troubleshooting , make sure you’re measuring those ingredients accurately and watching the clock for those rising times.
And there you have it—the perfect iced raisin bread recipe sure to fill your kitchen with comforting aromas and your tummy with love.
Before i sign off, i’ll just mention that you’ll want to experiment with this recipe. maybe try adding nuts or spices, or even swap out the raisins for something fruity and fresh! seriously, it’s all about making it yours.
But hold on a second. If you’re itching to dive deeper into the world of sweet breakfast comfort foods, stick around for more tips and tricks coming right up!
Happy baking, and may your iced raisin bread be as fluffy as your dreams!
Professional Secrets
Ah, the heartwarming, nostalgia-inducing world of iced raisin bread ! 💖 you know, there’s something so sublime about baking bread.
It’s akin to magic, really; a sprinkle of yeast, some flour, and voilà! you’ve got a comforting loaf that whispers cozy tales of home, especially when it’s sweet and filled with plump raisins.
So, let’s dive into some professional insights and kitchen wisdom that can help elevate this sweet bread recipe from simple to extraordinary.
First off, let’s talk expert techniques . when you’re venturing into the realm of bread making, mastering your dough rising tips is crucial.
Use a warm, draft-free spot to let your dough rise; think of it like a cozy blanket for yeasty goodness! oh, and don’t forget to bloom your yeast! this little step makes all the difference, making sure fluffy bread texture.
With that in mind, here’s a little nugget of kitchen wisdom: patience. let your dough say hello to the warm air for at least an hour.
Ensure it doubles in size—it’s like a mini celebration of life!
Perfect Presentation
Alright, moving onto one of my fave parts: plating techniques ! honestly, there’s something so gratifying about making a delicious dish look pretty.
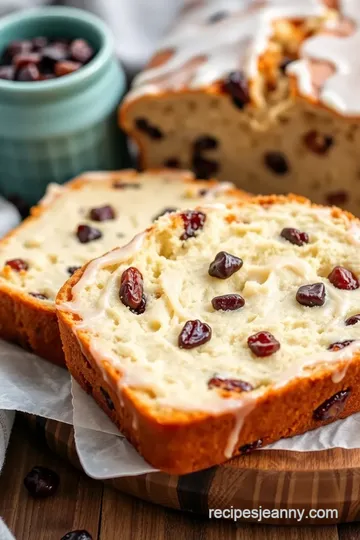
Your iced raisin bread deserves a spot on the center of the table, flaunting its golden crust and creamy icing like it’s just come off the cover of a culinary magazine!
When it’s time to serve, a delicate drizzle of creamy icing for bread can set that sweet balance—while making it look like heavenly breakfast bread ideas! you know what i always do? i dust it with a teeny bit of cinnamon for that “wow” factor, and it’s like each slice smiles back at you.
Garnish Ideas
As for garnish, a few slices of fresh fruit can complement your loaf beautifully. think berries or even a sprig of mint! this adds a pop of color and freshness—a lovely balance to those rich flavors.
Storage and Make-Ahead
Now, if you’re like me, you might want to make-ahead and savor that deliciousness for the coming days. this bread is perfect for it! just remember some important storage guidelines : wrap your loaf in plastic wrap or foil and keep it at room temperature.
It should last about 3 days, but let’s be honest—once you take a bite, who can resist another slice?
For longer pleasure, you can freeze your freshly baked bread. Cut it into slices for easy thawing. Pop it in a toaster for that freshly baked morning treat.
When it comes to reheating, a quick zap in the microwave for about 10 seconds is all you need to revive the fluffy bread texture.
Creative Variations
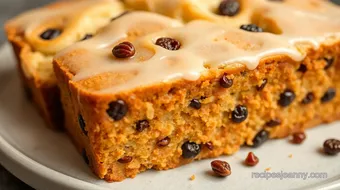
Feeling adventurous? let’s get creative with some flavor adaptations ! this homemade raisin bread can be jazzed up in so many ways.
You can toss in some crushed walnuts or pecans for a nutty delight, or even switch up the spices. how about a dash of nutmeg or cardamom? it’ll feel like an entirely new experience.
Seasonal Twists
And guess what? You can turn this into a seasonal twist , too! For fall, think about adding a touch of pumpkin spice—the flavors just dance together!
Complete Nutrition Guide
Okay, let’s get down to the nitty-gritty with the nutritional side of things. you’ll be pleased to know that this recipe isn’t just all about comfort.
The health benefits from those plump raisins are outstanding—packed with fiber and antioxidants! and while it’s a rich bread recipe , moderation is key.
You might consider portion guidance where one slice is enough to satisfy your sweet tooth.
Expert FAQ Solutions
Now, let’s sidestep for a moment and address some common concerns you might have—including troubleshooting tips. if your dough doesn’t rise, it could be the yeast.
Make sure it’s fresh and doing its thing! and for an occasional loaf that doesn’t turn out so fluffy, remember that kneading properly is essential for development.
In the end, making iced raisin bread is not just about following a recipe. it's about the experience—the feel of the dough, the smell wafting through your kitchen, and the joy of sharing a slice with loved ones.
Trust me, once you take the plunge into baking your own, you might just find your kitchen transforming into a warm, inviting sanctuary! give it a go, and enjoy the delicious rewards of your hard work!
Iced Raisin Bread Recipe Card
⚖️ Ingredients:
- 3 ½ cups all-purpose flour (420g)
- 1 packet (2 ¼ teaspoons) active dry yeast
- ½ cup granulated sugar (100g)
- 1 teaspoon salt
- 1 teaspoon ground cinnamon
- ½ cup whole milk, warmed (120ml)
- ¼ cup unsalted butter, melted (55g)
- 2 large eggs, room temperature
- 1 cup raisins (150g)
- 1 teaspoon cinnamon (optional, for extra flavor)
- 1 cup powdered sugar (120g)
- 2-3 tablespoons milk (30-45ml)
- ½ teaspoon vanilla extract
🥄 Instructions:
- Step 1: In a small bowl, dissolve yeast in warmed milk with a pinch of sugar; let sit until frothy.
- Step 2: In a large bowl, combine flour, sugar, salt, and cinnamon.
- Step 3: Create a well in the center, then add the yeast mixture, melted butter, and eggs.
- Step 4: Mix until combined; knead dough on a floured surface for approximately 8-10 minutes until smooth.
- Step 5: Place the dough in a greased bowl, cover with plastic wrap, and let it rise in a warm place until doubled in size (about 1 hour).
- Step 6: Gently punch down the risen dough and roll out on a lightly floured surface.
- Step 7: Sprinkle with raisins and additional cinnamon; roll it up tightly.
- Step 8: Place the rolled dough seam-side down in a greased loaf pan.
- Step 9: Cover and let rise until nearly doubled (about 30-45 minutes).
- Step 10: Preheat the oven to 350°F (175°C).
- Step 11: Bake for 25-30 minutes, or until golden brown and the internal temperature reaches 190°F (88°C).
- Step 12: Allow the bread to cool in the pan for 10 minutes, then transfer to a cooling rack.
- Step 13: Combine icing ingredients until smooth; drizzle over the cooled bread.
Previous Recipe: Delicious banana caramel pecan layer cake: The Ultimate Celebration Dessert
Next Recipe: Cinnamon Honey Bun Cheesecake: The Ultimate Easy Recipe to Indulge!