Heavenly Layers Cakery: Vanilla Berry Layer Cake
Looking for a scrumptious vanilla berry layer cake? My grandmother’s recipe is the perfect centerpiece for any occasion, bursting with fresh flavors and fun!

A Slice of Sweet Nostalgia: The Heavenly Layers Cakery
Oh my gosh, let me tell you a story! one sunny afternoon, i found myself in my kitchen craving a little slice of nostalgia.
You see, my grandma always baked her famous layer cakes for family gatherings. just like that, i decided i needed to whip up a heavenly layers cakery: vanilla berry layer cake .
It’s an easy layer cake that reminds me of those warm, inviting days spent with family. could there be anything better?
A Tasty Journey Through Time
Now, let’s chat about where this deliciousness comes from. layer cakes have been around for ages but really took off in american kitchens in the 19th century.
Back then, the cakes were simple—but now they’re all about towering heights and luscious fillings! today, this party cake recipe popularized by bakeries can be a showstopper at your gatherings, whether it’s a birthday bash or an afternoon tea.
In terms of time, making this cake isn't a race against time, but it’s not a weekend-long project either. you’ll need about 1 hour and 25 minutes from start to finish.
Sure, it’s got a medium difficulty level thanks to those vanilla cake layers and toppings, but just take it step by step.
Plus, the satisfaction is totally worth it!
And guess what? you won’t break the bank making this! with a few simple ingredients, you can serve up 10 to 12 people a slice of heaven, without selling your kidney for fancy store-bought stuff.
Why You’ll Fall in Love with This Cake
Now let's get to the good stuff: why should you make this cake? for starters, it’s not just pretty; it’s also packed with goodness! using fresh mixed berries means you’ll get a healthy dose of vitamins.
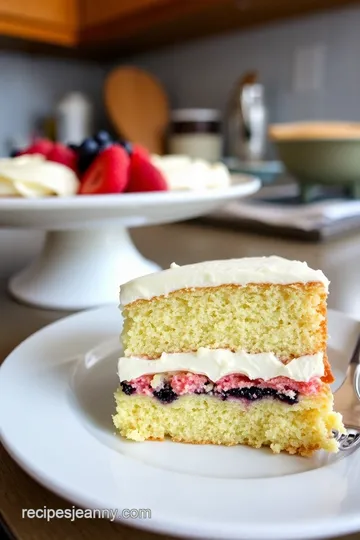
Imagine the light and fluffy texture of the cake paired with that creamy homemade buttercream frosting—it’s a match made in dessert heaven.
One of the best parts? you can customize it! want a chocolate layer cake variation? go for it! feeling bold? try out different berry fillings like raspberries or strawberries! and let’s not forget how great it looks.
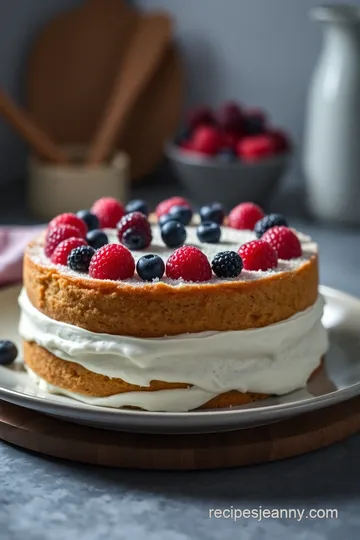
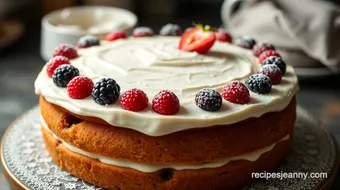
A tall, beautiful cake decorated with fresh berries and maybe some decorative cake toppers is bound to wow your guests.
Thinking about serving it for a special occasion? this cake is your go-to. whether for a birthday, an anniversary, or just an excuse to bake on a wednesday, it’s a perfect choice.
The vibrant colors and flavors also make it a fantastic centerpiece for summer gatherings or any celebratory event. seriously, who wouldn’t want a slice of that magic?
Your Next Steps in Cake Perfection
Alright, we’ve built up the excitement! next up, let’s dive right into the ingredients that’ll help you create this mouthwatering masterpiece.
Remember, room temperature ingredients make a difference. your cake texture will be just right if you follow those baking tips for layer cakes .
Stay tuned because we’re about to get our hands dirty and let that batter speak for itself. And trust me, once you taste that vanilla and berry goodness, you’ll be flipping through your recipe book for the next occasion to whip up this delightful treat!
Let’s get baking!
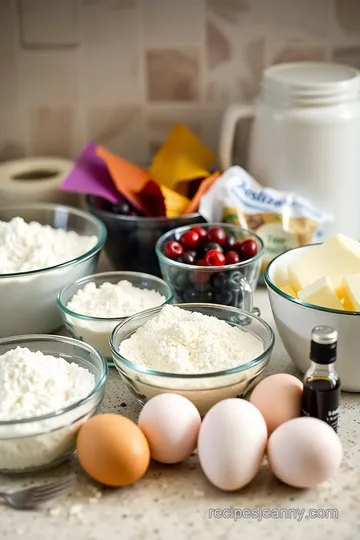
Essential Ingredients Guide
When it comes to crafting the perfect layer cake , knowing your ingredients is half the battle. you want the best vanilla cake layers, that ooey-gooey berry filling , and, of course, a gloriously creamy buttercream frosting .
Let’s walk through the essentials together, and i promise you’ll be baking like a pro in no time!
Premium Core Components
Get your measurements right!
for your heavenly layers cakery: vanilla berry layer cake , precision is key. use 2 ½ cups of all-purpose flour (that’s 312g for my metric friends).
Don’t forget that ½ cup (115g) of softened butter is the magic ingredient for that rich flavor.
Spotting quality ingredients
when purchasing ingredients, look for freshness. eggs should feel heavy and come from a reputable farm.
Flour? no lumps, and the bag should be intact. check those expiration dates on sugar, too, folks!
Storage guidelines
keep your flour in a cool, dry place, and make sure your butter is always in the fridge but not frozen solid! most ingredients have a decent shelf life—flour lasts for several months, while butter keeps well in the freezer if you stock up.
Stay fresh!
selecting ripe berries for your filling is crucial. look for plump, vibrant colors (like deep red strawberries or bright blue blueberries), and don’t hesitate to give them a sniff; they should smell fragrant, not musty.
Signature Seasoning Blend
Let’s pump up those flavors! you’ll need a classic combo: vanilla extract is your bff for this cake. just a tablespoon will do wonders in adding that cozy flavor we all love.
For our berry filling, the addition of 1 tbsp (15ml) of lemon juice elevates it, making the sweetness pop.
Herb selections
while herbs aren’t the main players here, feel free to use lemon zest in your buttercream or even create a floral cake presentation with edible flowers that complement the berry theme beautifully.
Smart Substitutions
What If You’re Out?
No worries, buddy! If you’re low on milk, buttermilk works wonders. And if you need an emergency cake fix, a box of mix isn’t a crime—just jazz it up with fresh berries!
Dietary Modifications
For gluten-free buddies, swap flour for a 1:1 gluten-free blend. Want dairy-free? Go with coconut milk and vegan butter!
Kitchen Equipment Essentials
Let’s talk tools that will help you nail this easy layer cake . you’ll need three 8-inch cake pans —make sure they are shiny; that reflects heat and helps your cakes rise beautifully! a good mixer, whether hand or stand (i adore my stand mixer; it’s a total workhorse), is pivotal in achieving that light and fluffy cake texture.
Pro tip : use a cake leveler (or a serrated knife if you're a rebel) to make those layers perfect for assembly.
And remember, always line your pans with parchment paper; no one wants a stuck cake!
The Transition
Now that you’ve got the scoop on ingredients, it’s time to swing into action! gather those seasonal berry desserts and get ready for some fun in the kitchen.
Start your oven and get that first layer of cake in the pan. oh, and don’t forget to grab your favorite music playlist—baking is all about the good vibes!
With all these tips and tools at hand, you’re more than ready to dive into baking your stunning vanilla berry layer cake . Let’s make this masterpiece together!
Professional Cooking Method
When it comes to baking, especially for something as delightful as a layer cake recipe , professional methods can elevate your game and make your desserts truly stand out.
With my favorite recipe for heavenly layers cakery’s vanilla berry layer cake , i’ll guide you through essential preparation steps, step-by-step processes, expert techniques, and success strategies.
Trust me, you’re gonna nail it!
Essential Preparation Steps
Let’s kick things off with mise en place , which is just a fancy way of saying "everything in its place.
" before you start mixing that batter, have all your ingredients measured and ready to go. it’ll save you time and chaos.
I mean, who likes scrambling for flour while the butter’s melting, right?
Speaking of time management, set a timer . baking requires precise timing. for the vanilla cake, you’ll need about 30 minutes in the oven at 350° f ( 175° c) .
Keep that oven door shut! peeking can mess with your bake. and as the cake bakes, use that time wisely—clean up your mess, prep your filling, or just sit back with a cup of coffee.
You’re about to create something magical!
Organization is key, too. i like to group ingredients by stages. keep your dry ingredients in one bowl and your wet in another until it's time to combine.
Trust me, it makes things so much easier and you'll feel like a pro!
And, anyway, safety first. Always use oven mitts and be careful with those sharp knives when leveling your cakes. We all have battle scars from the kitchen, but let’s keep them to a minimum, shall we?
Step-by-Step Process
Okay, now onto the good stuff! Here’s how you’ll put it all together.
-
Preheat the oven to 350° F ( 175° C) .
-
Grease and line your cake pans with parchment paper. This step is super important! You don’t want your beautiful cakes stuck to the pan.
-
Mix your dry ingredients together. Remember: don't overmix the batter! Just combine until you see no more flour.
-
Bake the cakes for 25- 30 minutes . Keep an eye out for those golden edges and a toothpick that comes out clean.
-
While your cakes cool (even the veggies need a chill moment, right?), prepare your berry filling . Cook those mixed berries down for about 10 minutes until they burst with flavor.
-
For the buttercream, you want a nice creamy consistency—don't hesitate to add that heavy cream if it’s too thick.
Expert Techniques
Now let’s talk like the pros. one thing that helps is paying attention to temperature control. make sure your butter and eggs are at room temperature to get that light and fluffy cake we all dream of.
Here’s a pro tip: When layering, take a cake leveler or serrated knife and make those tops nice and flat. It’ll make your assembly even more beautiful!
Quality checkpoints are essential. Check your cakes at 25 minutes to see how they’re doing, and remember to cool them before frosting (I know it’s hard to wait, but trust me!).
And if you run into trouble—like a sad, saggy cake —use these troubleshooting tips: Dry? Add a bit of cream to the frosting. Crumbly? Maybe you didn’t mix enough. There, easy fixes!
Success Strategies
Let’s wrap this up with success strategies. common mistakes? overmixing is big. each layer needs that love but keep it gentle.
Also, remember to keep that buttercream cool if it gets too soft. a quick chill can save you from a melted mess.
Quality assurance? Taste as you go! Seriously, this is your cake—make sure it’s delicious at every step.
And, lastly, make-ahead options. you can bake those vanilla cake layers a day in advance. just wrap them tightly in plastic wrap to keep them moist.
Ain't nobody got time for dry cakes, right?
Additional Information
Now, as we wrap up, remember that baking can be an adventure. from layering those fluffy vanilla cake layers with a tart berry cake filling and slathering on your homemade buttercream frosting , it’s all about having fun and creating memories.
Who knows? you might just end up with the best vanilla cake your friends have ever tasted. so step into the kitchen, gather those baking essentials for cakes , and whip up some magic!
Mastering the Art of Layer Cake: Tips, Tricks, and More
Let’s talk about one of the greatest joys in baking—creating that mouth-watering, show-stopping layer cake ! you know, those dreamy cakes you see in bakeries that seem to shout, "look at me!" well, i'm here to help you create that wow factor at home.
So, get your aprons on; we’re diving into everything you need to know about crafting the ultimate heavenly layers cakery: vanilla berry layer cake !
Pro Tips & Secrets to Cake Perfection
Here’s the truth, friends. mastering a layer cake recipe isn't just about following the steps. it’s about finding joy and confidence in the kitchen.
First off, room temperature ingredients are key. they whip up into that light and fluffy cake we all crave. think about it—cold butter and eggs just don’t play nice together!
Oh, and if you want to take your flavor game up a notch, try adding a teaspoon of almond extract along with the vanilla.
It adds a surprising depth that’s simply yummy . also, when you’re cooking your blueberry filling, be sure not to walk away! trust me; there’s nothing worse than burnt berries.
Nobody wants that in their summer desserts !
Perfect Presentation: Making It Instagram-Worthy
Now, let's chat about how to make this cake as aesthetically pleasing as it is delicious. a simple, yet effective trick is layering the cake with all the colors of the berries peeking through.
It creates that dramatic look and makes everyone excited for a slice.
For garnishing, fresh mint leaves can add that vibrant pop of green that just screams garden party . and if you really want to impress, use an offset spatula for a smooth buttercream finish.
It’s like the cherry on top of your celebratory cake recipes .
Storage & Make-Ahead: Keeping It Fresh
Planning ahead can be a game-changer, especially if you’re prepping for a gathering. once your cake is fully assembled, you can refrigerate it for about three days.
Just make sure to cover it with a cake dome or some plastic wrap so it doesn't dry out!
If you need to make it even earlier, why not freeze the layers? just wrap ‘em up tightly in plastic film and pop them in the freezer.
When you’re ready to serve, let them thaw in the fridge overnight.
Creative Variations: Your Cake, Your Way!
While we're settling into the classic version of this cake, don’t hesitate to get experimental! swap out the vanilla cake layers for chocolate, and you've got yourself a rich chocolate layer cake variation .
Or, if you’re feeling zesty, how about lemon cake layers with a berry filling that’ll knock your socks off? the sky's the limit, really! just remember, you can always play around with buttercream frosting variations to match your flavor choices.
Complete Nutrition Guide: Making Smart Choices
I know, i know—cake is delicious , but can also be a bit indulgent. a slice of our vanilla berry layer cake comes in around 320 calories , which isn’t too shabby for a dessert.
Plus, berries bring in some antioxidants, which makes us feel kinda healthy , right? just consider portion guidance, especially if you're serving up to 12 people.
Sharing is caring after all!
Expert FAQ Solutions: No More Baking Mysteries
Got questions? i certainly have a few from my kitchen fails! a couple of common hiccups are overbaking or forgetting how to layer nicely.
Remember, cakes continue to cook after they come out of the oven, so don’t leave them in too long! if it’s still a little sticky when you pull that toothpick out, the cake is likely on point!
Ending on a High Note
Baking is about joy and creativity, and your own layers cakery can reflect your unique flavor. don’t sweat the small stuff, and just have fun.
You’ll have friends and family talking about your heavenly cake for ages. so, roll up those sleeves and show off your skills.
Trust me, once you take a bite of this vanilla berry layer cake with its creamy frosting and burst of berry flavor, you’ll feel like a baking superstar.
Happy baking, folks!
Heavenly Layers Cakery: Vanilla Berry Layer Cake Card
⚖️ Ingredients:
- 2 ½ cups (312g) all-purpose flour
- 2 ½ tsp (11g) baking powder
- ½ tsp (3g) salt
- ½ cup (115g) unsalted butter, softened
- 1 ¾ cups (350g) granulated sugar
- 3 large eggs
- 1 tbsp (15ml) vanilla extract
- 1 cup (240ml) whole milk
- 2 cups (300g) mixed berries (strawberries, blueberries, raspberries)
- ½ cup (100g) granulated sugar
- 1 tbsp (15ml) lemon juice
- 1 cup (230g) unsalted butter, softened
- 4 cups (480g) powdered sugar
- 1 tbsp (15ml) vanilla extract
- 2-4 tbsp (30-60ml) heavy cream (as needed for consistency)
🥄 Instructions:
- Step 1: Preheat oven to 350°F (175°C). Grease and line the cake pans with parchment paper.
- Step 2: In a bowl, whisk together flour, baking powder, and salt.
- Step 3: In a mixer, beat softened butter and sugar until fluffy.
- Step 4: Add eggs one at a time, mixing in the vanilla extract afterward.
- Step 5: Alternate adding flour mixture and milk, starting and ending with flour mixture; mix until just combined.
- Step 6: Divide the batter equally among the prepared pans. Bake for 25-30 minutes or until a toothpick inserted in the center comes out clean. Cool in pans for 10 minutes, then transfer to a cooling rack to cool completely.
- Step 7: In a saucepan, combine mixed berries, sugar, and lemon juice. Cook over medium heat until berries break down and mixture thickens, about 10 minutes. Cool completely.
- Step 8: Beat softened butter until creamy. Gradually add powdered sugar, mixing well. Add vanilla extract and cream until desired consistency.
- Step 9: Level the cooled cakes, if necessary. Place the first layer on a serving plate, spread a layer of berry filling, followed by frosting. Repeat with remaining layers, finishing with frosting on top and sides.
- Step 10: Chill the completed cake for at least 30 minutes. Decorate with fresh berries on top and serve.
Previous Recipe: Ultimate Decadent Chocolate Chunk Cookies: 5 Tips to Indulge!
Next Recipe: Easy Sugar-Free Bread: My Ultimate Recipe for Guilt-Free Toast!