Savory Roll Paper Cutter Canapés

- Essential Components Guide
- Perfect Cooking Technique for Savory Roll Paper Cutter Canapés
- Success Guaranteed Tips for Canapés
- Perfect Presentation for Your Canapés
- Storage and Make-Ahead Tips
- Creative Variations for Savory Roll Paper Cutter Canapés
- Expert FAQ Solutions for Canapés
- Complete Nutrition Guide for Canapés
- Recipe Card
Canapés have always held a special place at celebrations, and let me tell you, the Savory Roll Paper Cutter Canapés bring a fun twist to traditional appetizers. Origins of canapés trace back to 18th-century France, where elegant bites were served at upscale parties and events. What sets these canapés apart is how easy they are to make, combining rich flavors and beautiful presentation in less than half an hour. If you're looking to impress guests or simply satisfy your cravings, this recipe is the ticket!
Master the Art of Savory Roll Paper Cutter Canapés
These canapés celebrate a rich culinary heritage, merging influences from various cultures. The name "Roll Paper Cutter" comes from the method of slicing rolled tortillas into delightful bite-sized pieces. The origins of these canapés are rooted in practicality and elegance, making them a hit at cocktail parties and picnics alike. Today, they're more popular than ever, elevating gatherings from dull to dazzling with unique flavor combinations.
Your New Favorite Savory Roll Paper Cutter Canapés
Let’s dive into why these canapés will quickly become your go-to snack. The flavor profile is just divine! Cream cheese, Greek yogurt, roasted red peppers, and fresh spinach create a symphony of taste that pleases the palate. And here’s a pro tip: you don’t need to be a culinary expert to nail this recipe! The techniques are foolproof, and they’re expert-tested, so you know you’re getting a reliable method. Plus, I’ll share a few time-saving tips, because who has time to fuss over complex snacks?
Health and Nutrition Highlights
Now, I know what you’re thinking—can these tasty bites be healthy? Absolutely! These canapés pack key nutritional benefits, including protein and fiber, thanks to the whole wheat tortillas and Greek yogurt. They’re also versatile for dietary considerations; just swap out the dairy for vegan alternatives if needed. Enjoying these low-calorie canapés keeps your wellness goals on track without sacrificing flavor!
Recipe at a Glance
So, what’s the scoop on preparing these delightful bites? You’ll only need about 20 minutes for preparation and 10 minutes for cooking, which is super manageable—trust me, I often overthink things, but this one is straightforward. The skill level is easy, making it perfect for novice cooks or seasoned pros looking for a quick app! Each batch makes 12 canapés, ensuring plenty of servings without breaking the bank—talk about cost efficiency!
Whether you’re hosting a party, prepping for a family gathering, or even just craving a delicious snack, these Savory Roll Paper Cutter Canapés are your new best friend! Not only are they simple to whip up and yummy to eat, but they'll also leave your guests raving about your culinary skills!
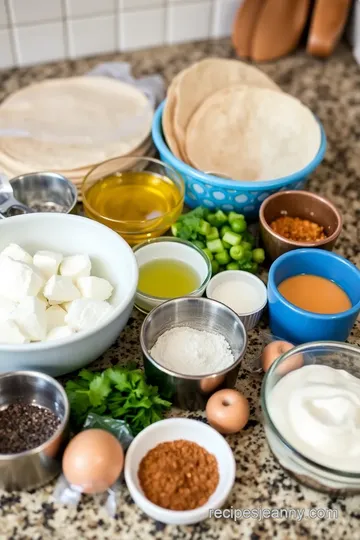
Essential Components Guide
Premium Core Ingredients
Let’s dive into the heart of our Savory Roll Paper Cutter Canapés. The key components set the stage, so choosing top-notch ingredients is a must!
- Whole Wheat Tortillas: You’ll need 6 medium-sized ones for the base. Look for tortillas with simple ingredients and whole grains—trust me, it makes a difference in taste and nutrition.
- Olive Oil: Just a tablespoon is all you need for brushing. Go for a high-quality extra virgin olive oil; you’ll really appreciate the flavor boost.
- Cream Cheese: Grab a full cup of softened cream cheese. Look for brands that use natural milk. I’ve learned that the texture can really alter the dish—softened is key to easy mixing.
- Greek Yogurt: A rich and creamy ½ cup adds great tang! Make sure it’s unsweetened; I once picked up a flavored one, and, well, let’s just say it was a weird surprise.
- Spices and Herbs: Keep essentials like garlic powder (1 teaspoon), onion powder (1 teaspoon), black pepper (½ teaspoon), and salt (½ teaspoon) handy.
- Chives: Fresh is always best—1 tablespoon of these fine beauties brings everything to life.
- Roasted Red Peppers and Spinach: Use ½ cup diced roasted red peppers and ¾ cup cooked spinach. I always keep a stash of roasted red peppers in my fridge; they add so much flavor effortlessly!
Storing these ingredients properly can also make a world of difference. Tortillas should be sealed in a cool, dry place, while cream cheese and yogurt belong in the fridge, of course!
Signature Seasoning Blend
The flavor game is where this dish truly shines. And for that, a well-thought-out blend of spices is everything!
Craft a mix that includes not just spices but little secrets. Here’s how to make it pop:
- Spice Combos: By mixing garlic powder with onion powder, you create a savory base that’s just so comforting.
- Herb Selections: Fresh herbs like chives or parsley not only look good but elevate the flavor.
- Flavor Enhancers: If you want to jazz it up, consider adding a dash of smoked paprika for a hint of smokiness!
- Aromatic Additions: A squeeze of fresh lemon juice can brighten it all up—gosh, I love that zing!
Feeding a crowd? I often double these blends, and they last a while stored in a cool, dry place. But always taste before you serve!
Smart Substitutions
You might find you're low on some ingredients, or maybe you've got some dietary preferences to accommodate. No worries!
- Alternative Options: If you don’t have whole wheat tortillas, try your hand at corn tortillas or even flatbreads. They’ll work just as well!
- Dietary Swaps: For a dairy-free version, look for plant-based cream cheese and yogurt. They can do the trick without sacrificing flavor.
- Emergency Replacements: No chives? No problem! Green onions or even finely diced red onion will step in superbly.
- Seasonal Variations: Ever try using asparagus or kale instead of spinach? Just wilting them lightly can add a fresh touch of seasonal goodness.
Kitchen Equipment Essentials
Now, let’s get real with the tools! You don’t need a fancy kitchen to whip these canapés up, but a few essentials will certainly help.
- Must-Have Tools: A good non-stick skillet is key for toasting those tortillas.
- Recommended Appliances: A food processor can make blending the filling a breeze—unless you want to do it manually, which totally brings some arm workouts into the mix!
- Helpful Gadgets: Speaking of tools, I adore using a sharp roll paper cutter for that clean finish on the canapés. It makes such a neat cut!
- Home Alternatives: If you don’t have a roll paper cutter, any sharp knife can work fine—just take your time with those cuts.
Pro Ingredient Tips
Alright, here’s where I dish out some wisdom I’ve picked up along the way.
- Selection Secrets: Always check for freshness, especially with dairy products; they should have a good date left on them.
- Quality Markers: When buying herbs, give them a sniff! If they smell vibrant, they’re a go!
- Storage Solutions: Place leftover filling in an airtight container—should last a few days, but I doubt it will last long around here!
- Money-Saving Tips: Buy in bulk when possible! Extra tortillas or cream cheese can often end up as a fun surprise in future meals.
So, there you have it—a delicious and straightforward guide to making your Savory Roll Paper Cutter Canapés a hit! Take these tips to heart, and happy cooking!
Perfect Cooking Technique for Savory Roll Paper Cutter Canapés
Essential Preparation Steps
When you’re getting ready to whip up these Savory Roll Paper Cutter Canapés, it's all about mise en place. Trust me; it makes everything so much easier. Start by gathering all your ingredients—those tortillas, cream cheese, and gorgeous roasted red peppers need to be within reach. I swear the key to smooth cooking lies in this prep step.
Now, let’s talk about prep techniques. Softening your cream cheese beforehand is essential. I’ve made the mistake of trying to mix cold cream cheese, and let me tell you, it’s a workout for your arm! Give it at least 30 minutes to come to room temperature. Keeping everything organized—like spices next to the mixing bowl and the cutting board handy—will help you stay on track. And, oh! If you can, set a timer while you're toasting those tortillas to keep your focus sharp.
Professional Cooking Method
Now onto the fun part—the actual cooking! Start with that non-stick skillet, over medium heat, of course. Brush the tortillas with olive oil. First side down for around 1-2 minutes until they're golden. The smell is divine, by the way! Don’t overdo it; the trick is to get that perfect crisp without burning. Flipping them might sound nerve-wracking, but you got this!
Next, whip up your filling. Combine the cream cheese and Greek yogurt until smooth, then toss in garlic and onion powder, sprinkling in those spices like you own the kitchen. Timing is everything; while you’re mixing, you can watch those tortillas cool off, which helps you to avoid burnt fingers! Spread that filling evenly; we want a delicious bite every time.
Expert Techniques
Okay, let’s talk about some expert techniques to make these canapés pop! The rolling part can be tricky. When rolling those tortillas, you might want to think of it like rolling a burrito—don’t be too aggressive. I’ve torn a few in my day. And glazing over how to cut them? Use a roll paper cutter or a sharp chef’s knife to slice them cleanly into 1-inch pieces. A clean cut means the filling stays put!
As for temperature control, make sure your filling is at room temp for optimal spreading. That can make a world of difference. After rolling and slicing, arrange your canapés standing up for presentation—it's like giving them their moment on the red carpet! You’ll know they’re perfect when they don’t fall apart and the filling isn’t overflowing.
Success Strategies
Let’s face it, even the best cooks have kitchen disasters, so I’ve gathered some troubleshooting tips to keep things smooth. If your canapés seem a bit too soft, consider toasting your tortillas a tad longer next time—this can help make them sturdier.
Quality assurance is key in every step. Taste your filling; if it’s bland, you might need more spices or a pinch of salt. And, the key to perfect results? Just look at them! If they’re holding shape and the flavors are bright, you're golden. Assign some taste testers; they’ll let you know if it’s winner!
Speaking of which, these canapés are perfect for parties. Nothing feels better than bringing fresh, delicious bites that everyone loves, right? Now, get into the kitchen and let those savory roll paper cutter canapés shine! Enjoy every pinch of flavor and every joyful bite!

Success Guaranteed Tips for Canapés
When it comes to making Savory Roll Paper Cutter Canapés that wow your guests, I've got a few professional insights that come from my own kitchen experiments. Start with quality ingredients—trust me, you’ll taste the difference. Fresh herbs, good olive oil, and creamy cheeses form the backbone of a great filling. Also, take your time mixing the filling. Proper blending boosts flavor and texture.
A tip I picked up from a chef friend is to let your filling chill in the fridge for about 15 minutes before rolling. This helps it firm up, making it easier to spread and roll without falling apart. You know, stability is key, just like getting that roll paper cutter to work without a hitch.
Perfect Presentation for Your Canapés
Plating can sometimes feel like an art form, doesn’t it? For these canapés, a little creativity can go a long way. After slicing them up, arrange the canapés standing upright. Trust me, your guests will be all “Wow, how did you do that?” You can make it pop visually by scattering some fresh herbs on the platter or adding a drizzle of balsamic reduction around.
And here's a fun garnish idea: instead of just using cherry tomatoes, try a sprinkle of pepitas (pumpkin seeds) or even crumbled feta for an extra crunch. It not only elevates the flavor but also adds texture and color to your dish—talk about visual appeal!
Storage and Make-Ahead Tips
Let’s talk storage: if you want to make these canapés ahead of time (like the night before a party), I recommend wrapping them in plastic wrap before refrigerating. Keep them in an airtight container. They’ll stay fresh, and you won’t have to stress about last-minute prep.
When reheating, use the oven instead of a microwave to maintain that crispy tortilla texture. Just a few minutes in a preheated oven should do the trick! Freshness is key, so aim to serve them within a day or two for the best flavor and texture—trust me, you don’t want soggy canapés!
Creative Variations for Savory Roll Paper Cutter Canapés
Here’s the fun part—mixing it up! You can totally tailor these canapés to fit your mood or season. Want a zesty twist? Add some chopped jalapeños to the filling for a kick. If you’re feeling fancy, try replacing the cream cheese with flavored varieties or even whipped ricotta for a lighter take.
For seasonal adaptations, consider using roasted butternut squash in the fall or fresh tomatoes in the summer. You can even switch the tortillas for nori sheets if you're feeling adventurous—a little sushi-inspired action never hurt anyone!
Expert FAQ Solutions for Canapés
You might have a few questions, and that’s totally normal. For starters, if the filling feels too runny, just pop it in the fridge for a bit longer—it'll thicken up nicely. Also, if you find it tricky to slice without squishing, remember to use a sharp knife or, my personal favorite, a roll paper cutter. It’s a game changer!
When it comes to flavors that clash—don’t overthink it! Stick to simple combinations. Too many ingredients can overwhelm. And if you do mess up? Just embrace it! Cooking is all about learning, right? Every mistake is a stepping stone to gourmet greatness.
Complete Nutrition Guide for Canapés
Nutrition matters, especially when you're serving up delicious canapés. These little bites weigh in at about 120 calories each, which isn’t half bad for a party treat! They hold a nice balance of healthy fats from the cream cheese and olives while sneaking in nutritious spinach and chives.
For those counting, it’s always good to portion out how many you intend to serve, as they can be quite tempting! a good balance is two to three per person along with some veggie sides. Overall, these canapés are not just tasty; they’re a well-rounded addition to any gathering.
So, let’s get rolling (pun intended) and whip up these delicious Savory Roll Paper Cutter Canapés. You’ll impress your friends and, honestly, yourself too! Happy cooking!

Savory Roll Paper Cutter Canapés Card

⚖️ Ingredients:
- 6 whole wheat tortillas (medium size)
- 1 tablespoon olive oil
- 1 cup cream cheese, softened
- ½ cup Greek yogurt
- 1 teaspoon garlic powder
- 1 teaspoon onion powder
- ½ teaspoon black pepper
- ½ teaspoon salt
- 1 tablespoon fresh chives, finely chopped
- ½ cup roasted red peppers, diced
- ¾ cup cooked spinach, drained and chopped
- 12 cherry tomatoes, halved
- 12 slices of cucumber (for garnish)
- Fresh herbs (basil or parsley) for garnish
🥄 Instructions:
- Step 1: Heat a non-stick skillet over medium heat. Brush one side of each whole wheat tortilla with olive oil. Place the tortillas in the skillet, oil-side down. Lightly toast for about 1-2 minutes until golden brown. Flip and toast for another minute. Remove from heat and let cool.
- Step 2: In a mixing bowl, combine softened cream cheese and Greek yogurt. Mix until smooth. Add garlic powder, onion powder, black pepper, salt, chopped chives, diced roasted red peppers, and chopped spinach. Stir until all ingredients are well incorporated.
- Step 3: Lay the toasted tortillas flat on a cutting board. Spread an even layer of the filling across each tortilla, covering it completely. Gently roll each tortilla tightly, like a burrito, starting from one end. Use a sharp knife to trim the ends for a neat look.
- Step 4: Using a roll paper cutter (or a sharp chefs knife), slice each rolled tortilla into 1-inch pieces. This will yield about 12 canapés from the six tortillas. Arrange the canapés on a serving platter, standing upright for presentation.
- Step 5: Top each canapé with a half cherry tomato and a slice of cucumber for garnish. Optionally, place a small herb sprig on top for freshness.
Previous Recipe: Delicious Butter Berry Cake That's Magical
Next Recipe: Easy Chocolate Brownies with White Choc Chips