Deliciously Thin Gluten-Free Phyllo Dough
Craving flaky gluten-free phyllo dough? My grandmother's secret recipe makes it deliciously easy! Perfect for spanakopita or sweet baklava—give it a try!

Discovering Gluten-Free Phyllo Dough: A Culinary Adventure
Opening Hook
You ever have one of those moments in the kitchen where something just slams you with nostalgia? i remember sitting in my grandmother’s warm kitchen, inhaling the buttery aroma of homemade pastries rising in the oven.
Who wouldn’t be instantly transported to the good ol’ days? but since going gluten-free, i’ve had to leave those memories on the shelf—until now.
Enter gluten-free phyllo dough , my ticket back to those flaky, crunchy, heavenly bites of spanakopita and baklava—which, let me tell you, taste just as good (if not better!) without the gluten.
Seriously, it’s like love at first bite!
Recipe Overview
Did you know the origins of phyllo dough trace back to the ancient mediterranean? it’s like a piece of history you can eat! traditionally, it’s made with wheat flour and water, layered into those delicate sheets we adore.
Nowadays, the demand for gluten-free mediterranean recipes has created a resurgence of interest in our beloved phyllo, giving us a chance to enjoy those traditional flavors minus the gluten.
If you’re wondering how much you’ll need to set aside for this delicious endeavor, let's break it down: this recipe takes about 1 hour to whip up— 30 minutes of prep and another 30 for resting.
It’s a medium-difficulty task, so don’t sweat it if you’re not a pro. you’ll probably yield about 12 sheets—plenty to layer and bake into your kitchen’s shining star.
Key Benefits
Why should you dive into the world of gluten-free baking ? let me count the ways! first off, with this gluten-free dough recipe , not only are you indulging in those flaky textures you crave, but you’re also getting a healthier option.
This dough is packed with good stuff. here’s the scoop—using gluten-free all-purpose flour and tapioca starch , you’re creating a nutty flavor that will leave you feeling satisfied without the gluten-induced bloat.
Trust me, it’s a win-win.
Want to impress at your next gathering? this dough is perfect for special occasions or weekend brunches, thanks to its versatility.
Whether whipping up a savory spanakopita or a sweet, sticky baklava gluten-free , there’s no wrong way to enjoy it!
Another little bonus? it’s a fantastic option for those following a gluten-free diet. you can whip up layered pastry recipes that would make any regular old pastry chef salivate with envy.
You’re essentially creating flaky pastry alternatives that your gluten-sensitive friends will thank you for.
Natural Transition to Ingredients
The time has come to gather our ingredients and get rolling! so grab those gluten-free baking tips and let’s dive into the step-by-step process of creating this versatile dough.
You'll be flinging flour and rolling out those layers in no time! ready? let's go!
Your Go-To Essential Ingredients Guide
Cooking is all about the right ingredients. if you ever felt lost in the grocery aisle with all those options, i totally get you! but don’t sweat it; i’m here to help with a handy guide on essential ingredients for any kitchen adventure, especially if you want to whip up some gluten-free recipes .
Premium Core Components
First up, let's break down those premium core components you'll definitely want to have on hand. Trust me, knowing your measurements is key! So, for precision, here’s a quick look:
- For dry ingredients like flour, 2 cups (240g) is a must for most recipes.
- When measuring liquids, 1/4 cup equals about 60ml .
Now, let’s talk quality. you want your gluten-free all-purpose flour to be a blend particularly designed for baking. look for gluten-free symbols or labels.
And as for storage? keep it cool, dry, and in an airtight container. most flours can hang out for 6 to 12 months .
Ever wondered how to spot freshness? Always check for a clean scent — no musty smells allowed! Also, give everything a quick look to spot moisture or bugs. No thanks!
Signature Seasoning Blend
Now, let’s jazz things up with some signature seasoning blends . spices can totally elevate your gluten-free dishes. think about combinations like garlic powder and onion powder for savory recipes.
Or, dried basil and oregano paired with olive oil to create that mediterranean vibe.
You might even consider dropping some fresh herbs like parsley or thyme. they really do wonders for flavor! as for flavor enhancers? a pinch of salt and a splash of vinegar can add depth to any dish.
Brings everything to life, ya know?
Smart Substitutions
Here’s where the magic happens. Sometimes you don’t have what you need, and that’s okay! Having smart substitutions in your back pocket saves the day.
- Need to swap out flours? A blend with almond or coconut flour can work wonders.
- For a phyllo dough substitute , try using light and crispy gluten-free tortillas or make a quick gluten-free dough recipe . You won’t even miss the gluten!
Consider dietary needs too. if you’re cooking for someone who can’t handle dairy, there’s always almond milk or coconut milk as alternative bases.
And for a quick emergency replacement , a simple soft tortilla can hold together your sweet or savory fillings beautifully.
Kitchen Equipment Essentials
Alright, equipment time! you don't need fancy gadgets, just some kitchen equipment essentials to make your life easier. a mixing bowl and a rolling pin are non-negotiable.
If you can get your hands on parchment paper, you’ll thank me later. no more fussing over dough sticking when it’s time to roll out that perfect sheet of phyllo !
Another handy tip: if you don’t have a pastry brush, a clean kitchen towel can dab oil or melted butter on your layers.
Oh, and don’t get me started on storing your creations! leave no room for spoilage — just wrap things up tight in plastic wrap.
Bringing It All Together
With these essential ingredients, signature seasonings, and handy kitchen tips, you’re all set to tackle flaky gluten-free desserts or savory treats like the classic spanakopita recipe gluten-free .
As you embark on your culinary adventures, remember that perfecting how to make phyllo dough or any other delicate pastry takes time.
Embrace the process, enjoy those resting dough benefits , and allow your creativity to flourish in the kitchen.
Ready to dive into recipes? Let’s get started with that deliciously thin gluten-free phyllo dough ! It's time to show off your new skills and whip up some mouth-watering Mediterranean dishes that everyone can enjoy!
Mastering the Art of Professional Cooking: A Guide to Gluten-Free Phyllo Dough
When it comes to cooking, the professionals have their secrets, and you’ll want to grab a front-row seat. today, we’re diving into something super fun and relevant—making gluten-free phyllo dough ! it’s a game-changer for anyone navigating a gluten-sensitive lifestyle.
So, put on your apron, grab a cup of coffee—trust me, you’ll need it—and let’s get started!
Essential Preparation Steps
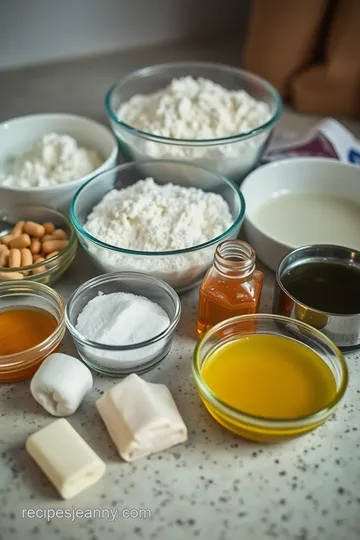
First things first. mise en place . yeah, it’s a fancy way of saying “everything in its place.” trust me, when you’re in the kitchen, this ain’t just a suggestion; it's a survival technique! measure out 2 cups (240g) of gluten-free all-purpose flour and 1/4 cup (50g) of tapioca starch .
Add a pinch of salt, and you're good to go.
Now, let’s talk time management . set a timer for 30 minutes to rest your dough. this rest time is crucial for the gluten-free magic.
Seriously, taking the time to let it chill will give you a fabulous texture! organize your space—get a clean kitchen towel, some plastic wrap, and a good rolling pin ready.
You’ll thank me later.
Safety considerations ? Make sure your surfaces are clean. And always remember: if you’re using your hands (which you will be!), wash them first. No one wants that extra seasoning—yikes!
Step-by-Step Process
Okay, here’s where we get into the nitty-gritty.
-
Prepare the dough : in a mixing bowl, combine your dry ingredients. then, whisk together 1/2 cup (120ml) of warm water , 1/4 cup (60ml) of olive oil , and 1 teaspoon of apple cider vinegar .
Slowly add this to your dry mix until you form a dough. nothing too sticky or dry, got it?
-
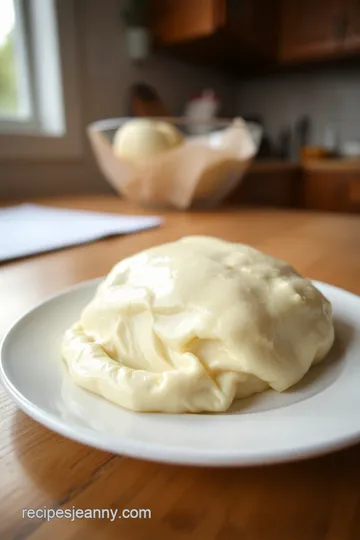
Knead and rest : knead for about 2- 3 minutes until smooth. then wrap that beauty in some plastic and let it rest for 30 minutes .
You’ve earned this time to relax!
-
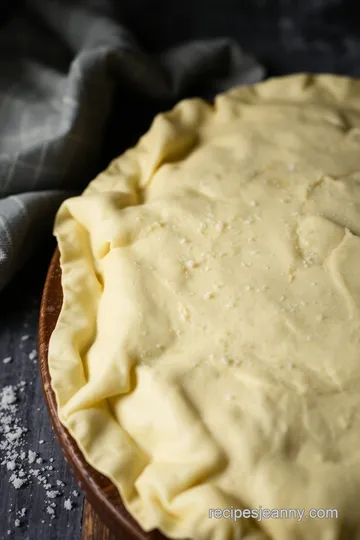
Roll out the dough : after resting, divide the dough into golf ball-sized pieces. roll each piece between two sheets of parchment paper as thin as possible.
Seriously, embrace the thinness! visit your inner chef while rolling.
-
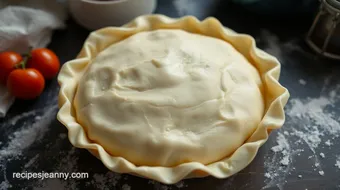
Layer the Sheets : If you’re diving into something audacious like making spanakopita or baklava , stack those sheets using parchment paper in between to avoid a sticky disaster.
Expert Techniques
Now, let’s talk about professional methods . first, your dough needs to be super thin. it’s all about those phyllo dough techniques .
Looking for those light and crispy layers ? brush those layers with olive oil or melted butter before stacking. flaky gluten-free desserts are totally possible, you just need to watch your temperatures.
When baking, keep an eye out for the perfect golden glow. If you see golden, you’re good! If you’re not sure, a little poking around won't hurt.
Success Strategies
Of course, every star chef has a few tricks up their sleeve. to avoid common mistakes, remember: keep things cool.
If your dough is starting to feel warm and mushy, it’s time for a break!
And let’s not forget about quality assurance . Always taste! That’s half the fun of cooking—and it helps ensure a fantastic dish.
And for those who love to plan, consider make-ahead options . You can store layers in the freezer. Wrap them carefully with plastic wrap and they’ll be ready for a spontaneous Mediterranean dinner night!
Additional Information
So there you have it! just like that, you’ve got the ins and outs of whipping up some deliciously thin gluten-free phyllo dough .
Whether you're craving baklava gluten-free or getting fancy with gluten-free mediterranean recipes , you’re armed with all the knowledge you need! keep practicing your gluten-free baking tips , and before you know it, you'll be dazzling your friends at dinner parties with your fabulous flaky pastry.
Keep cooking, exploring, and tasting, and join me in celebrating all things delicious. happy baking, friends!
Unlocking the Secrets of Gluten-Free Phyllo Dough
If you're a food lover like me, then you've probably faced that heart-wrenching moment when you realize a dish is off-limits due to gluten.
But fear not! with this delightful gluten-free phyllo dough , you can whip up all your favorite mediterranean treats. seriously! we're talking about flaky, layered pastries without any gluten guilt.
Let’s dive into some pro tips and tricks to make your gluten-free goodies shine like stars!
Pro Tips & Secrets
You know what they say, “A good chef is like a magician!” Here are some tricks of the trade to up your phyllo game:
- Chill, Chill, Chill: Keep your dough cool. It’s easier to roll out, and you’ll avoid those sticky situations. I’ve learned this the hard way—trust me, no one wants a dough ball stuck to their hands.
- Resting is Not for the Weak: Letting your dough rest for a solid 30 minutes makes all the difference. It relaxes the gluten-free flour, resulting in a more flexible dough. Think of it as giving your dough a mini-vacation!
- Olive Oil is Your Best Friend: For added flavor, brush layers with olive oil or melted butter. This makes your treats extra flaky and delicious. Who doesn’t want that?
- Cut the Mess: Always use parchment paper for rolling out your dough. This not only helps with the mess but also gives you a smooth surface to work with.
Perfect Presentation
Listen up, folks! A great dish isn’t just about taste; it’s also about how it looks. Here are my fave presentation tips:
- Layering is Key: When stacking your phyllo sheets, remember to alternate with parchment paper. This keeps them separated and ensures they remain flaky during baking.
- Colorful Garnishes: Add fresh herbs like parsley or mint on top. They pop on the plate and scream, “Look at me!”
- Play with Color Combinations: Use colorful veggies or fruits in your filling. Not only does it taste divine, but it makes for a vibrant dish!
Storage & Make-Ahead
Planning ahead can save you time and stress. Here’s how to store your gluten-free dough for later use:
- Storage Guidelines: Wrap your phyllo sheets tightly in plastic wrap and store in an airtight container. They can last a week in the fridge or even longer in the freezer.
- Reheating Instructions: When you’re ready to use it, let it thaw in the fridge overnight. To warm and crisp it, pop it in the oven for a few minutes.
- Freshness Duration: Your gluten-free creations are best enjoyed fresh, but with proper storage, they can maintain quality for up to a week in the fridge.
Creative Variations
Bored of the same old, same old? It’s time to switch things up! Here are some creative variations you might love:
- Sweeten the Deal: For a delightful baklava , add a bit of sugar to your dough. Trust me, it will be the star of your dessert table!
- Herby Goodness: Feeling adventurous? Mix in dried herbs for a savory twist. Think oregano or basil—yummm!
- Seasonal Swaps: Use seasonal fruits for fillings. Fresh berries or apples add a nice touch for summer or fall goodies.
Complete Nutrition Guide
I’m all about mindful eating. Here’s the breakdown of your gluten-free phyllo dough:
- Each sheet is about 100 calories —light enough to allow for a little indulgence!
- Packed with flavor but low on guilt, contributing only 2g of protein and 5g of fat . Consider it a healthier option for those flaky cravings.
Expert FAQ Solutions
Got questions about gluten-sensitive cooking? You’re not alone! Here are some common ones I hear:
- Why is my dough too sticky? Chill it. A cold dough is less sticky. It’s all in the temperature, folks!
- How can I make it taste better? Infuse it with spices or brush it with oil. You’ll be surprised at how much it elevates the flavors!
- Can I use regular flour instead? Nope! This recipe particularly requires gluten-free flour to keep that flakiness intact.
Conclusion
So, there you have it! with a few tips and some creativity, your journey into gluten-free mediterranean recipes can be a total success.
Just remember to have fun with it! cooking is all about experimenting and making it your own. whether you're diving into a spanakopita recipe gluten-free or creating your own flaky dessert, just embrace the process.
Get those aprons on, and let’s make some incredible gluten-free pastry magic happen! Unleash your inner chef, and remember: don’t sweat the small stuff—just enjoy the delicious journey ahead!
Deliciously Thin Gluten-Free Phyllo Dough Card
⚖️ Ingredients:
- 2 cups (240g) gluten-free all-purpose flour (preferably a blend optimized for baking)
- 1/4 cup (50g) tapioca starch
- 1/4 teaspoon salt
- 1/2 cup (120ml) warm water
- 1/4 cup (60ml) olive oil
- 1 teaspoon apple cider vinegar
🥄 Instructions:
- Step 1: In a large mixing bowl, combine gluten-free flour, tapioca starch, and salt.
- Step 2: In a separate bowl, whisk together warm water, olive oil, and apple cider vinegar.
- Step 3: Gradually add wet ingredients to dry ingredients, mixing until a dough forms.
- Step 4: Transfer the dough to a lightly floured surface and knead for 2-3 minutes until smooth.
- Step 5: Wrap the dough tightly in plastic wrap and let it rest for 30 minutes at room temperature.
- Step 6: Divide the rested dough into small balls (about the size of a golf ball).
- Step 7: Roll each ball out on a sheet of parchment paper as thin as possible, dusting with additional gluten-free flour as needed.
- Step 8: If using immediately, stack sheets with parchment paper in between each layer to prevent sticking.
- Step 9: If storing, wrap layers tightly with plastic wrap or in an airtight container.
Previous Recipe: How to Make Soft and Fluffy Milk Yeast Rolls: The Secret to Deliciousness!
Next Recipe: How to Bake the Ultimate Birthday Cupcake: Funfetti Edition