Quick & Easy Homemade Pita Bread
Looking for a tasty treat? Bake Pita Bread - Quick & Easy Recipe that brings warmth and joy to your kitchen! Perfect for dipping or stuffing.

- look into Into Deliciousness: The Story of Homemade Pita Bread
- Why Pita Bread Matters: A Quick Journey Through Flavor
- The Good Stuff: Benefits of Your New Favorite Recipe
- Why This Recipe Reigns Supreme
- Essential Ingredients Guide
- Mastering the Art of Homemade Pita Bread: A Quick & Easy Recipe
- Additional Recipe Information: Bake Pita Bread - Quick & Easy Recipe
- Frequently Asked Questions
- Recipe Card
look into Into Deliciousness: The Story of Homemade Pita Bread
Ever find yourself at a family gathering, and the conversation turns to food? everyone gets a little hazy-eyed, reminiscing about the last amazing meal they had.
For me, that moment happened when my aunt pulled out a warm basket of homemade pita bread . i mean, oh my gosh—it was heavenly! golden brown, puffy pockets begging to be filled with dips and spreads.
That’s when i realized: i need to learn how to bake this .
Now, if you've ever thought about making your own pita bread , let’s talk about this magical recipe: the bake pita bread - quick & easy recipe .
Seriously, we’re talking about a soft, fluffy middle eastern treasure that takes less time than you might think. just imagine tearing off a piece and dunking it into hummus or stuffing it with fresh veggies.
Heck, you could even celebrate a random tuesday with pita night!
Why Pita Bread Matters: A Quick Journey Through Flavor
Pita bread has been around for ages, tracing its roots back to ancient mesopotamia. yeah, that’s right! people have been baking this stuff for thousands of years, showing just how much we love our bread variations .
Fast forward to today, and it’s such a hit at dinner tables across america. i mean, who doesn’t want to whip up something that’s not only easy but downright impressive?
So how much time do you need to dedicate to this scrumptious project? well, the total time is about 1 hour and 25 minutes , with only 15 minutes of active prep ! talk about a quick win.
And guess what? this recipe requires zero fancy equipment. just your hands and a couple of bowls—easy-peasy!
The Good Stuff: Benefits of Your New Favorite Recipe
Let’s chat about what makes this easy pita bread recipe a total game-changer. first off, it’s got stellar nutrition! this isn’t your average loaf.
The combination of whole wheat and all-purpose flour gives you some valuable fiber. plus, it's naturally vegan, so it fits right in with healthy bread alternatives .
It’s perfect for anyone looking to add a touch of the mediterranean to their dinner table.
And don’t even get me started on versatility! these pitas can be hollowed out for some awesome pita pocket filling ideas .
Imagine stuffing them with grilled chicken, veggies, or even falafel—it’s a mediterranean feast waiting to happen! you can serve them at parties, pack them for lunch, or enjoy them while binge-watching your favorite show.
Those airy pouches are also super fun to eat, making them perfect for casual hangouts or family dinners.
Why This Recipe Reigns Supreme
One of the best parts about this homemade pita bread is that it beats store-bought any day, hands down. seriously, you can feel the difference in every bite.
When you make it yourself, you control the ingredients. want a gluten-free pita bread ? you got it! just swap out the flours and still get those lovely pockets.
Plus, baking pita bread at home means you can get creative—so many options for toppings and fillings await!
Another great perk of this recipe is the satisfaction of cooking with yeast . watching the dough rise is magical. it’s like a little party in your bowl! trust me, once you see those pitas puff up in the oven, you’ll be grinning ear to ear.
This isn’t just about making food; it’s about crafting little moments of joy, you know?
So, are you ready to start your own pita-making journey? Let’s gather those ingredients. Understanding how to make pita bread gives you a culinary skill that’ll impress anyone from your grandma to your besties!
Stay tuned as we dive into the ingredients you’ll need for this delightful adventure. Happy baking!
Essential Ingredients Guide
Premium Core Components
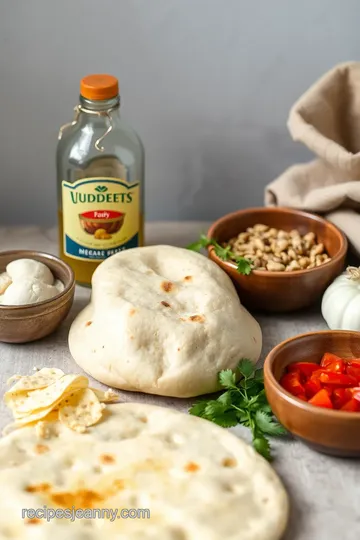
When you’re whipping up homemade pita bread , getting the right ingredients matters. start with 2 cups (240g) of all-purpose flour and 1 cup (120g) of whole wheat flour.
You want both for that perfect chew! so, when it comes to quality, look for flour that feels soft and powdery.
Also, check the label—fresh flour should have a pleasant smell and won’t be clumpy.
Then, there’s yeast —you’re gonna need 1 tablespoon (14g) of instant yeast. make sure your yeast is fresh—nobody wants to bake with flat dough.
Try to find one that’s within its expiration date.
Now, after mixing everything up, you’ll need to store those ingredients. keep your flour in a cool, dry place, away from sunlight.
A sealed container works wonders. as for your yeast, keep it in the fridge once it’s opened for max freshness.
Signature Seasoning Blend
Pita’s amazing on its own, but do you know what takes it to the next level? a sprinkle of salt —you'll want 1 ½ teaspoons (6g) .
Salt brings out all the flavors. and if you want to experiment, try adding herbs. a touch of dried oregano or thyme blends magically into the dough!
And if you're feeling fancy, brush them with olive oil when they're fresh out of the oven. It makes for the ultimate golden sheen and adds a burst of flavor—oh my gosh, it’s divine!
Smart Substitutions
Let’s talk alternatives. don’t have whole wheat flour? no problem! just use more all-purpose flour. or if you need a gluten-free pita bread , check out some chickpea flour or almond flour recipes.
There are so many ways to play around with this. need a sweetener? you can swap sugar out for honey —just remember to adjust your liquid a bit.
In a pinch and out of olive oil? Use any neutral oil you have—canola or vegetable oil will do just fine! Life is busy, right? Gotta make it work.
Kitchen Equipment Essentials
Now, onto tools! you don’t need a fancy setup to create fluffy pita bread. just have on hand a mixing bowl , a wooden spoon , and a clean kitchen towel .
If you’ve got a rolling pin —great! if not, use a wine bottle or even your hands. no stress!
A baking sheet or a pizza stone can give you those perfect puffed pitas. remember to preheat that oven to 475° f ( 245° c) —this helps in giving the bread those beautiful pockets.
Don't worry too much about storage either; keep your leftovers in an airtight container. Trust me, they’ll stay fresh longer.
Let’s Get Baking!
So, now that you’re set up with the essentials, let’s dive into the fun part: making that bake pita bread - quick & easy recipe ! with just a few steps, you’ll have a batch of soft, fluffy pita bread that could fool anyone into thinking you’ve got some middle eastern cooking skills up your sleeve.
Plus, it’s perfect for pita pocket filling ideas or just dipping into your favorite snack dips !
Stay tuned for my detailed instructions coming up next.
Mastering the Art of Homemade Pita Bread: A Quick & Easy Recipe
Have you ever sampled a warm, fluffy pita bread fresh from the oven? oh my gosh, it’s like a hug in carb form! today, we’re diving into my go-to recipe for bake pita bread - quick & easy recipe that’s perfect for absolute beginners and seasoned bakers alike.
Whether you’re throwing together a mediterranean feast or just need something to scoop up that delicious hummus, you’re gonna love this.
Essential Preparation Steps
Before we roll up our sleeves, let’s talk about a few essential preparation steps. Trust me, they can save you from a culinary disaster!
Mise en place is your best friend. this french term simply means “everything in its place.” gather your ingredients : flour, salt, sugar, instant yeast, olive oil, and warm water.
Having everything pre-measured? game changer.
Next, think time management . you’ll want to factor in a good 1 hour for dough rising . while you’re waiting, you could binge-watch a show or prep your favorite toppings.
And organization strategies? look, keeping your workspace neat is key. it’ll make your life easier and your pitas fluffier!
Safety first! Make sure your baking area is clean, and remember to wash your hands. Food safety is crucial—no one wants a cooking mishap.
Step-by-Step Process
Now for the fun part—let's put it all together! Here’s a clear step-by-step process:
-
Mix dry ingredients : in a mixing bowl, whisk together 2 cups of all-purpose flour , 1 cup of whole wheat flour , 1 ½ teaspoons of salt , 1 tablespoon of sugar , and 1 tablespoon of instant yeast .
-
Add wet ingredients : create a well in the middle. add 1 tablespoon of olive oil and 1 cup of warm water (about 110° f or 43° c ).
Stir until a shaggy dough forms.
-
Knead the Dough : Transfer your dough onto a floured surface and knead it for about 5- 7 minutes until it’s smooth and elastic.
-
Let it Rise : Pop that dough in a lightly oiled bowl and cover it with a kitchen towel. Let it rise for about 1 hour or until it doubles in size.
-
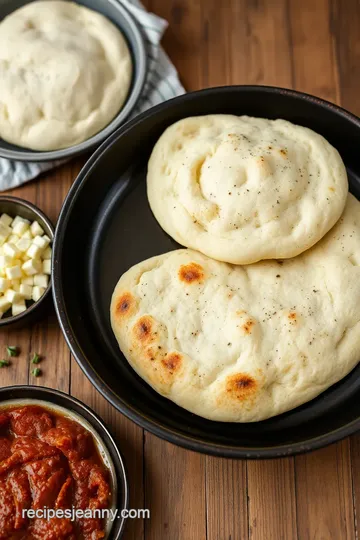
Preheat Your Oven : When your dough is fluffy and proud, preheat the oven to 475° F ( 245° C) and place a baking sheet or pizza stone inside to heat up.
-
Shape the pitas : punch down the dough and divide it into 8 equal portions . roll each piece into a ball, then flatten it with a rolling pin into circles about ¼ inch thick .
-
Bake : Carefully transfer the circles to your hot baking surface. Bake for about 5- 7 minutes , until they puff up and turn a light golden color.
-
Cool and enjoy : remove from the oven, cover with a towel to keep warm, and if you’re feeling fancy, brush with olive oil and sprinkle some sesame seeds on top.
They might just disappear before you get to the table!
Expert Techniques
Alright, let's get a bit pro here. It’s the little things that can elevate your pita baking game .
-
Temperature Control : Keep that oven hot, folks! A hot oven is a must for those pockets to puff up perfectly.
-
Timing Precision : Resist the urge to keep opening the oven door. Just a sneak peek can ruin the fun.
-
Visual Cues : Look for those pitas puffing like little balloons. That’s your golden moment!
-
Troubleshooting Tips : If your pitas aren’t puffing, check your yeast. Make sure it’s fresh and fizzy; otherwise, it’s time for some new yeast friends!
Success Strategies
Before you dive in, here are some success strategies :
-
Common Mistakes to Avoid : Don’t over-knead—this is a quick and fluffy bread!
-
Quality Assurance : Make sure to use warm water because it activates the yeast. A cold start won’t do you any favors.
-
Perfect Results Guide : Trust the process. If it seems a little messy, embrace it! That's part of the joy of baking.
-
Make-Ahead Options : You can make the dough in advance and store it in the fridge for a day or two. Though, freshly baked homemade pita bread is hard to resist!
So there you have it! that dreamy, soft pita bread you can whip up at home. seriously, it’s like a portal to the middle east, right in your kitchen.
Plus, you can stuff it with whatever strikes your fancy, whether it's classic falafel, grilled veggies, or maybe even a healthy snack dip!
With our baking basics firmly established, let’s move on to additional information about nutritious toppings, creative filling ideas, and more tips that can help you make pita bread a staple in your kitchen!

Additional Recipe Information: Bake Pita Bread - Quick & Easy Recipe
Who knew making homemade pita bread could be this easy? seriously, with a few simple steps, you can impress everyone and score major kitchen cred.
Let’s dive into some pro tips, storage advice, and even creative variations, so you can make this easy pita bread recipe your own!
Pro Tips & Secrets
Oh my gosh, if there's one thing i've learned, it’s all about the dough! start by making sure your water is the perfect temperature.
Use warm water around 110° f ; it gets the yeast all excited. you want that lovely fluffy bread, right? also, don't skip the resting time.
That hour of rising is essential.
If you’re feeling fancy, throw in some fresh herbs into the dough. Seriously, rosemary or oregano can elevate this Middle Eastern pita into a flavor bomb.
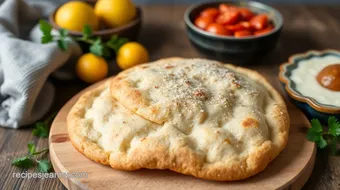
Presentation advice: when you bake those pitas, grab them while they’re puffing up in the oven. the sight will have you singing! but don't forget to cover them with a kitchen towel post-baking to keep ‘em soft and lovely.
Perfect Presentation
Now, let’s chat about making your pita look ridiculously good. plating can be as simple (and fun) as loading them up with colorful toppings.
Think bright roasted veggies or fresh greens. for an extra touch, sprinkle sesame seeds on top before they go in the oven for that chic look.
When it comes to color, imagine a vibrant mix of reds, greens, and oranges! fill your pitas with roasted peppers, feta cheese, or a zingy tzatziki.
Your friends will be instagramming their meals like they’re in a food magazine!
Storage & Make-Ahead
So, you went a little wild making pitas and now you have extras? totally normal! here’s how to keep them fresh: store your soft pita bread in an airtight container or wrap them in foil.
They’ll last about 3-4 days at room temperature.
You could freeze them, too! just pop them in a freezer bag after they’re cooled, and they’ll be good for up to a month.
When it’s time to eat, just toss them in the oven at 350° f for 5- 8 minutes until warm.
Easy peasy!
Creative Variations
Now let’s get creative! how about trying a gluten-free pita bread ? substitute the all-purpose flour with a gluten-free mix and follow the same steps.
Need something healthier? check out a whole wheat pita recipe and enjoy that nutty flavor.
You can even switch it up seasonally! in summer, load those pitas with fresh basil, mozzarella, and tomatoes. in winter, make a cozy filling with roasted root veggies and a spiced yogurt sauce.
The options are endless!
Complete Nutrition Guide
Alright, here’s the real deal on nutrients. each of your delicious pitas boasts about 120 calories , 4 grams of protein, and 3 grams of fiber.
They’re a tasty way to enjoy a balanced meal or snack without the guilt, especially when paired with snack dips like hummus.
But don’t forget portion control; two pitas might just be perfect when stuffed with those yummy fillings! As with any bread, moderation is key to making the healthiest choices.
Wrapping It Up
So there you have it! making your own bake pita bread - quick & easy recipe is not just about whipping up bread; it’s a deliciously rewarding activity that brings joy into your kitchen.
Don’t be afraid to play with flavors and make it your own! grab those warm pockets of goodness, dip them, fill them, or serve them up at your next gathering.
Trust me—everyone’s gonna love ‘em. so, what are you waiting for? get baking and enjoy your fluffy creations!
Frequently Asked Questions
What is the easiest way to Bake Pita Bread - Quick & Easy Recipe at home?
The easiest way to bake pita bread at home is by following the simple steps provided in the recipe. Start by mixing the dry ingredients, combine with warm water, and knead the dough until smooth. Let it rise, shape the pitas, and bake them in a preheated oven for a delicious result!
How can I make my pita bread more flavorful?
To enhance the flavor of your pita bread, consider adding dried herbs like oregano or thyme directly into the dough. Additionally, brushing the baked pitas with olive oil and sprinkling sesame seeds on top can provide extra taste and a nice visual appeal.
What should I do if my pitas don't puff up?
If your pitas don’t puff up while baking, make sure your oven is fully preheated before placing them inside. The baking surface should also be hot; otherwise, the pitas won’t rise effectively. Additionally, check if your dough has risen adequately during the resting period.
Can I store leftover pita bread, and how should I do it?
Yes, you can store leftover pita bread in an airtight container or wrap them in foil to keep them soft. For longer storage, you can freeze the pitas, and reheat them in a warm oven or a toaster upon serving.
What are some popular variations of this Quick & Easy Pita Bread recipe?
Some popular variations include making whole wheat pitas by substituting all the all-purpose flour with whole wheat. You can also prepare stuffed pitas by adding fillings like cheese or seasoned meat before rolling the dough into shape.
Is homemade pita bread healthier than store-bought?
Homemade pita bread is often healthier than store-bought options because you can control the ingredients and avoid preservatives. Substituting whole wheat flour or adding fiber-rich ingredients can further enhance its nutritional profile.
Quick & Easy Homemade Pita Bread Card
⚖️ Ingredients:
- 2 cups (240g) all-purpose flour
- 1 cup (120g) whole wheat flour
- 1 ½ teaspoons (6g) salt
- 1 tablespoon (12g) sugar
- 1 tablespoon (14g) instant yeast
- 1 tablespoon (15ml) olive oil
- 1 cup (240ml) warm water (about 110°F or 43°C)
- Olive oil for brushing
- Sesame seeds for sprinkling (optional)
🥄 Instructions:
- Step 1: In a mixing bowl, whisk together the all-purpose flour, whole wheat flour, salt, sugar, and instant yeast until well blended.
- Step 2: Create a well in the center of the dry mixture and add the olive oil and warm water. Stir with a wooden spoon or spatula until a shaggy dough forms.
- Step 3: Transfer the dough onto a floured surface and knead for about 5-7 minutes until smooth and elastic.
- Step 4: Place the kneaded dough in a lightly oiled bowl and cover with a clean kitchen towel. Allow it to rise in a warm place for about 1 hour or until doubled in size.
- Step 5: Preheat the oven to 475°F (245°C) and place a baking sheet or pizza stone in the oven to heat.
- Step 6: Punch down the dough, and divide it into 8 equal portions. Roll each portion into a ball and then flatten it with a rolling pin into circles about ¼ inch thick.
- Step 7: Carefully transfer the rolled-out circles to the preheated baking surface. Bake for about 5-7 minutes, until they puff up and are lightly golden brown.
- Step 8: Remove from the oven and cover with a kitchen towel to keep warm. Brush with olive oil and sprinkle with sesame seeds if desired.
Previous Recipe: How to Make Fried Chicken Crispy & Flavorful in 50 Min: A Soulful Delight
Next Recipe: How to Mix Unsalted Butter for Creamy Delight: 5 Amazing Recipes!