Decadent Chocolate Nut Bites
Craving something sweet? Try my easy Decadent Chocolate Nut Bites! Perfect for snacks or desserts, they’re fudgy, nutty, and utterly satisfying!

Have you ever found yourself rummaging through the pantry, desperately hunting for something sweet, only to come up empty-handed? i totally get it! just the other day, i was feeling a bit blah , and all i craved was a little chocolatey goodness.
That's when i whipped up a batch of decadent chocolate nut bites . honestly, these little gems saved the day and turned my mood around faster than you can say “chocolate snack!”
You know those days when you want a treat but don’t want to end up rolling in flour or dirtying every dish in the kitchen? that's where these no-bake chocolate bites come in.
So, if you’re like me and a lover of easy chocolate desserts that deliver on flavor without the fuss, keep reading.
Recipe Overview
Now, let's dive into a little history. the world of chocolate isn't just about sweetness; it’s rooted in rich traditions and ancient practices.
The origins of these bites are inspired by traditional chocolate-making, tracing back to the aztecs. they knew what was up with combining cocoa and nuts—it's a combo that never gets old and is beloved by chocolate ensoiasts everywhere.
These days, decadent chocolate nut bites are all the rage. you can find them at cafes and snack bars, but why not make your own? they’re totally doable at home, only take about 55 minutes to whip up (including cooling time!), and they’re super simple .
Seriously, even your kids can jump in on this one—they’ll love being little chocolate chefs!
And oh, have I mentioned how wallet-friendly this recipe is? You can make around 12-15 bites for just a few bucks. That’s way cheaper than grabbing a fancy box of chocolates!
Key Benefits
Now let’s talk benefits because these little bites aren’t just tasty; they’re also packed with some nutritional perks. first off, these are not your average chocolate snacks.
They’re made with mixed nuts , which means you're getting a healthy dose of protein and fiber. plus, when you choose nuts over refined sugar-heavy treats, you’re treating your body right.
These bites are also perfect for special occasions . whether it's a casual movie night or a summer bbq, everyone loves a good chocolate treat.
You can even tailor them for parties by adding festive toppings or arranging them nicely on a platter. it’s a crowd-pleaser that’ll make chocolate lovers swoon!
The best part is that they stack up well against other desserts. unlike some fudgy chocolate recipes that can be a bit richer, these bites strike a great balance.
They’re not too heavy, but they still pack that sweet punch you’re looking for when the sweet tooth satisfaction calls.
Who can argue with a good chocolate and nut combination, right?
Are you feeling inspired yet? Get ready to gather your ingredients because the fun is just about to begin with these homemade chocolate treats . You won’t regret it!
Next up, we’ll go through what you need to make these delicious bites, so grab a notepad and a pencil. Trust me, you’ll want to keep this recipe handy!
Your Go-To Essential Ingredients Guide
Getting the right ingredients is like finding the golden ticket to willy wonka's chocolate factory! and trust me, i’ve been there, sifting through the pantry, unsure if my cocoa powder is still good or if my honey has turned into a science experiment.
Let's dive into this essential ingredients guide so you can cook like a pro, even if you’re just making decadent chocolate nut bites for your kid’s birthday bash!
Premium Core Components
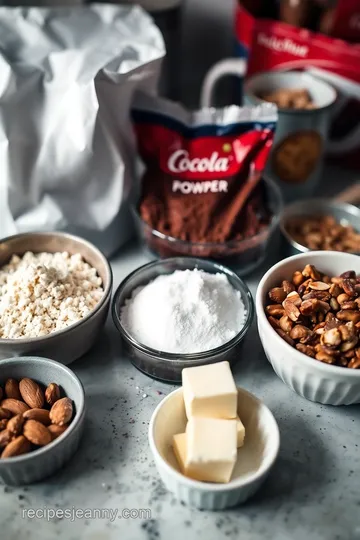
Before you start cooking, you want to nail those measurements . for our chocolate bites, you’ll need 1.5 cups (150g) milk powder and 1 cup (100g) cocoa powder , plus some granulated sugar and butter.
Don't stress if you're more into the metric system; just plug those numbers into your favorite conversion app!
Quality indicators make a world of difference. when you grab your cocoa powder, look for a deep, rich color. that’s a sign it’s fresh and ready to bring the flavor.
And as for storage, keep those dry ingredients in a cool, dark place in airtight containers. they'll last quite a while—think months, not just days! but definitely check for expiration dates.
Signature Seasoning Blend
Spices are so much more than competition in your spice rack. for a sweet treat like decadent chocolate nut bites , the right herbs and spices aren’t necessary but putting a pinch of sea salt can really elevate that rich chocolate flavor.
You can also mix in some vanilla extract, especially if you’re a vanilla lover like me.
Different regions have their own takes on flavors. for instance, if you feel daring, why not try raspberries in the mix? they add a tart sweetness that pairs beautifully with chocolate.
Overall, don’t be shy to play around with chocolate and nut combinations until you find something that sings to you.
Smart Substitutions
We all find ourselves out of an ingredient. hey, it happens! the best part? there are common alternatives . don’t have milk powder? use powdered sugar! seriously, if you’re in a pinch, just make it work.
If you need to adjust for dietary restrictions, almond milk works just as well as a substitute for butter—plus, it's healthier.
And let's talk about those emergency replacements ! Ran out of nuts? No worries. Popcorn can give that crunch! If you have seasonal options, try incorporating diced apples or dried cranberries if you're feeling fruity!
Kitchen Equipment Essentials
When it comes to equipment, you really only need the basics. a medium saucepan and a wooden spoon are all you require to whip up those tasty no-bake chocolate bites .
If you’re feeling a bit fancy, you can invest in a cookie cutter to shape your treats. otherwise, just roll them into little balls—it’s way easier, and honestly, who’s gonna judge you?
Also, think about your storage solutions. an airtight container is essential! you want your chocolate bites with nuts to stay fresh and fudgy.
There's nothing worse than a sad, dried-out chocolate ball! store them in the fridge, and they’ll keep for about a week.
Good luck making them last that long, though!
Wrapping It Up
So, to put a cherry on top of this ingredients guide, it’s all about tackling your kitchen with confidence. whether you're mixing together a quick dessert for your sweet tooth or improvising on those homemade chocolate treats , keep this guide close.
Your shopping trips will be smoother, your pantry will look organized, and making those delicious no-bake desserts like decadent chocolate nut bites will become second nature.
Now that you're all set with the essentials, let’s move on to whipping up those scrumptious bites!
Get to Know the Professional Cooking Method
When you step into the kitchen, especially if you're whipping up something as indulgent as decadent chocolate nut bites , there are some pro cooking methods that make life so much easier.
Let's dive into how to prep, cook, and enjoy these little chocolate goodies by mastering these essential cooking techniques!
Essential Preparation Steps
First thing's first, mise en place . this fancy french term just means having all your ingredients prepped and ready to go.
For our chocolate nut bites, gather things like milk powder , cocoa powder , and chopped nuts. nothing's worse than frantically searching for an ingredient while chocolate starts to melt!
Now, let’s talk time management . set a timer for everything! whether it’s those 10 minutes of cook time or the 30 minutes for cooling later, a timer is your best kitchen buddy.
You won't want to overcook that chocolate mixture and burn it. oh my gosh, the smell of burnt chocolate? yikes!
Organization is key! keep your workspace tidy. i honestly can’t focus if my kitchen looks like a disaster zone. lay out your measuring cups, spoons, and those adorable cookie cutters ahead of time.
You'll feel like a professional chef in no time.
And don’t forget safety considerations . use oven mitts when handling hot pans and keep that butter away from flames. trust me, burnt butter isn’t at all a desirable flavor when you want to enjoy some fudgy chocolate treats .
Step-by-Step Process
Ready to get cooking? Here’s your clear roadmap:
-
Dissolve Sugar : In a medium saucepan over low heat, mix ¾ cup (150g) of granulated sugar with ¼ cup (60ml) of water. Stir until it’s all dissolved.
-
Add Butter : Bring it to a boil. Add ⅓ cup (75g) of cubed unsalted butter, stirring until it’s melted. Smell that? It’s divine!
-
Incorporate powders : gradually whisk in 1 cup (100g) of cocoa powder and 1.5 cups (150g) of milk powder until you achieve a smooth mix, no lumps allowed.
Seriously, lumps are the enemy!
-
Cool and mix in nuts : remove from heat and stir in ½ cup (75g) of your mixed chopped nuts.
Let it cool a bit. this chocolate mixture is gonna be gooey – in a delightful way!
-
Shape into bites : allow it to cool until manageable, then roll it into small balls or spread into a greased tray.
Pop it in the fridge for 30 minutes to set.
-
Cut and serve : if you used a tray, now it’s cookie cutter time! take your favorite shape and cut those bites into pieces.
Store the leftovers (if there are any!) in an airtight container in the fridge.
Expert Techniques
Now that you're on your way to creating these quick chocolate recipes , let’s get fancy with some expert techniques.
-
Quality Checkpoints : When you mix in your cocoa and milk powders, make sure there's no grit. If it doesn’t blend perfectly, you’ll end up with a weird texture.
-
Temperature Control : Keep an eye on that heat! You want a gentle simmer, not a wild boil. Too much heat can burn the sugars.
-
Troubleshooting : if your chocolate bites are too soft, wait a little longer in the fridge. and if they're too hard, hey, a little drizzle of melted chocolate on top can cover a multitude of sins.
Success Strategies
We're almost there, but let’s sift through some common pitfalls.
-
Avoiding Mistakes : Don't rush through the cooling step. Patience is key for those perfect no-bake chocolate bites . If you shape them too soon, they’ll just fall apart!
-
Quality Assurance : Always taste! Nothing beats the satisfaction of knowing you nailed it before sharing.
-
Make-Ahead Options : You can prep these bites up to a week in advance. They’re perfect for parties or just to indulge during a Netflix binge.
So, if you’re looking for an easy chocolate dessert that dazzles, your journey into homemade chocolate treats is just beginning! these decadent chocolate nut bites are not only a treat for your taste buds; they’re also incredibly simple to make.
Up next, let’s talk about some Additional Information that can really spruce up your chocolate game!

Unlocking the Secrets of Decadent Chocolate Nut Bites
Let’s dive into the delicious world of decadent chocolate nut bites ! these little treasures combine rich cocoa with the creamy goodness of milk powder, all wrapped up with some delightful crunch from mixed nuts.
Perfect for those moments when a sweet tooth kicks in, or for parties when you want to impress your friends with little effort—a total win-win!
Pro Tips & Secrets
Oh my gosh, you want to make these bites sing, right? Here’s where I spill the beans on my pro tips:
-
Start by Dissolving Sugar : Make sure you really mix that sugar into the water slowly. Less stir, more swirl, folks. You want it all melted without getting overly heated.
-
Timing is Key : Allow the chocolate nut mixture to cool just enough before you mold them. If it’s too hot, it’ll be a big ol’ mess, and nobody likes that!
-
Flavor Boosters : Seriously, consider throwing in a splash of vanilla extract or even a pinch of espresso powder. Trust me; your taste buds will be thanking you later!
Perfect Presentation
Once your Decadent Chocolate Nut Bites are ready to go, let’s talk about how to make them look as good as they taste:
-
Plating Techniques : A simple white plate goes a long way in displaying those gorgeous bites. Arrange them in a playful circle or stack them high for extra flair!
-
Garnish Ideas : Think about a light dusting of cocoa or chopped nuts on top. It’s like the cherry on your sundae, but way more chocolatey.
-
Color Combinations : Mix and match your nuts! The contrast of color really amps up the visual appeal. Plus, it kinda makes it look gourmet, don’t you think?
Storage & Make-Ahead
You can whip these up in advance. Just make sure you follow these storage tips:
-
Cool Completely : Let them chill out in the fridge for at least 30 minutes before you touch them. This sets the shape and makes them firm.
-
Preservation : Store your bites in an airtight container. They’ll be good for about a week! Not that they’ll last that long—seriously, they’re too tasty.
-
Reheating Instructions : Who needs that? These babies don’t need reheating—just grab and go!
Creative Variations
Feeling adventurous? Here are some ideas to jazz up your Decadent Chocolate Nut Bites :
-
Seasonal Twists : Add some pumpkin spice for a fall vibe or sprinkle in some dried fruit for a pop of summer freshness.
-
Dietary Modifications : Want something nut-free? Swap the nuts for crispy rice cereal. It gives a nice crunch too!
-
Chocolate Recipes with Nuts : If you’re in the mood for something even richer, toss in chocolate chips. More chocolate? Yes, please!
Complete Nutrition Guide
Let’s not forget about the nutritional side:
-
Each bite packs about 150 calories —not too shabby for a chocolate nut snack !
-
You’ll get a nice boost of energy thanks to those nuts—packed with protein and healthy fats.
-
Just keep an eye on your portions. It’s easy to nibble on these without realizing how many you’ve had. But hey, who’s judging when they taste this good?
Expert FAQ Solutions
Now, let’s tackle some common questions that pop up:
-
Why are my bites falling apart? : Make sure your mixture is cool enough before shaping. Hot means gooey, and we want the perfect bite!
-
Can I use sweetened milk powder? : Definitely! Just adjust the added sugar in the recipe.
-
What if I don’t have cocoa powder? : You could go for carob powder—a different flavor but still delish!
Don’t worry, you’ll figure it out. Cooking is all about experimenting and finding what works for you!
So, go ahead, dive into the joy of making your own decadent chocolate nut bites . whether you’re looking for an easy chocolate dessert or a chocolate snack idea , these bites are here to satisfy that sweet tooth.
Enjoy every nibble, and share them if you can—though i can’t guarantee they’ll last long enough to make it out the door!

Decadent Chocolate Nut Bites Card

⚖️ Ingredients:
- 1.5 cups (150g) milk powder
- 1 cup (100g) cocoa powder
- 3/4 cup (150g) granulated sugar
- 1/4 cup (60ml) water
- 1/3 cup (75g) unsalted butter, cubed
- 1/2 cup (75g) chopped nuts (a mix of almonds, walnuts, and cashews)
🥄 Instructions:
- Step 1: In a medium saucepan over low heat, combine sugar and water. Stir until sugar is fully dissolved.
- Step 2: Bring the sugar mixture to a boil. Once boiling, add the cubed butter. Stir until melted.
- Step 3: Gradually whisk in cocoa powder and milk powder until the mixture is smooth and free of lumps.
- Step 4: Remove from heat. Stir in the chopped nuts until evenly distributed.
- Step 5: Allow the mixture to cool slightly. Form small balls or spread the mixture into a greased tray. Refrigerate until set.
- Step 6: If using a tray, cut into shapes with a cookie cutter. Store in an airtight container in the refrigerator.
Previous Recipe: Ultimate Beef Pizza: 5 Secret Tips for Homemade Perfection!
Next Recipe: Ultimate Crunchy Salted Potato Chips: 5 Easy Techniques for Snacking