Decadent Chocolate Almond Bliss Bars
Looking for a treat? Try my delicious gluten and dairy free bars! Packed with chocolate and nuts, they’re perfect for snacking or dessert. Enjoy!

- The Ultimate Guide to Mastering Decadent Chocolate Almond Bliss Bars
- Your New Favorite Decadent Chocolate Almond Bliss Bars
- Health and Nutrition Highlights
- Recipe at a Glance
- Perfect Ingredients Selection
- Foolproof Cooking Steps
- Game-Changing Tips
- Perfect Presentation
- Storage and Make-Ahead
- Creative Variations
- Complete Nutrition Guide
- Expert FAQ Solutions
- Recipe Card
Have you ever thought about how satisfying it is to munch on a snack that’s not only delicious but also guilt-free? i mean, we’re talking about those moments when you reach for something sweet but want it to be gluten and dairy free .
Introducing the decadent chocolate almond bliss bars —this recipe is not just any snack; it's a heavenly combination of rich chocolate and crunchy almonds.
In just an hour, you’ll have a batch of easy and nutrient-dense snack options that’ll keep you energized all day!
You might be wondering about the history behind these bars. well, snack bars have been a staple across cultures for ages.
They evolved from simple sustenance into the sweet, protein-packed snacks we see today. these chocolate almond bliss bars pay homage to that culinary evolution, blending wholesome ingredients with a touch of indulgence that makes them irresistible.
What makes these bars special? they're not just about taste; they tick all the boxes for anyone seeking healthy chocolate snacks .
Plus, they’re gluten-free recipes for dessert , so you can enjoy them without a second thought. you can whip them up in no time, making them perfect for a quick treat or a last-minute dessert for your kid’s birthday party.
Let’s be real; who wants to spend hours in the kitchen when you can have quick and easy homemade snack bars ?
The Ultimate Guide to Mastering Decadent Chocolate Almond Bliss Bars
Rich in culinary heritage, these bars combine almond flour recipes with the delightful charm of comfort food. legend has it that almond flour has roots dating back to ancient rome, where it was used in various dishes.
These bars carry forward that proud tradition into your home while adding a modern flair.
In today’s health-conscious world, these bars hit the sweet spot for snack options. their unique flavor and energy-boosting qualities have made them a hit in households across america.
They even serve as dairy-free treats for kids , so moms are all in when it comes to these bars.
Believe me, they’ll love them as much as any candy—my kids can’t get enough of them!
Your New Favorite Decadent Chocolate Almond Bliss Bars
So, what are the unique flavor combos? the rich chocolate mingles flawlessly with crunchy almonds, creating a balance that dances on your taste buds.
You’ll instantly fall in love with the foolproof techniques used here. seriously, you can make these bars even if you're new at baking.
Need a little nudge to get started? i used to bake with my grandma, and she taught me one absolute truth: simplicity is key.
These bars are proof of that. and don't worry; experts have tested these out, making sure every bite is perfection.
Plus, i’ll share my own time-saving tips so you can get these bars into your belly faster!
Health and Nutrition Highlights
Are you a health nut? let’s talk numbers! these bars are loaded with nutritional benefits. gluten-free snack bars like these help you avoid unnecessary additives, giving you a wholesome treat.
Each bar is a powerhouse, offering a balanced mix of fats, fiber, and protein. if you’re looking at dietary considerations, you’ll be happy to hear these are completely dairy-free and tailored for various diets.
When i first started experimenting with sweetener alternatives for baking , i discovered the magic of maple syrup. just enough sweetness without the guilt! talk about a win-win situation for anyone looking for low-sugar bar recipes .
Recipe at a Glance
- Total Preparation Time: 1 hour
- Skill Level Required: Easy
- Serving Size: Yields approximately 12 bars
- Cost Efficiency: Super affordable for such a delicious treat
Now that you’re all set to get those pans out, let's dive into the fun part—grabbing your ingredients! get ready for some serious snack-making magic with these gluten and dairy free bars .
You’ll love how simple it is to create a treat that stands out. so, gather your ingredients, and let’s get cooking! what’s next? well, you’ll need to rustle up everything you need, so let’s check out what goes into these delicious bars!
Perfect Ingredients Selection
Let’s talk about the perfect ingredients for making those mouthwatering gluten and dairy free bars. when it comes to whipping up some decadent chocolate almond bliss bars , i’ve learned that the right ingredients really make a difference.
So, here we go, ingredient hunters!
Premium Core Ingredients
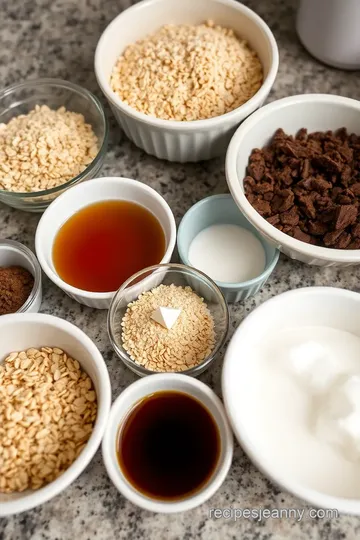
First off, for the base of our bars, we’ll need some serious bliss. The main ingredients are:
- 1 cup almond flour
- ¾ cup gluten-free rolled oats
- ½ cup unsweetened cocoa powder
- ⅓ cup maple syrup
- ¼ cup melted coconut oil
- 1 teaspoon vanilla extract
- ½ teaspoon salt
When picking almond flour, look for a fine grind. you wanna avoid anything too gritty. trust me - the smoother, the better! the same goes for cocoa powder; quality brands will really bring out the flavor in your no-bake energy bars.
A quick tip: store flour and cocoa in a cool, dark pantry. you want them to stay fresh for when those late-night cravings hit!
Signature Seasoning Blend
Now onto enhancing those flavors! you’ll want to combine your almond flour and cocoa powder without skimping on the seasoning.
While this recipe doesn’t need a ton of spices, you can elevate it with a little sprinkle of sea salt.
It actually balances out the sweetness from our natural sweeteners for baking !
Smart Substitutions
A cool trick i’ve picked up along the way is being creative with substitutes. if someone’s got a nut allergy, swap out that almond flour for some sunflower seed flour.
Boom—nut-free bar alternatives! for a yummy twist, consider using honey instead of maple syrup. honestly, your taste buds might just thank you.
And if you’re in a pinch, regular oats can sometimes be substituted if they’re certified gluten-free.
Kitchen Equipment Essentials
Let’s not forget about the tools needed to craft these beauties! You’ll need:
- Mixing bowls (big enough to allow for some ensoiastic stirring)
- A 9x9 baking dish (I love how I can reuse mine for brownies, too!)
- Parchment paper (life-changing, I promise)
- A rubber spatula (for all that goodness)
- An oven
I remember the first time I didn’t have parchment paper. I was scraping my bars off the pan like it was a wrestling match. Spoiler: the bars won.
Pro Ingredient Tips
When you grab your ingredients, keep an eye out for these pro tips. check almond flour for those little oil specks – it’s fresh if it doesn't have them! and if you’ve got any leftover maple syrup from another bake, use that up because it’s all about avoiding waste.
Storage-wise, keep your flour in the fridge for longevity.
One of my favorite money-saving tips? Buy in bulk! It’s always cheaper and you’ll be ready for those spontaneous baking days. Trust me, they happen!
And now that we’re all armed with this ingredient knowledge, let’s dive into making those bars come to life in the next section! i promise you, whipping up gluten and dairy free snacks that everyone will love is easier than you think.
Get ready to create something delicious that you'll always want to keep stocked – it’s time for the instructions!
Foolproof Cooking Steps
So, you're ready to dive into the world of gluten and dairy free bars , huh? perfect! let’s make those decadent chocolate almond bliss bars together—there's absolutely no reason to fear! just think of me as your baking buddy guiding you through the process, step by step.
Trust me; they're just that good.
Essential Preparation Steps
First off, we gotta get our mise en place sorted. this fancy-sounding term just means getting everything ready before you start cooking.
Grab your ingredients: almond flour, rolled oats, cocoa powder , and all the goodies we’ll mix in. measure them out and place them in separate bowls.
Trust me, it's a game changer!
Now, let’s talk prep techniques . for this recipe, it's as easy as whisking and mixing. you'll mix dry ingredients in one bowl and the wet stuff in another.
No fancy gadgets needed—just a good ol' bowl and a spoon.
Time management is crucial here. you’ll need about 15 minutes for prep, but while the bars chill in the fridge, take a breather for 30 minutes .
Honestly, go grab yourself a snack!
And here’s a quick organization tip : as you use your ingredients, put them away. it keeps your space tidy and helps you focus on the fun parts of baking.
Think about it like cleaning as you go when you’re watching a netflix series—you’ll feel so good once it’s over, right?
Professional Cooking Method
Now, let’s jump into the step-by-step process . Preheat your oven to 350°F (175°C) . Line your 9x9 inch baking dish with some parchment paper, leaving overhang for easy removal later—trust me on this one; it’ll save you a headache!
Combine your dry ingredients: 1 cup almond flour, ¾ cup rolled oats, and ½ cup cocoa powder , then whisk them like you're beating a smoothie! next, in another bowl, whisk together ⅓ cup maple syrup, ¼ cup melted coconut oil , and 1 teaspoon vanilla extract until it's smooth.
When you pour the wet into the dry, make sure it’s mixed well. your mixture should look like a rich, chocolatey dough, and it should be slightly sticky.
Spread this baby evenly into the baking dish!
Temperature control is key here. Pop those bars in the oven for about 15 minutes until they’re just starting to firm up at the edges, but still soft in the middle.
Success indicators? You want to see the edges set beautifully—golden brown but not burnt. If your bars are a bit wobbly in the center, don’t fret; they’ll firm up as they cool.
Expert Techniques
Here comes the expert part! keep it professional yet simple. make sure you press your mixture down firmly in the baking dish; that’s how you get those easy homemade snack bars to hold together nicely.
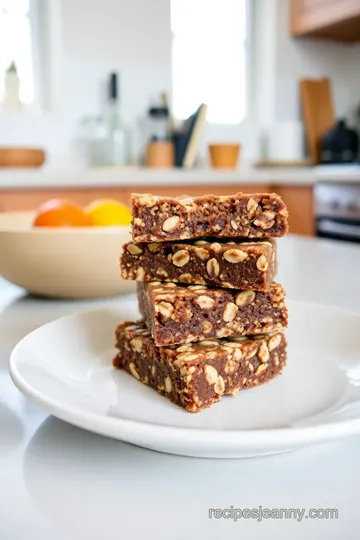
When the bars come out of the oven, sprinkle on ½ cup dairy-free chocolate chips and some slivered almonds . Push them down gently. This little detail adds that wow factor.
You wanna check for quality, too. if the chocolate melts just a tad, you know you've got something special. let your bars cool completely before lifting them out with the parchment.
If you try to cut them too soon, they might crumble.
Success Strategies
So you’re almost there! but let’s talk troubleshooting tips . if your bars turn out crumbly, it might be a sign you didn’t press them down enough or didn't use enough binder (like syrup or oil).
Quality assurance? Simple—taste as you go. Is it chocolatey enough? Too dry? Adjust as needed! Remember, it's all about finding that balance , and not every baking adventure goes perfectly.
Perfect results guide: store your bars in an airtight container in the fridge and enjoy them as a protein-packed snack for up to a week.
That’s right; they’ll stay fresh, so you’ll have healthy chocolate snacks ready to go!
So now that you’re all prepped and ready to rock, i think it’s time to talk about the fun stuff—the creative twists you can add! whether you want to swap out some ingredients or play around with flavors, all those variations are just waiting for you to try.
Let's get to the additional information on how to customize your gluten and dairy free snacks while keeping them fun and delicious!
Game-Changing Tips
Alright, if you're ready to dive into these gluten and dairy free bars , you’ll want to grab some insider info. It’s all about the small wins that make a big difference!
Professional Insights
You know what’s a game changer? using almond flour instead of regular flour. it’s not just gluten-free; it’s packed with healthy fats, and it gives that lovely moist texture.
Make sure you use finely ground almond flour; otherwise, your bars could turn out a bit grainy.
Expert Techniques
When mixing your ingredients, don’t skip the step of letting the mixture rest for a minute before pressing it into the pan.
This helps the oats absorb moisture, leading to a better texture overall. trust me, it’ll be worth it when the bars are done baking!
Kitchen Wisdom
Prepping these bars is pretty straightforward, but everyone makes mistakes. i once forgot to add the sweetener—oh my gosh, i was just sitting there trying to figure out why my bars tasted so bland! don’t rush it; check your ingredients before you mix.
Success Guarantees
Want to guarantee delicious results? don’t skip the cooling time! it might be tempting to dig in right away as the chocolate begins to melt on top, but allowing them to cool completely helps your bars set properly.
You’ll be thanking me later!
Perfect Presentation
Now, let’s chat about how to rock the presentation. Because we eat with our eyes first, right?
Plating Techniques
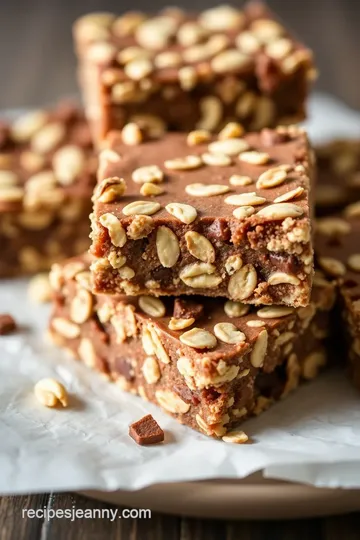
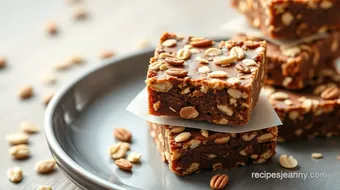
After cutting your gluten-free snack bars , use a simple wooden board or a colorful plate. Layer them neatly, maybe with a little parchment paper for effect, and BAM—you’ve got Instagram-worthy treats!
Garnish Ideas
Sprinkle a few extra slivered almonds on top or some cocoa nibs for that gourmet look. A light drizzle of melted dairy-free chocolate or a dash of sea salt can take them to a whole new level!
Serving Suggestions
Serve these bars with a side of fresh fruit or a scoop of coconut yogurt for a delightful snack pairing. Seriously, it’s like a little treat party!
Visual Appeal Tips
Cut them into different shapes—triangles or squares—mix it up! it adds a fun twist to how your snacks are presented.
If you're feeling extra fancy, grab some edible flowers from your garden, and toss them into the mix.
Storage and Make-Ahead
Let’s face it, you want to make these ahead of time, right? Here’s how to keep them fresh.
Storage Guidelines
Keep your gluten and dairy free snacks in an airtight container. I swear, they’ll stay fresh in the fridge for up to a week!
Preservation Methods
For even longer storage, you can freeze them! just wrap them individually in parchment paper and pop them in a zip-top bag.
When you need a quick snack, just take one out and let it thaw!
Reheating Instructions
If you like them a tad warm, pop them in the microwave for about 10-15 seconds. Just enough to soften that chocolate a bit. Heaven!
Freshness Tips
Make a double batch! These bars go fast. If you store them well, you’ll always have a healthy chocolate snack ready for the kids or for a midday pick-me-up.
Creative Variations
Let’s spice things up! You can customize these bars in so many fun ways.
Flavor Adaptations
Feeling adventurous? Try swapping the cocoa powder with carob powder if you want a caffeine-free option. It can be a game changer for your taste buds!
Dietary Modifications
Got nut allergies? No worries! Use sunflower seed flour instead of almond flour—totally works! You can make it nut-free without losing the taste.
Seasonal Twists
In the fall, add some pumpkin spice. In summer, toss in some dried fruits like cranberries or apricots. It makes for a legit seasonal treat.
Regional Variations
Try a Paleo dessert bar vibe by adding coconut flakes to the mix. The tropical flavor is absolutely divine!
Complete Nutrition Guide
Now, let’s talk nutrition. This isn’t just a treat; it’s packed with goodies!
Detailed Breakdown
Each bar has about 180 calories, which is quite reasonable, especially considering how filling they are. Plus, they contain all sorts of good fats and protein from almond flour and chocolate!
Health Benefits
Dark chocolate is a winner! It contains antioxidants and can boost your mood. And if you go easy on sweeteners, you’ll keep the sugar crash away!
Dietary Information
These bars are gluten-free and perfect for anyone who’s trying to cut out the dairy. It’s a win-win!
Portion Guidance
Cut them into smaller pieces for a snack-friendly size, or go big for dessert. It’s all about how you feel!
Expert FAQ Solutions
Got questions? I’ve got answers!
Common Concerns
Can I bake these bars longer for a crunchier texture? Absolutely! Just keep an eye on them to avoid burning.
Expert Answers
Wondering how to keep them from falling apart? Make sure you let them cool completely before slicing them.
Troubleshooting Guide
Bars too crumbly? Try adding an extra tablespoon of coconut oil to hold everything together better.
Success Tips
If you’re worried about flavor, always taste the mixture before baking! You can tweak it by adding more sweetener or cocoa to suit your palate.
So there you have it, all the goods on crafting these gluten and dairy free bars . baking has its hiccups, but with a little fun in the kitchen and a few tips, you’re on your way to amazing treats.
Enjoy the process, take your time, and most importantly, share them with your friends and family. you’ll be the rock star of healthy snacking!
Decadent Chocolate Almond Bliss Bars Card
⚖️ Ingredients:
- 1 cup (150g) almond flour
- ¾ cup (75g) rolled oats, certified gluten-free
- ½ cup (50g) unsweetened cocoa powder
- ⅓ cup (80ml) maple syrup
- ¼ cup (60ml) coconut oil, melted
- 1 teaspoon vanilla extract
- ½ teaspoon salt
- ½ cup (75g) dark dairy-free chocolate chips
- ¼ cup (35g) slivered almonds
🥄 Instructions:
- Step 1: Preheat the oven to 350°F (175°C).
- Step 2: Line the baking dish with parchment paper, leaving some overhang for easy removal later.
- Step 3: In a mixing bowl, combine almond flour, rolled oats, cocoa powder, and salt.
- Step 4: In a separate bowl, whisk together maple syrup, melted coconut oil, and vanilla extract.
- Step 5: Pour the wet ingredients into the dry ingredients and combine until fully mixed.
- Step 6: Spread the mixture evenly into the prepared baking dish, pressing firmly.
- Step 7: Bake in the preheated oven for 15 minutes, until edges are set.
- Step 8: Remove from the oven and let cool for 10 minutes.
- Step 9: Sprinkle chocolate chips and slivered almonds on top while still warm, pressing gently to adhere.
- Step 10: Allow to cool completely in the pan, then lift out using parchment overhang and cut into bars.
Previous Recipe: Birthday Cake Syrup: The Ultimate Celebration Sauce for Desserts!
Next Recipe: How to Make the Best Gluten-Free Browned Butter Chocolate Chip Cookies