Creamy Homemade Yogurt Chips
Looking for a sweet, healthy snack? Try my creamy yogurt chips! They’re simple, customizable, and perfect for munching on or topping dishes. Give them a go!

Oh my gosh, let me tell you about my first experience with yogurt chips ! it was one of those hot summer days, the kind that makes you crave something cool and delicious but also healthy.
I was rummaging through my fridge, feeling like a snack monster, when i stumbled upon a tub of greek yogurt.
I thought, "why not whip up some yogurt treats?" that’s when it hit me! yogurt chips could be the perfect low-calorie snacks that satisfy my sweet tooth without all the guilt.
And guess what? they were a hit!
Yogurt snacks like these have been around in one form or another, but they’ve gained a massive following in recent years.
Everyone is hopping on the health train, and for good reason! these homemade yogurt treats give a delightful crunch while packing a punch of creaminess, and they’re super easy to make.
Plus, they’re perfect when you want a quick, nutritious option to fight those afternoon cravings. are you ready to dive into this creamy joy? let’s go!
Recipe Overview
Historically, yogurt has vibed with cultures around the world for centuries. it started as a way to preserve milk, but now it's a superstar in our kitchens.
Greek yogurt recipes exploded onto the scene because folks are loving that tangy flavor and thick texture. nowadays, yogurt chips are up there with trendy snacks like kale chips and avocado toast.
Everyone's looking for those healthy dessert ideas , and trust me, these chips fit right in!
Making these yogurt chips is as easy as pie (or, you know, not even baking ). you've got about 15 minutes of active prep and then a chill time of around 4 hours in the freezer.
Not too shabby, right? this means you can kick back and relax while they freeze up. and the cost? it's surprisingly low! you’re mostly grabbing yogurt and any fun mix-ins you like.
You can whip up about 24 yogurt chips , which is a perfect amount to share or keep for yourself!
Key Benefits
Now let me spill some of the good stuff about these yogurt chips. first off, they’re packed with protein. greek yogurt has tons to offer—it’s loaded with yogurt nutrient benefits that’ll keep you feeling energized and full.
Plus, if you throw in some fruit or nuts, you’ve got a colorful, nutrient-dense snack that’s good for you.
These are nutritious snack alternatives to sugary treats. instead of reaching for that candy bar, munch on a few of these yogurt chips whenever a sweet moment strikes.
They are incredible for summer snacks or just for satisfying an itch without overindulging. you can customize these chips to fit any occasion—from picnics to birthday parties, or even just that moment you're chilling on the couch watching your fave show.
What’s even better? they are fun yogurt flavors waiting to happen! want to spice things up? toss in some cinnamon or a handful of chocolate chips! the options are endless, and you can create your own diy yogurt chips that scream your name.
Kids will love them, and they can even help in the kitchen—talk about child-friendly snacks !
So, if you’re ready to get started, let’s dive into the ingredient list for these amazing yogurt chips! you'll be whipping them up in no time, and trust me, your future self will thank you for swapping out those sugary, processed treats for these delightful creations.
Essential Ingredients Guide for Creamy Homemade Yogurt Chips
So, you're diving into the wonderful world of homemade yogurt snacks, huh? well, before you get started whipping up those delightful yogurt chips , let’s set the stage with some essential ingredients that’ll make your kitchen adventures a whole lot easier.
I promise, this is not a boring lecture. think of it as your personal cheat sheet for yogurt treats!
Premium Core Components
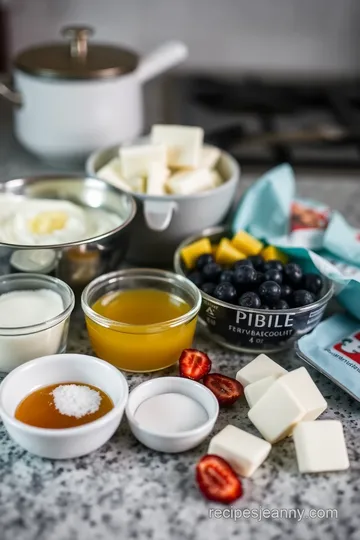
First up, let’s talk measurements. if you’re like me, you probably have a love-hate relationship with measuring cups. here’s the scoop: for the yogurt chip recipe , you’ll need 2 cups (480 ml) of plain yogurt.
If you’re feeling extra fancy, grab some full-fat greek yogurt – it’s creamier and adds that dreamy richness. also, you’ll want to sweeten things up.
A good 2-3 tablespoons (30-45 g) of honey or maple syrup will do the trick.
Now, quality is key! look for plain yogurt with a creamy texture and no added sugars. check the expiration date, of course! you want that yogurt to be fresh.
When storing your ingredients, keep the yogurt in the fridge and use it within 7-10 days after opening. freshness matters because nobody wants sour yogurt chips, am i right?
Signature Seasoning Blend
Now, on to the fun part: flavor! the base of our yogurt chips is pretty simple, but you can jazz it up! if you feel adventurous, consider adding a pinch of salt to enhance the sweetness, and about a teaspoon (5 g) of vanilla extract.
You can also get creative with mix-ins like fresh or dried fruits and chocolate chips . think berries, bananas, or nuts.
Totally your call!
Remember, though, this is your canvas. so whether you prefer a nutty twist with a bit of crunch or some swoon-worthy chocolate, it can all be done with a little imagination.
And if you want to keep it seasonal, swap out fresh fruits depending on what’s ripe and ready!
Smart Substitutions
So, what if you don’t have some of the ingredients on hand? no need to panic! yogurt snacks are super forgiving.
Don’t have honey? no problem; agave syrup works just as well. looking to keep it dairy-free? go for some almond or coconut yogurt! seriously, it’s all about finding those common alternatives that suit your lifestyle.
And let’s face it, we all have those moments—like when you realize you forgot to grab that one ingredient. but don’t sweat it; adapt those flavors to what you have in your pantry.
Make it fun and personal!
Kitchen Equipment Essentials
Before you dash off to the kitchen, let’s gather some must-have tools. you’ll need a mixing bowl, a whisk or spatula, and either silicone molds or a parchment-lined baking sheet.
And trust me on this; silicone molds are a game-changer. you can even pop your yogurt chip creations out like a pro!
Now, if you don’t have silicone molds, don’t sweat it! ice cube trays work great too. just remember to keep things organized in your kitchen.
Storage solutions matter. an airtight container is a must once you’ve got those yogurt chips frozen and ready to snack on!
Final Thoughts Before You look into In!
At this point, you’ve got the knowledge to create a batch of creamy yogurt chips that will knock your socks off.
These little bites can easily become your go-to healthy dessert ideas or fun snacks for kids. they are suitable for any occasion and packed with nutrient benefits that can make your snacking habits healthier.
Talk about a win-win!
Now, let’s get to the nitty-gritty of how to whip up these easy yogurt desserts—trust me, your taste buds are going to thank you later.
Get your ingredients ready, and let’s make some delicious diy yogurt chips !
Mastering the Art of Professional Cooking
When it comes to cooking like a pro, it’s all about the details. you know, those little things that make the big picture come together perfectly? today, let’s dive into essential preparation steps , a step-by-step guide to get you rolling, and some expert techniques to up your game.
Plus, i’ll throw in some juicy tips to avoid common mishaps in the kitchen. and oh boy, you don’t want to miss how you can whip up those fabulous yogurt chips that are perfect for snacking!
Essential Preparation Steps
Mise en place — french for "everything in its place." imagine it like laying out your ingredients, tools, and utensils before you get started.
It’s like setting the stage for a play; you want everything ready to rock! chop your veggies, measure your spices, and have your pots and pans handy.
This saves tons of time and keeps you from scrambling around when you’re deep into cooking.
Time management tips — start by timing your dishes. you want to think ahead. for instance, if one dish takes 30 minutes to cook, while another is a 45-minute wonder, start with the longer one.
It feels less chaotic, trust me!
Organization strategies — use a checklist as you prep. mark off what you’ve done, and keep your space tidy. a messy kitchen is a recipe for disaster (and not in a fun way).
Also, it’s handy to have a garbage bowl for quick clean-up — no one wants to make a mess everywhere.
Safety considerations — make sure to wash your hands and keep those cutting boards and knives clean. if you’re working with raw meat, sanitize your surfaces afterwards.
Always, always check your food temperature — 145° f for poultry, 160° f for ground meats, and 165° f for leftovers reheated.
Safety first, people!
Step-by-Step Process
Now, onto the fun part! Here’s how to nail that dish step-by-step.
-
Gather Your Ingredients — Make sure everything is in arm’s reach. You don’t want to be running back and forth.
-
Temperature control points — keep an eye on your stovetop or oven temperature. if you’re searing meat, aim for medium-high heat (around 400° f ), and lower it as needed while cooking.
Use a meat thermometer for perfect results.
-
Timing Precision — Set a timer! Not only for cooking, but also for things you need to check like sauces simmering. It’s super helpful to avoid overcooking.
-
Visual cues for doneness — trust your eyes, folks! for example, chicken should be golden brown and juices should run clear.
For veggies, you want that perfect vibrant color — soggy is out, crisp is in!
Expert Techniques
Want to cook like a pro? Here are some catchy expert tricks:
-
Professional Methods — Learn the techniques like sautéing, braising, or roasting. Each has its vibe and flavor impact.
-
Critical Steps Explained — Don’t skip letting meats rest after cooking. It keeps them juicy and flavorful. Around 10- 15 minutes can do wonders.
-
Quality Checkpoints — Taste as you go. A little pinch of seasoning can turn a “meh” dish into a “wow!” moment.
-
Troubleshooting Tips — If a sauce is too thin, simmer it longer. If things are too salty, throw in some sugar or add more veggies to balance it out.
Success Strategies
Here’s where I share the juicy tidbits to make sure you ace your meals:
-
Common Mistakes to Avoid — Don’t overcrowd the pan; it leads to steaming instead of browning. Give food the space it needs.
-
Quality Assurance Tips — Always taste better to ensure everything is just right.
-
Perfect Results Guide — Follow the recipe but feel free to adjust based on your taste. Cooking is an art, not a science!
-
Make-Ahead Options — Prep your ingredients ahead of time. Many dishes taste even better the next day!
And speaking of make-ahead, let’s talk about those yogurt chips . they’re the perfect healthy dessert idea and a total game-changer for snacking.
Whip them up in advance and you'll have a delicious and creamy yogurt treat ready to go whenever you feel like munching.
Experiment with mix-ins or try out different yogurt flavors to keep things fresh. and if you've got kids around, they’ll love helping out with the process.
Trust me, those homemade yogurt treats are a hit!
Additional Information
Cooking can seem daunting, but with these strategies, you’ll find that it can be a breeze. always remember the joy in creating something delicious.
Those little yogurt snacks might just become your go-to treat, especially in the summer heat when you want something chilled and refreshing.
So get in that kitchen, channel your inner chef, and have fun!
Additional Recipe Information for Creamy Homemade Yogurt Chips
Pro Tips & Secrets
Okay, let’s kick things off with some insider knowledge about these delicious yogurt chips. first up, if you’re trying to keep things extra creamy , go for full-fat greek yogurt .
You won’t regret it! the texture is just out of this world. oh, and don’t be shy with the honey or maple syrup —a little taste test before you freeze can really help you nail down that perfect sweetness.
Now here’s a time-saver: if you’ve got a blender, toss your yogurt mixture in there. it’ll combine faster and smoother than my attempts at dancing at weddings.
Plus, if you’re feeling fancy, blend in some fun flavors like orange zest or matcha powder for a twist. trust me, your taste buds will thank you later.
Perfect Presentation
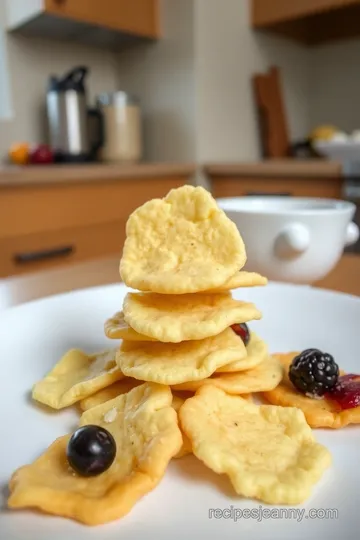
Alright, once you’re ready to show off your homemade yogurt treats, let’s talk presentation ! plating these yogurt chips is super simple but totally effective.
If you’re feeling fancy, grab a plate and arrange them in a circle with some fresh berries sprinkled in the middle.
Serious pinterest vibes!
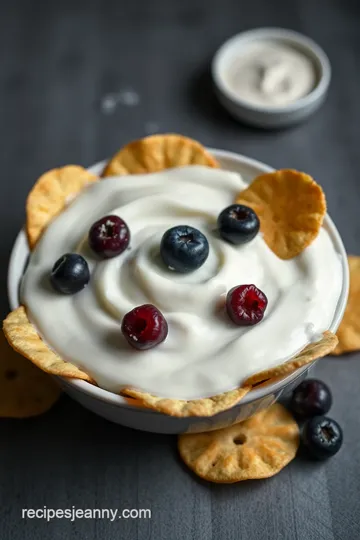
Don’t forget about garnishes . a drizzle of honey or a few colorful sprinkles can make all the difference in the world.
Visual appeal is key, especially for those instagram pics! think about using colors that pop: creamy whites, vibrant berries, and maybe a splash of chocolate for good measure.
Storage & Make-Ahead
Making your yogurt chips in advance? totally smart! just make sure to store them in an airtight container in the freezer, and they’ll hang out there perfectly for about two weeks .
If they last that long—no guarantees, my friend!
And when you’re ready to snack, let them sit at room temp for a few minutes for the ultimate chewiness.
No one wants a rock-hard yogurt chip, am i right? just make sure you don’t leave them out too long, or they might get a little too soft.
Creative Variations
Let’s get creative! the beauty of this yogurt chip recipe is how customizable it is. flavor adaptations ? check! you can swap in different yogurts—how about strawberry or vanilla? and those mix-ins ? you can use whatever fruits or nuts you have on hand.
Think of it like a diy yogurt bar!
Feeling seasonal? Try adding pumpkin spice in the fall or some crushed candy canes around the holidays. These little bites could be your go-to for every festive gathering!
Complete Nutrition Guide
Now let’s break it down a little. these yogurt chips are not just a tasty little snack; they’re also packed with benefits.
Each chip is about 30 calories, and they deliver a solid protein punch—perfect for those mid-day cravings. if you’re diving into the world of healthy snacking habits , these chips are a great choice.
Plus, for those watching their carbs, they fit right into various dietary considerations.
And don’t forget the micronutrients! Yogurt brings along some calcium and probiotic goodness which can be a fantastic boost for digestion. Now that's a nutritious snack alternative that checks all the boxes.
Expert FAQ Solutions
Feeling unsure? don't sweat it; we’ve all been there! a common question is about those pesky freezer crystals that can form, leading to a weird texture.
Just make sure to store them in a well-sealed container , and you’ll be golden.
If your chips come out too hard, let them sit a few minutes at room temp before eating. they should be a snack that melts in your mouth, not a dental hazard! want to mix it up next time? add some matcha powder or even peanut butter to your yogurt mix for a fun twist.
Conclusion
So, there you have it! with these tips, you’re ready to create some killer diy yogurt chips . they’re super versatile, fun to make, and let’s be honest, way better than any store-bought snack out there.
Enjoy your journey into the world of yogurt snacks , and remember, experiment with flavors until you find that perfect combo! grab your favorite fruits, throw in some nuts, and get ready to indulge in these healthy, creamy delights.
Happy snacking!
Creamy Homemade Yogurt Chips Card

⚖️ Ingredients:
- 2 cups plain yogurt (Greek yogurt for creaminess)
- 2-3 tablespoons honey or maple syrup (adjust for sweetness)
- 1 teaspoon vanilla extract
- Pinch of salt
- 1/2 cup fresh or dried fruit (e.g., blueberries, strawberries, or raisins)
- 1/4 cup nuts (e.g., chopped almonds or walnuts)
- 1/4 cup chocolate chips (for a decadent twist)
🥄 Instructions:
- Step 1: In a mixing bowl, combine plain yogurt, honey (or maple syrup), vanilla extract, and salt. Whisk until smooth and well combined.
- Step 2: Gently fold in any optional mix-ins like fruit, nuts, or chocolate chips.
- Step 3: Carefully pour the yogurt mixture into silicone molds or drop spoonfuls onto a parchment-lined baking sheet.
- Step 4: Place molds or baking sheet in the freezer and allow yogurt chips to freeze completely (approximately 4 hours).
- Step 5: Once frozen, remove the yogurt chips from molds or peel off the parchment. Store in an airtight container in the freezer for up to 2 weeks.
Previous Recipe: How to Make Amazing Gluten-Free Chocolate Chip Cookies: My Comfort Treat
Next Recipe: How to Bake Delicious Vanilla Dream Cupcakes: My Cupcake Diaries