Birthday Cake Syrup
Looking for a tasty birthday cake syrup? Discover how to make this amazing syrup bursting with festive flavors. Perfect for pancakes, desserts, and more!

- The Complete Guide to Authentic Birthday Cake Syrup
- What Makes This Recipe Special
- Health and Nutrition Highlights
- Recipe at a Glance
- Perfect Ingredients Selection
- Celebration Syrup: The Ultimate Birthday Cake Syrup
- Expert Kitchen Wisdom
- Perfect Presentation
- Storage and Make-Ahead
- Creative Variations
- Complete Nutrition Guide
- Expert FAQ Solutions
- Recipe Card
Have you ever wondered why birthday celebrations always seem to sparkle with something special, even before the first slice of cake is cut? what if i told you that you can bottle that celebratory magic in the form of a syrup? yep, you heard that right! i mean, imagine drizzling a birthday cake syrup over your pancakes, desserts, or even cocktails.
I recently dove into this delightful concoction and fell head over heels! it requires just about 20 minutes —and trust me, it's super easy to whip up.
Now, let’s go a little deeper. this birthday cake syrup taps into the rich tapestry of anglo-saxon culinary history, where the sweetness of cakes has been celebrated for generations.
Think of it as a tasty tribute to the age-old tradition of feasting. celebrating with sweets isn’t just about indulgence; it’s about creating memories.
You know how birthdays make us feel? a mix of nostalgia and joy? well, this syrup captures that essence perfectly!
But what truly makes this recipe stand out? for starters, it’s quick to prepare, making it ideal for busy mornings or spontaneous get-togethers with friends.
Plus, you’re not just getting a syrup; you’re getting a sauce that embodies fun! it brings together flavors like vanilla and almond with a hint of sprinkles—pleasing to both the palate and the eyes.
Seriously, how can you resist sprinkles?
The Complete Guide to Authentic Birthday Cake Syrup
Let’s talk about the culinary heritage surrounding syrup. in many cultures, a splash of syrup adds a touch of sweetness to life.
The origin story of this particular syrup stems from the modern trend of cake-inspired sauces , which aim to elevate ordinary snacks into something extraordinary.
In fact, this idea has exploded in popularity, especially as more people crave those nostalgic flavors without the fuss of baking an actual cake.
Now picture this: you’re hosting a little gathering at home. you whip out this syrup, and with it, you instantly uplift the entire vibe.
It’s not just a topping; it’s a conversation starter! people are going to reminisce about their favorite birthday memories while drizzling this magic onto their ice creams or pancakes.
Doesn’t that sound dreamy?
What Makes This Recipe Special
Okay, let’s dive into the juicy details! what hooked me about this syrup was the unique flavor combinations . you get that smooth, sweet vanilla intertwining with the nutty essence of almond; then, those rainbow sprinkles add a playful crunch.
It truly feels like a party in a jar ! the method remains foolproof , making it hard to mess up—trust me, i’ve tried.
Need a time-saving tip? cook in bulk! double the recipe and store it for future festive breakfast ideas or as a go-to dessert topping .
This syrup is a fantastic addition to pancakes, but it’s also amazing drizzled over ice cream or mixed into cocktails.
If you haven’t tried it in coffee yet, you’re missing out!
Health and Nutrition Highlights
Now, let’s quickly touch on the health angle—because who doesn’t want that? while the syrup leans into the sweetness, it’s not devoid of potential nutritional benefits.
Sure, it’s sugar-heavy , but you can always modify it for dietary considerations. for instance, coconut sugar can replace granulated sugar for a more wholesome approach.
Plus, if you're looking to minimize sugar intake, remember it’s meant to enhance dishes, not drown them in sweetness. balance is key! when used wisely, this syrup can play a role in a well-rounded diet.
Drizzle it lightly over a bowl of fresh fruits for a delicious yet controlled indulgence.
Recipe at a Glance
- Total Preparation Time: 20 minutes
- Skill Level Required: Easy (like, so easy!)
- Serving Size: About 1 cup (good for 4-6 servings)
- Cost Efficiency: Super affordable—ingredients you probably have lying around!
So, whether you’re hosting a party or just treating yourself (which, let’s face it, we all deserve sometimes), this syrup is here to elevate your dishes.
Stay tuned! Next, we’re diving into the ingredients you’ll need to craft your very own jar of happiness. You’re gonna love how simple it is!
Perfect Ingredients Selection
Gather ‘round, friends, because we’re diving into the world of ingredients—the unsung heroes of our kitchen adventures. seriously, the right quality and selection can make or break your culinary creations.
Let’s chat about premium core ingredients before we get to those sweet, sweet syrups we can drizzle over everything.
Premium Core Ingredients
First things first, when it comes to ingredients like sugar and extract, we want premium options. for our birthday cake syrup , we use granulated sugar , which is essential for sweetness.
I’ve learned, the hard way, that using a cheaper sugar can lead to a syrup that’s not quite as delightful.
A good rule of thumb? look for sugar that’s pure and white—no funny business.
Talking measurements, make sure you’re precise. for instance, you’ll need 1 cup of granulated sugar (that’s about 200 grams if you’re fancy with metric).
Always double-check your measuring cups. trust me, nobody wants an overly sticky syrup because you miscalculated!
Storage? oh, don’t even get me started! clear out a dark cupboard and pop your sugar in a sealed container to keep it fresh.
Because who wants to deal with those annoying little bugs that show up at the worst times?
Signature Seasoning Blend
Now, let’s spice it up with some signature seasoning blends . you’ll mostly think about vanilla and almond extract when making your syrup.
These aren’t just flavoring agents—they’re the key players. for our syrup, 1 teaspoon of pure vanilla extract and 1 teaspoon of almond extract are what you're after.
Grab quality bottles; trust me when i say you’ll not regret it!
You can even jazz it up with some rainbow sprinkles—totally optional but, let’s be real, they’re perfect for that festive touch. Nothing says “birthday” like a sprinkle-topped dessert, am I right?
Smart Substitutions
And if you’re in a pinch? no sweat. this is where smart substitutions come into play! don’t have almond extract? use a tad more vanilla.
Or lemon extract for a zing! and if you’re watching your sugar, coconut sugar can do the trick too. plus, it adds that subtle caramel flavor which is to die for!
Kitchen Equipment Essentials
Right, moving away from ingredients to our trusty tools. you don’t need a michelin-starred kitchen to whip this up! grab a medium saucepan, a whisk, and a heat-safe jar.
Honestly, it’s all about the simple must-have tools. the less clutter, the better!
And appliances? if you’ve got a microwave handy, you can even melt your sugar and water in there, though i prefer the stovetop for that neater syrup.
Oh, and a small funnel can be a lifesaver when transferring your syrup to the jar. totally cuts down on spills.
Pro Ingredient Tips
Before we jump to the fun part—how to make this delicious syrup—here are my pro ingredient tips : check for quality markers! you want that lovely aroma wafting when you open that vanilla bottle.
As for storage solutions, keep your syrup in the fridge and it’ll last up to two weeks! and if you’re looking to save some coin? buy in bulk; you’ll thank me later.
Alright, are you ready to drizzle some sweet birthday cake syrup over your pancakes? this syrup is versatile! it can top ice cream, jazz up your morning latte, or even add festive flair to cocktails.
Imagine that birthday celebration, but every dessert is drizzled with vibrant, cake-flavored syrup. honestly, it’s like a party in a jar.
Next up, let’s dive into the fun part— the instructions on crafting your very own birthday cake syrup . You won’t want to miss this!
Celebration Syrup: The Ultimate Birthday Cake Syrup
Oh my gosh, if you’ve ever craved that sweet, nostalgic flavor of birthday cake but didn’t want to go through all the fuss of baking a cake, i’ve got just the thing for you.
Meet birthday cake syrup . this syrup is like a party in a jar! with its delicious blend of vanilla and almond, oh, and those adorable rainbow sprinkles, it transforms everything from pancakes to ice cream into a festive celebration.
Let me tell you how to whip up this delightful concoction in just 20 minutes!
Essential Preparation Steps
First things first: let’s talk mise en place . doing a bit of prep work will save us time later and keep things running smoothly.
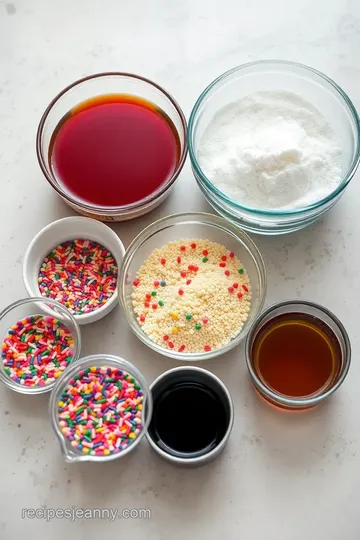
Grab your ingredients: one cup of granulated sugar, one cup of water, a teaspoon of pure vanilla extract, and almond extract.
If you’re feeling extra, toss in some rainbow sprinkles for garnish!
Next, you’ll want to measure everything out. it takes just a moment, but oh, it makes such a difference when you’re in the zone! set up your medium saucepan, whisk, and a heat-safe container for after we cook.
Trust me, there's nothing worse than scrambling for the right tools when you're elbow-deep in syrup-making.
Now for some time management —this recipe comes together quickly. you can set aside about 10 minutes for prep and another 10 for cooking.
So, maybe, pop on your favorite playlist to get in that festive mood while you cook!
Professional Cooking Method
Alright, let's dive into the cooking! start by whisking together the sugar and water in your saucepan. yep, it’s as simple as that.
Next, place it over medium heat, and stir occasionally until it starts to bubble gently. here’s a little tip: pay attention to the color—it should be a lovely clear liquid that’s beginning to shimmer.
Once boiling, reduce the heat to low and let it simmer for about five minutes. this thickening is where the magic happens.
You’ll know it's done when it sticks to the back of a spoon—such a satisfying moment! remove it from the heat and mix in your vanilla and almond extracts .
This step is where the smell alone will have you wishing you could bottle it up and keep it forever!
Let it cool for a few minutes. And by the way, don’t skip the sprinkles if you're feeling festive; they add not only a fun color but a lovely texture too!
Expert Techniques
Here’s where i remind you to keep an eye on your syrup. the cooking process is forgiving but not without its little quirks.
If it gets too thick—no worries! you can always add a splash of water and reheat gently to get it back to that syrupy goodness.
Now, if you’re looking to upscale this syrup into something gourmet, let me drop a little knowledge: a tablespoon of heavy cream stirred in right after cooling makes it dreamy and perfect for drizzling over pancakes or ice cream.
Now that’s how to make a basic syrup feel extra special !
Success Strategies
Feeling a bit nervous? don’t! here's a little reassurance. this cake-inspired sauce is really hard to mess up! however, if in doubt, you can check for sweetness and consistency.
If it’s too sweet, a dash of lemon juice can balance things out. and if you’re supposed to be eating a special occasion dessert , like birthday cake-flavored syrup, well, just serve it with pride!
Remember, it’s all about having fun. this can be a simple homemade syrup to keep on hand for pancakes, drizzles over yogurt, or even a topping for ice cream.
Store it in the fridge for up to two weeks and just watch how it lasts through birthdays, casual brunches, or even when a sweet craving hits.
So, if you’re ready, grab your ingredients and treat yourself and your friends to this fun, festive syrup. Trust me, it’s the perfect way to jazz up any meal, turning it into a celebration!
And just like that, you’re well on your way to crafting your own homemade masterpiece. Stick around for more fun tips and serving suggestions to take your syrup game to the next level!
Expert Kitchen Wisdom
Oh my gosh, let me tell you, creating your own birthday cake syrup can be an absolute game changer for all your party food recipes! you might think, "why bother? isn’t it just easier to pour some store-bought stuff?" honestly, once you try this easy syrup recipe, you'll never want to look back! it’s like having a tiny celebration in a bottle, bursting with sweetness and nostalgia that takes you right back to childhood birthday parties.
So, if you want to unlock the secrets of professional kitchens, focus on the little things . layering flavors, balancing sweetness, and using quality extracts like pure vanilla can make your homemade syrup taste gourmet.
It's all about technique—don't just toss the ingredients together haphazardly. combine, stir, and let them simmer lovingly. i promise you, the end result just guarantees success!
Perfect Presentation
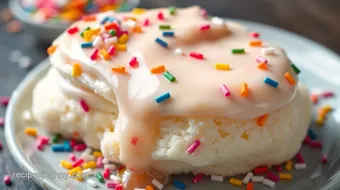
Next up, let’s chat about how to serve this syrup with flair because, honestly, who doesn’t love a little pizzazz at breakfast? plating is just as important.
Ever seen a gorgeous stack of pancakes drizzled with homemade syrup that glistens in the morning light? talk about divine!
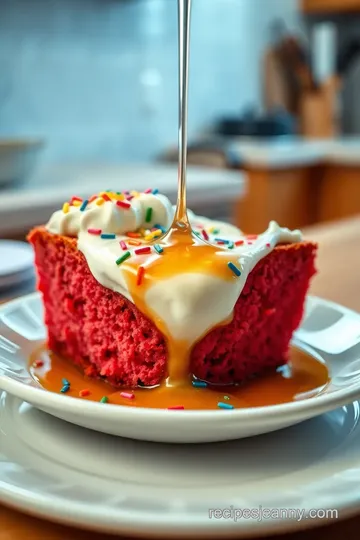
For a touch of fun, don’t forget garnish ideas. a sprinkle of rainbow sprinkles not only adds a splash of color but also gives that birthday vibe.
Drizzle the syrup artistically over your pancakes, ice cream, or even yogurt—just imagine the visual appeal of those vibrant colors against fluffy whites.
You could even use the syrup as a layer in a dessert parfait. seriously, the possibilities are endless!
Storage and Make-Ahead
Now that you're all pumped to whip up some birthday syrup , let’s talk about storage and how to make your life easier.
This syrup is quick enough to make last minute, but if you’re feeling organized (and i totally recommend it!), you can whip it up ahead of time.
After you've allowed it to cool, pour it into a heat-safe container. it can chill in the fridge for about two weeks.
.. if it lasts that long! seriously, you might end up sneaking spoonfuls from the jar every time you open the fridge.
For freshness tips, always check for any change in smell or consistency before using it. if you're looking to preserve it even longer, consider canning techniques or freezing it in ice cube trays—perfect for quick dessert toppings!
Creative Variations
Now, let’s jazz things up and think about syrup variations because the beauty of creating your own syrup is that you have the freedom to play! first, what if instead of traditional vanilla, you switched it up with almond or coconut extract? that would give you a whole new flavor profile perfect for those summer parties.
You could also experiment with some delicious seasonal twists. how about a pumpkin spice syrup in the fall or a funfetti syrup with sprinkles for an extra festive touch? for those of you watching dietary needs, you can easily adapt the ingredients.
Swap out regular sugar for coconut sugar and use plant-based extracts, and voilà! you have a vegan-friendly birthday celebration syrup that tastes just as delightful.
Complete Nutrition Guide
As with any treat, it’s good to be aware of what you’re indulging in! this syrup has about 100 calories per serving , mostly from sugar.
But don’t let that deter you; everything is good in moderation, right? it can elevate your pancakes or ice cream and make those celebratory moments even sweeter.
Plus, think about the happiness it brings—it’s a way to celebrate life’s little moments! health benefits? well, let’s say the sugar gives you an instant boost of energy, and the joy of making and sharing it creates those lovely connections we cherish in life.
Expert FAQ Solutions
Okay, i know you might have some niggling concerns. “how do i actually get it the right thickness?” you may be wondering.
First off, patience is key . keep an eye on that simmer. if it’s too thin, just bring it back to a gentle boil for a couple more minutes.
If you find it too thick, whisk in a little water until it’s just right.
For those of you who might run into crystallization issues, just remember—stir continuously until all the sugar dissolves initially and consider adding a tiny drop of lemon juice to break down the crystals.
Feeling anxious about your syrup turning out right? just add a splash of love, and i swear it’ll work out!
So there you have it—my love for all things sweet, celebration-worthy, and homemade, wrapped up in a beautiful bottle of birthday cake syrup .
Whether you’re treating yourself or throwing a party, this syrup is beyond a simple topping; it’s a way to elevate your desserts and create joyous memories.
So get in that kitchen, unleash your creativity, and whip up some sweet magic! you won’t regret it!

Birthday Cake Syrup Card
⚖️ Ingredients:
- 1 cup granulated sugar (200g)
- 1 cup water (240ml)
- 1 teaspoon pure vanilla extract
- 1 teaspoon almond extract
- 2 tablespoons rainbow sprinkles (optional for garnish)
🥄 Instructions:
- Step 1: In a medium saucepan, whisk together the sugar and water until fully combined.
- Step 2: Place the saucepan over medium heat. Stir occasionally until the mixture comes to a gentle boil.
- Step 3: Reduce heat to low and let simmer for 5 minutes or until slightly thickened.
- Step 4: Remove from heat and stir in vanilla extract and almond extract.
- Step 5: Allow the syrup to cool for a few minutes, then pour into a heat-safe container or jar.
- Step 6: If desired, stir in rainbow sprinkles for added texture and appearance.
Previous Recipe: Marshmallow Strawberry Bliss Bites: 5 Easy Steps to Summer Delight!
Next Recipe: How to Make Decadent Gluten and Dairy Free Bars: 5 Amazing Tips!