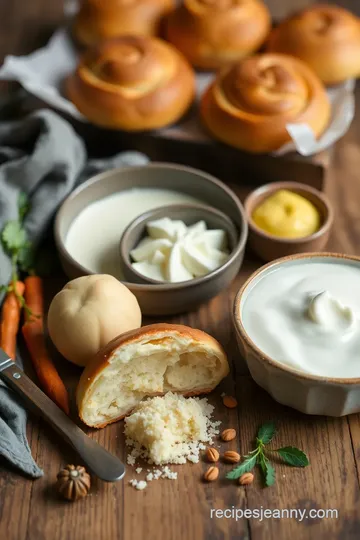
Fluffy Pav Buns with Velvety Milk Spread
Discover how to bake soft pav buns with a creamy milk treat! This easy and delicious recipe is perfect for snacks or serving alongside your favorite dishes.

- look into into Delight: Bake Soft Pav Buns with Creamy Milk Treat
- A Taste of Tradition: Recipe Overview
- Why You Should Make These Buns: Key Benefits
- Ingredients You’ll Need
- Essential Ingredients Guide: Bake Soft Pav Buns with Creamy Milk Treat
- Mastering the Art of Baking Soft Pav Buns
- Pro Tips & Secrets to Baking Soft Pav Buns
- Perfect Presentation to Wow Your Guests
- Storage & Make-Ahead Tips
- Creative Variations to Shake It Up!
- Complete Nutrition Guide for Your Pav Buns
- Frequently Asked Questions
- Recipe Card
look into into Delight: Bake Soft Pav Buns with Creamy Milk Treat
Have you ever sunk your teeth into a freshly baked bun and instantly thought, “wow, this is a hug for my tummy”? that’s how i felt the first time i made these soft pav buns with a luscious creamy milk treat ! honestly, it was a game-changer.
I remember the smell wafting through my kitchen as the golden-brown buns baked to perfection. it was a moment of pure joy, one that i just had to share.
Today, we're going to create these soft, pillowy treasures that are perfect for snacking, breakfast, or even dessert.
A Taste of Tradition: Recipe Overview
So, where do these amazing indian pav buns come from? their roots trace back to india, where they were typically served with flavorful curries or enjoyed as a savory snack.
Over the years, these little fluffy wonders have been embraced across cultures, becoming a staple for many. fast forward to today, and you'll find pav buns in all sorts of kitchens, from homes to chic brunch spots!
Now, let's talk time. you can whip these up in about 1 hour and 35 minutes from start to finish.
Yes, there's a bit of rising time, but it’s totally worth it! plus, the difficulty level is medium, so don’t sweat it, even if you're a beginner.
All you need is patience and a willingness to knead that dough. trust me, it's therapeutic!
One aspect that often gets overlooked is the cost. honestly, this recipe is budget-friendly. for under $10, you can make about 12 fluffy buns.
Think about it: that’s cheaper than your average takeout.
Why You Should Make These Buns: Key Benefits
Now, why should you bake these fluffy buns today? first up, let's not forget the health benefits . every bun is a source of carbs to keep your energy up.
Plus, the creamy spread made with full-fat milk and vanilla is a delicious way to satisfy those sweet cravings without going overboard!
These pav buns are unique in so many ways. they can stand alone as a snack or be paired with other dishes.
Imagine serving them with spicy chutney or alongside a comforting curry. they also make a great breakfast option when you slather on that creamy milk dip !
Perfect for special occasions, they can easily steal the show at a gathering. whether it's a family dinner or a birthday party, these easy pav buns will be the star of the table.
The best part? You won't find a more pillow-like bun out there. Homemade means fluffy, airy goodness, ready to be paired with a range of flavors!
Ingredients You’ll Need
Ready to get your bake on? Here’s what you’ll need for your Homemade Pav Buns and that fabulous milk treat:
For the Dough:
- 4 cups all-purpose flour
- 2 teaspoons instant yeast
- 1/4 cup granulated sugar
- 1 teaspoon salt
- 1/4 cup warm milk
- 1/2 cup warm water
- 4 tablespoons unsalted butter, softened
- 1 large egg
For the Creamy Milk Treat:
- 1 cup full-fat milk
- 1/4 cup powdered sugar
- 1 teaspoon vanilla extract
- 1 tablespoon butter, softened
So, grab your baking equipment essentials and get ready for a love affair with baking! We’re about to create something that even the pickiest eaters will adore.
In the next section, i'll walk you through every step, from kneading techniques to dough rising tips. you’re going to want to stick around! let’s get those buns made and put together a delightful experience that you’ll cherish for years to come.
Who’s ready to bake soft pav buns with creamy milk treat ? i know i am!
Essential Ingredients Guide: Bake Soft Pav Buns with Creamy Milk Treat
Alright, folks! let’s dive into the world of baking where we can whip up the ultimate comfort food. today, we’re talking about how to bake soft pav buns with creamy milk treat .
These little clouds of joy are sweeter than your favorite instagram filter and perfect for any snack time. let’s get you prepped with an essential ingredients guide that’ll set you up for success!
Premium Core Components
When it comes to baking those soft pav buns , having the right ingredients matters. You’ll need:
-
4 cups (500g) all-purpose flour : this is the backbone of your dough. look for something with a protein content around 10-12%, which gives you that chewy texture.
Not all flours are created equal, you know?
-
2 teaspoons (8g) instant yeast : This is your secret weapon for fluffy buns. Always check the expiration date—fresh yeast means happy rises!
-
1/4 cup (50g) granulated sugar : This little sweetener helps with flavor and browning. If you’re feeling fancy, try using honey instead.
-
1 teaspoon (5g) salt : Salt isn’t just for flavor; it strengthens dough and balances sweetness.
-
1/4 cup (60ml) warm milk & 1/2 cup (120ml) warm water : Always use warm, not hot, because we want the yeast to party, not get burned out!
-
4 tablespoons (56g) unsalted butter : Choose a quality butter; it makes a world of difference.
-
1 large egg : This gives you that golden color and richness.
Storage Tip : Keep your dry ingredients in airtight containers for longer shelf life.
Signature Seasoning Blend
Now let’s spice things up! While pav buns are generally simple, you can elevate your experience:
-
Essential Spice Combinations : A hint of cardamom powder can take you to a whole new level. Or you could mix in some cinnamon for a unique twist!
-
Herb Selections and Pairings : Think rosemary or thyme for savory spins.
-
Flavor Enhancers : A dash of vanilla in your creamy milk spread makes all the difference!
Smart Substitutions
What happens when you run out of something? No worries! Here’s where substitutions save the day:
-
Flour Alternatives : Whole wheat flour works, but be prepared for denser buns. Gluten-free flour? Go for it, just follow package directions for best results.
-
Egg-Free : Use applesauce or flaxseed meal mixed with water if you’re vegan.
-
Milk Options : Almond or oat milk makes great stand-ins for those avoiding dairy.
Kitchen Equipment Essentials
Let’s keep things easy-peasy! Grab these must-have tools:
-
Mixing bowls and measuring cups : This makes it a breeze to handle all those ingredients. Your inner perfectionist will thank you.
-
Baking sheet & parchment paper : No sticking allowed!
-
Kitchen towel or plastic wrap : For covering that dough while it rises.
Tip : If you’ve got a stand mixer, use it! The kneading will be way less messy.
Baking Techniques to Remember
No one wants a dense, sad bun. Here’s how to avoid that:
-
Kneading Techniques : You’ll want to knead for 8- 10 minutes until the dough is smooth. It’s a workout, but totally worth it.
-
Dough Rising Tips : Find a warm spot in your kitchen. If you’re cold, preheat your oven for a minute, turn it off, then let your dough rise in there.
-
Checking Doneness : They should sound hollow when tapped. No one likes burnt buns!
Conclusion: Let’s Get Baking!
Now that you have the essentials down, it’s time to put it all together! follow those steps and you’ll be enjoying pillowy soft pav buns in no time.
These beauties, paired with a luscious creamy milk dip , can quickly become your go-to comfort food.
Got your ingredients ready? Let's bounce over to the step-by-step instructions section to create these delightful treats!
Mastering the Art of Baking Soft Pav Buns
Alright, friends! let's dive into something truly delightful today— bake soft pav buns with creamy milk treat . trust me, once you’ve got these fluffy buns in your arsenal, you’ll be the star of every snack-time, brunch, or chill night.
Seriously, nothing beats warm, pillowy buns slathered with a creamy milk spread. it’s comfort food at its finest!
Essential Preparation Steps
First things first: mise en place . this fancy french term just means getting everything ready before diving in. measure out your ingredients.
Have your warm milk, yeast, and sugar ready to go. gather your mixing bowls and pans. it’s all about that smooth flow!
Time management is key. you’ve got prep time of around 15 minutes plus a 60-minute rise . but hey, use this time to chill or tackle that netflix binge.
You'll also need about 20 minutes to bake —you’re looking at a total of 1 hour and 35 minutes from start to finish.
Next, let’s talk organization strategies . keep your work area tidy. clean up as you go. nothing's worse than a cluttered space when your dough is rising! and don’t forget safety considerations —when you’re mixing.
Watch your fingers, especially when you’re kneading that dough into something magical!
Step-by-Step Process
Alright, here’s the fun part! Let’s break it down. Follow these clear, numbered steps to success.
- Start with Your Dough : In a large mixing bowl, mix 1/4 cup of warm milk , 2 teaspoons of instant yeast , and 1/4 cup of granulated sugar . Let this sit for 5 minutes until frothy .
- Mix Well : Add 4 cups of flour, 1 teaspoon of salt, 4 tablespoons of softened butter, and 1 large egg . Combine until it forms a loose dough.
- Knead Away : Get your hands in there! Knead for about 8- 10 minutes until it's smooth and elastic.
- Rise and Shine : Place your dough in a greased bowl, cover it, and let it rise for an hour , or until it's doubled.
- Shape Your Buns : Once risen, punch that dough down—don’t be shy! Divide into 12 equal parts, shape into balls, and place them on a lined baking sheet.
- Second Rise : Cover them again and let rise for another 30 minutes until they’re puffy.
- Bake Away : Preheat your oven to 375° F ( 190° C) . Bake those buns for about 20 minutes , until golden brown.
- Creamy Milk Treat : While they’re baking, whip together 1 cup of full-fat milk, 1/4 cup of powdered sugar, and a touch of vanilla and butter until silky smooth.
Expert Techniques
Now, let’s chat about some expert techniques.
- Quality Checkpoints : Your buns should sound hollow when tapped on the bottom—that’s the sweet spot.
- Temperature Control : If your dough isn’t rising, check the temperature of your space. Yeast loves warmth!
- Troubleshooting : If your dough feels too sticky, just add a bit more flour gradually. If it’s too dry, sprinkle a little water until it dances right.
Success Strategies
Do you wanna know the common mistakes? over-kneading is a big no-no. keep it gentle! and remember, allow that dough to rise properly.
Rushing this step makes dense buns, and nobody wants that!
Check your buns as they bake. if they’re golden brown, it’s time to pull them out of the oven. serve ‘em warm for the best taste.
And hey, if you wanna make-ahead options, you can prepare the dough and freeze it for later.
Lastly, what's better than pairing these soft Pav buns with a tangy chutney or a cozy coffee ?
As you embark on this delicious journey, remember that the joy of baking is in the trial and error. if you face challenges, laugh them off! after all, we’re here for the experience and the perfect results guide .
So, gather those baking essentials and let’s whip up some of the best pav recipe you'll ever make. get ready for the most deliciously fluffy bread rolls .
Prepping these can give you the confidence to tackle even greater comfort food recipes in the future.
Stay tuned for the next section: Additional Information, where we’ll get into creative variations and more tips to tweak this homemade pav buns recipe to perfection!
Pro Tips & Secrets to Baking Soft Pav Buns
Alright, friends! let’s dive into the pro tips and secrets for mastering the art of baking soft pav buns. first off, don’t stress if it seems tricky.
A little patience goes a long way. here are my tried-and-true techniques to elevate your baking:
Chef's Personal Insights
Honestly? the secret to pillowy buns lies in yeast. you want that yeast to come to life! for your yeast dough recipe , make sure your water is warm but not too hot —think bath water, not soup! too high temperatures can kill your yeast, and then you're left with sad, flat buns.
Give it about 5 minutes to get frothy; that's how you know it’s working.
Time-Saving Techniques
Now, if you’re short on time, let’s think strategically. you can prepare your dough in the evening and let it rise overnight in the fridge.
This slow rise builds flavor and makes the morning a breeze. just shape, rise again for 30 minutes, and bake.
Flavor Enhancement Tips
Remember, the key to a good bun is in the flavor. try adding a touch of cinnamon or nutmeg to your dough for a little kick! a sprinkle of salt can also bring out the sweetness in your sweet buns recipe .
Presentation Advice
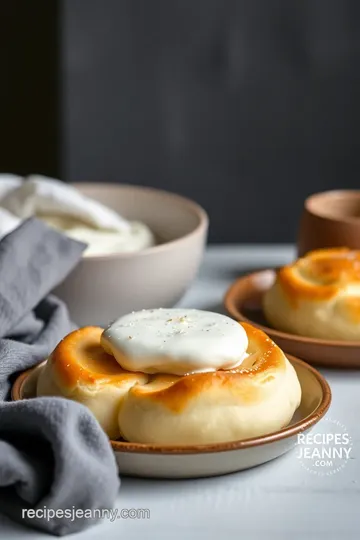
When it comes to aesthetics, don’t skip out on presentation! you’ve put in the work, and now it's time to show it off! serve your homemade pav buns on a cute little board with the creamy milk spread in a small bowl for that rustic charm.
Perfect Presentation to Wow Your Guests
Now, let's talk about how to make these airy bread rolls look as good as they taste!
Plating Techniques
Try to arrange them close together but not too squished—think big family! When you pull them apart, everyone gets that lovely, soft texture that makes your best pav recipe stand out.
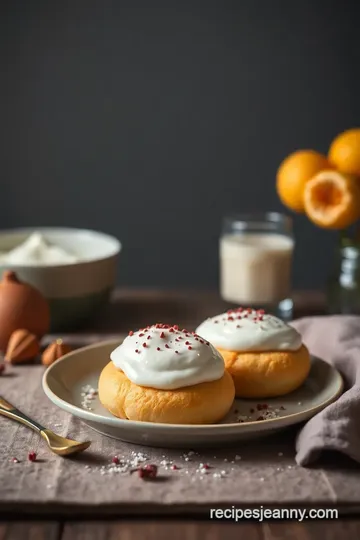
Garnish Ideas
A sprinkle of powdered sugar on top could elevate your staging, or even chopped pistachios for a pop of color and flavor!
Color Combinations
Pair those fluffy buns with a vibrant bowl of fresh fruits or a colorful salad. Your table will look as welcoming as a sunny picnic!
Visual Appeal Tips
Let’s be real; we eat with our eyes first. Taking a second to think about how you plate your food makes a huge difference in the overall experience.
Storage & Make-Ahead Tips
So you've baked those soft pav buns? Awesome! Let’s talk about how to keep them fresh or make them ahead of time.
Storage Guidelines
For storing, make sure they cool completely and then pop them in an airtight container. These puppies can last about 2-3 days on your counter.
Preservation Methods
If you want to go longer, freeze them! Just wrap each bun in plastic wrap and toss them in a freezer bag. They can stay good for up to a month.
Reheating Instructions
When you’re ready to enjoy again, toss them in the oven at 350° f ( 175° c) for about 10- 15 minutes.
This will revive that soft texture. trust me; it’s like taking a trip back to the oven.
Freshness Duration
After baking and storing, remember—these buns are best enjoyed fresh. If you notice any dryness, a quick dip in your creamy milk treat can revive that softness.
Creative Variations to Shake It Up!
Why not get adventurous? Let’s spice things up with some creative variations !
Flavor Adaptations
Feeling chocolatey? Toss in some chocolate chips while mixing your dough! Or keep it classic and introduce dried fruits for a sweet kick.
Dietary Modifications
If you’re looking for gluten-free pav options , almond flour offers a great alternative. Just keep in mind the texture will change a bit!
Seasonal Twists
Think holidays—add pumpkin spice in the fall or even dried cranberries during the winter for a festive vibe.
Regional Variations
Want to go truly international ? Pair these traditional Indian bread with different dips like hummus or tzatziki. You'd be amazed at how they adapt that way!
Complete Nutrition Guide for Your Pav Buns
Finally, let’s break down some nutrition basics for you.
Detailed Breakdown
Each soft bread alternative has around 180 calories per bun. That’s not bad, right?
Health Benefits
These buns use whole ingredients, and adding milk keeps them rich in calcium. Plus, if you play with those flavors and spices, you could boost antioxidants too!
Dietary Considerations
Watch out if you need to keep it low-carb or low-sugar—some simple swaps can make a big difference in your overall meal plan.
Portion Guidance
It’s totally okay to enjoy one or two buns, especially if you’re pairing them with nutritious sides. Balance is key!
So, whether you're serving them at brunch, alongside a hearty curry, or enjoying them as a comforting snack with your favorite beverage, these bake soft pav buns with creamy milk treat are sure to please.
They're not just baked goods; they're memories waiting to be made. now get into that kitchen and make some magic happen!
Frequently Asked Questions
What ingredients do I need to Bake Soft Pav Buns with Creamy Milk Treat?
To Bake Soft Pav Buns with Creamy Milk Treat, you'll need all-purpose flour, instant yeast, granulated sugar, salt, warm milk, warm water, unsalted butter, a large egg for the buns, and for the creamy milk treat, full-fat milk, powdered sugar, vanilla extract, and butter. Make sure to have these ingredients ready for the best results!
How do I ensure my pav buns come out soft and fluffy?
To achieve soft and fluffy pav buns, knead the dough thoroughly until it is smooth and elastic. Allow the dough to rise in a warm environment for both the first and second rises, which helps to develop the gluten and creates the desired texture. Do not rush the rising times, as this is crucial for fluffiness.
Can I customize the creamy milk treat that goes with my pav buns?
Absolutely! You can customize the creamy milk treat by experimenting with flavors such as chocolate, almond, or even adding spices like cinnamon or cardamom. Feel free to adjust the sweetness by varying the amount of powdered sugar according to your taste preference.
How should I store leftover pav buns with creamy milk treat?
To store leftover pav buns, place them in an airtight container at room temperature for up to 2 days. For longer storage, you can freeze them in a freezer-safe bag for up to a month. Thaw and reheat in the oven for a few minutes before serving. The creamy milk treat can be refrigerated in a sealed container for up to a week.
Are there any healthier alternatives for Baking Soft Pav Buns with Creamy Milk Treat?
Yes! You can use whole wheat flour instead of all-purpose flour for a healthier version, though it may result in denser buns. For the creamy treat, consider using reduced-fat milk or a non-dairy milk alternative to cut down on calories. You can also reduce the sugar in both the buns and the creamy treat to make them healthier.
Fluffy Pav Buns with Velvety Milk Spread Card

⚖️ Ingredients:
- 4 cups (500g) all-purpose flour
- 2 teaspoons (8g) instant yeast
- 1/4 cup (50g) granulated sugar
- 1 teaspoon (5g) salt
- 1/4 cup (60ml) warm milk
- 1/2 cup (120ml) warm water
- 4 tablespoons (56g) unsalted butter, softened
- 1 large egg
- 1 cup (240ml) full-fat milk
- 1/4 cup (50g) powdered sugar
- 1 teaspoon (5g) vanilla extract
- 1 tablespoon (15g) butter, softened
🥄 Instructions:
- Step 1: In a large mixing bowl, combine warm milk, yeast, and sugar. Let it sit for 5 minutes until frothy.
- Step 2: Add flour, salt, soft butter, and egg to the yeast mixture. Mix until combined.
- Step 3: Knead the dough on a lightly floured surface for about 8-10 minutes until smooth and elastic.
- Step 4: Place the kneaded dough in a greased bowl, cover with a damp towel, and let it rise in a warm place for 1 hour or until doubled in size.
- Step 5: Punch down the risen dough. Divide it into 12 equal portions.
- Step 6: Shape each portion into a smooth ball and place them close together on a lined baking sheet.
- Step 7: Cover the buns with a towel and let rise for another 30 minutes until puffy.
- Step 8: Preheat the oven to 375°F (190°C).
- Step 9: Bake the buns for 20 minutes, or until golden brown on top.
- Step 10: In a bowl, whisk together milk, powdered sugar, vanilla, and butter until smooth.
- Step 11: Allow the buns to cool slightly before serving with the creamy milk treat.
Previous Recipe: Indulge in Bake Chocolate Mousse Cake Delight: A Chocolate Lover's Dream
Next Recipe: My Family's Favorite: Bake Soft Dough Delights in 40 Minutes – Fluffy Herb and Cheese Treats