Delicious Funfetti Cake with Homemade Frosting
Indulge in my Easy Bake Funfetti Cake - Perfectly Colorful Delight! This moist vanilla cake with colorful sprinkles is perfect for every celebration. Enjoy!

A Slice of Joy: Bake Funfetti Cake - Perfectly Colorful Delight
Oh my gosh! have you ever walked into a party and been greeted by the vibrant sight of a funfetti cake? you know, the one that instantly sparks childhood nostalgia? i remember the first time i tried it.
It was at a friend's birthday party, and that colorful sprinkle explosion made my heart do cartwheels. let’s be real—who doesn’t adore those colorful sprinkles that seem to shout “celebrate”? the beauty of baking funfetti cake isn’t just the taste; it’s about the joy it brings.
Sharing this cake feels like sending slices of happiness to everyone you love!
A Little Bakery History
You might be wondering where this whimsical wonder came from. funfetti cake traces its roots back to the late 1980s when it was first introduced by a popular cake mix brand, bringing that playful vibe to home bakers everywhere.
Fast forward, and it has become a go-to for birthdays and celebrations, so much so that it deserves its own spot in the american baking culture .
People adore it for its sweet and buttery flavors and the way it instantly lights up any gathering.
This cake is super relevant today, too! whether it's a kid's birthday party or you just want to make a tuesday a little more fun, it slots in perfectly as a celebration cake .
Plus, it’s crazy easy to whip up, making it an ideal choice for novice bakers. you could even call it one of those “easy cake recipes” that gets rave reviews every time.
Bake Time & Budgeting
Here’s the scoop: you’ll need about an hour and fifteen minutes total, but trust me, it's worth every second. it’s a breeze— 15 minutes to prep, followed by around 30 to 35 minutes in the oven.
The best part? you won’t have to break the bank. this delightful treat can serve around 8 to 10 people, so it’s perfect for sharing with family and friends.
Why You Should Try It
One of the best things about this funfetti cake recipe is its versatility. not only does it look like a whimsical dessert , but it also packs some nutritional benefits, too.
Made primarily from simple ingredients like all-purpose flour and eggs, this cake caters to a wide range of palates. plus, it’s a fantastic way to sneak in those organic rainbow sprinkles that make it not just a cake, but a party on a plate.
For celebrations—think birthdays, graduations, or just sweet little gatherings—this cake is a crowd-pleaser. and guess what? swap in funfetti frosting for that little extra fluff.
You can even give it seasonal twists with different colored sprinkles for holidays!
Unleashing Your Inner Baker
Don’t fret if you're not a baking whiz. This Funfetti cake is one of those wonderful easy baking projects . Just remember a couple of basic cake baking tips : use room-temperature ingredients for that fluffy texture, and don’t overstir the batter! You want a moist cake recipe , and mixing it just right does the trick!
As you prepare to bake funfetti cake - perfectly colorful delight , you’ll also notice it's a charming way to embrace your inner child.
Plus, you can get creative with decorating ideas. imagine topping it with some homemade vanilla buttercream frosting and letting the colorful sprinkles fall like confetti—a sure-fire way to make the dessert table pop!
Ready to Gather Ingredients
So, ready to dive into all the fun? next up, let’s check out the ingredients you’ll need to whip this beauty together.
Get excited for the delightful flavors and vibrant colors to fill your home with sweet memories, just like those childhood birthday parties!

Essential Ingredients Guide
Whether you're whipping up a funfetti cake recipe for a birthday bash or just adding some color to your everyday treats, having the right ingredients is key.
Let’s dive into the basics and get you started with all the essential elements you’ll need.
Premium Core Components
First off, know what you’re workin' with when it comes to your premium ingredients . it’s not just about grabbing stuff off the shelf.
You wanna make sure you have the best for that sweet moist cake recipe .
-
All-Purpose Flour : 2 ½ cups (320g) . Check the expiration date; you want it fresh! Store in a cool, dry place. It should last six to eight months.
-
Granulated Sugar : 1 ½ cups (300g) . Look for that fine, sparkly stuff. Keep it sealed to prevent clumping.
-
Butter : ½ cup (115g) . Unsalted is the way to go because you control the salt content. C’mon, always keep that butter in the fridge!
-
Rainbow sprinkles : ½ cup (80g) . the star of the show! make sure they’re vibrant and not stale—no one likes a cake that looks sad.
You can stash them in a cool, dry spot, and they'll keep for quite a while.
Having fresh and quality ingredients makes a world of difference in baking tips for beginners . Remember, the fresher, the better your cake!
Signature Seasoning Blend
Now that you’ve got your ingredients sorted, let’s explore some signature flavor boosters . Even in a simple vanilla cake , a bit of seasoning goes a long way.
-
Vanilla Extract : Absolutely essential! Get the real deal, not that imitation stuff. Just 1 tablespoon makes all the difference.
-
Baking Powder : 2 ½ teaspoons. This is your leavener, so check the date. It should be fresh to ensure your cake rises like it should!
-
Salt : Just ½ teaspoon adds depth. It might seem small, but it brightens flavors.
Get creative with herb selections if you’re making variations! Thyme or rosemary can potentially jazz up those special occasion cakes with a floral note.
Smart Substitutions
Hey, life happens, and sometimes you don’t have everything on hand. But don't sweat it—here’s where smart substitutions come into play.
-
No Milk? Swap it out for almond or oat milk.
-
Out of Eggs? Use ¼ cup of applesauce per egg. Crazy, right? But it totally works!
-
Butter Alternatives : Go for coconut oil if you need a dairy-free option. It adds a delightful twist to your festive desserts .
Kitchen Equipment Essentials
Okay, let’s talk gear. You don’t need a fancy setup to bake a killer Funfetti cake! Here are the must-have tools I swear by:
-
9-Inch Round Cake Pans : You need two to create that fun layer cake look.
-
Mixing Bowls : A few of 'em in different sizes for mixing and prepping.
-
Electric Mixer or good ol’ whisk if you're channeling your inner workout.
-
Rubber Spatula : This is essential for scraping every last bit of that delicious batter out!
-
Parchment Paper : Line those pans! Seriously, it’s a game changer.
-
Cooling Rack : Letting your cake cool properly is key to frosting it without a meltdown.
Keep your kitchen organized with proper storage solutions. It’ll save you a headache when you’re deep in the baking zone.
Easy Tips for Baking Funfetti Cake
Ready to bring it all together and bake your funfetti cake ? here’s the scoop; don't overthink it! using easy cake recipes , you’re just a few steps away from a colorful, festive masterpiece.
By knowing about your ingredients, the right tools, and some handy substitutions, you're all set to impress your friends and family.
Stay tuned for the instructions coming up, and let's get baking that bake funfetti cake - perfectly colorful delight that’ll have everyone raving!

Whipping Up Funfetti Cake: A Professional Approach
Let’s get real for a second—baking a cake can feel like climbing a mountain, right? but trust me, with the right methods, you’ll not only get to the top but have a colorful party up there! i'm talking about baking a funfetti cake - perfectly colorful delight! yeah, that’s right.
This isn’t just any cake; it’s a burst of childhood memories, birthday cheer, and pure sugar happiness all rolled into one easy vanilla cake recipe .
Let’s dive into how you can master this delightful treat!
Essential Preparation Steps
First things first: mise en place ! sounds fancy, right? but it just means getting everything ready before you start.
Grab your ingredients and equipment. it’s gonna make your life so much easier.
Now, let’s talk time management . while you’re waiting for the butter to soften (no one likes cold butter emergencies in a cake recipe), you can prep your pans and organize your workspace.
Keep the area tidy—this isn’t just a recipe; it’s a cute little baking adventure.
Safety is key! Don’t forget to wash your hands and be careful with those sharp tools. If you’ve got kids around, make sure they’re not getting too close to the hot oven.
Step-by-Step Process
Now for the fun part—actually baking! Here’s how to tackle the Funfetti Cake step by step:
-
Preheat your oven to 350° F ( 175° C) . Get that party started before mixing!
-
Prepare your cake pans by greasing them and laying down parchment paper. This step is your cake’s best friend for easy removal.
-
In a bowl, whisk together 2 ½ cups flour, 2 ½ tsp baking powder , and ½ tsp salt . This is your dry team—let them get friendly!
-
In a separate bowl, cream together ½ cup unsalted butter and 1 ½ cups sugar until it’s light and fluffy—around 3- 5 minutes . Ooh, sweet and buttery flavors coming through!
-
Now, add 3 large eggs , one at a time, and mix well after each addition. Toss in 1 tbsp vanilla extract for that delightful aroma.
-
Alternate adding your dry mix and 1 cup whole milk to the butter mixture. Keep it mixed but don’t overdo it!
-
Gently fold in ½ cup rainbow sprinkles . It’s like a color explosion—don’t go overboard.
-
Divide your batter into the prepared pans and bake for 30- 35 minutes . you’ll know it’s ready when a toothpick comes out clean.
No one wants a gooey mess; we want that perfect layer cake!
-
Allow your cakes to cool in the pans for 10 minutes before transferring them to a cooling rack. Patience, my friend!
-
Time to make frosting magic! beat up some butter, add 4 cups powdered sugar , 2-4 tbsp milk , and 1 tsp vanilla extract for a creamy funfetti frosting that’ll make your taste buds dance.
Expert Techniques
Here’s where the pros get quirky! Quality is important—check for doneness and keep an eye on that oven temperature. Ideally, you want it to bake evenly.
If your cake layers look uneven, don’t panic! Just level them off with a serrated knife or a cake leveler.
Now, let’s talk about troubleshooting . If your cake is too dry, you may have overmixed it—remember, just mix until combined!
Success Strategies
Here’s a little secret: there are common mistakes you can totally sidestep! Think of it as a cake baking tips for beginners checklist.
Don't skimp on greasing those pans! If your cake sticks, all that hard work is for nothing. And remember, make sure your ingredients are at room temperature for an evenly mixed batter.
Want a special occasion cake ready ahead of time? you can make the cake layers a day in advance and chill them! just make sure to wrap them up tight to avoid that dreaded dry cake.
Celebrating Your Creation
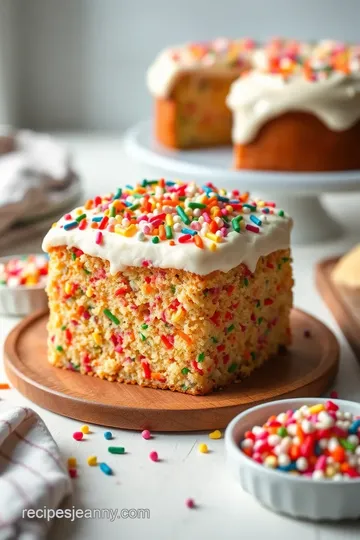
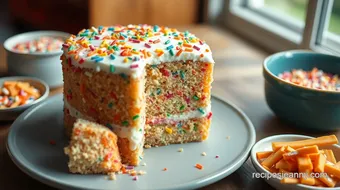
Your funfetti cake should now be a sight to behold, with colorful sprinkles popping out everywhere! whether you’re serving it at a birthday bash or just indulging in a little celebration cake on a tuesday, it’s gonna be a hit.
And remember, whatever you do, have fun with your cake decorating ideas! Slather on that vanilla buttercream frosting , throw on more sprinkles, and let your whimsical dessert shine.
Ready for more? We’re just getting warmed up. Stay tuned for some additional information about flavor variations and fun pairings for your delightful Funfetti Cake!
Bake Funfetti Cake - Perfectly Colorful Delight: Your Ultimate Guide
Oh my gosh, it's time to bring some joy into your kitchen with a bake funfetti cake - perfectly colorful delight ! this cake isn’t just a dessert; it’s a celebration in every bite.
Picture this: fluffy vanilla cake bursting with colorful sprinkles, making it a star at any birthday party or just a cozy get-together.
Let's dive into some pro tips and insights that’ll make your baking journey as smooth as buttercream frosting!
Pro Tips & Secrets
Baking doesn’t need to be intimidating. Here are some of my personal cake baking tips that I’ve learned over the years:
-
Room Temp Ingredients : Always start with your eggs and butter at room temperature. This helps them mix more evenly and gives you that moist cake recipe we all crave.
-
Quick & Easy : For a time-saving technique , set out your ingredients while the oven preheats. It'll cut down on your prep time, keeping things breezy!
-
Flavor Boost : Want to amp up the taste? Add a hint of almond extract to the vanilla. You’ll get a lovely twist on that sweet and buttery flavor everyone loves.
-
Lookin’ Good : Presentation is key! Once your cake is frosted, sprinkle some extra rainbow cake sprinkles on top. It instantly transforms the look from ordinary to extraordinary!
Perfect Presentation
You can whip up the best cake, but if it doesn’t look good, it’s hard to impress. Here’s how to make your whimsical dessert shine:
-
Plating Magic : Use a cake stand for a polished, eye-catching display. Just place your layer cake on it and watch eyes light up!
-
Garnishing : Fresh fruit or edible flowers can elevate your cake's look. Trust me; it makes a world of difference.
-
Color Combinations : Pair your cake with bold-colored frosting or play with the colorful sprinkles for visual appeal that pops.
Storage & Make-Ahead
One of the best things about this cake is it's perfect to make ahead! Here’s how to keep it fresh:
-
Storage Guidelines : Wrap your cake tightly with plastic wrap or store it in an airtight container. It’ll last about 3-4 days at room temp.
-
Preservation : if you're planning to keep it longer, pop it in the fridge for up to a week or freeze it for a month.
Just remember, let it cool completely before storing.
-
Reheating : If you freeze it, allow it to thaw overnight in the fridge, then bring it to room temperature before serving to keep it moist.
Creative Variations
Feeling adventurous? Check out some fun takes on this classic:
-
Seasonal Twists : Add crushed peppermint for a wintery vibe or swap in pumpkin spice for a fall-inspired cake.
-
Dietary modifications : need to cater to allergies? go dairy-free by using almond or coconut milk and dairy-free butter. you can even get fancy with aquafaba instead of eggs for a vegan option.
Complete Nutrition Guide
Want to know what’s in this delightful treat? Here’s a quick breakdown:
-
Health Benefits : While cake isn’t exactly health food, homemade treats often have fewer preservatives than store-bought options. Plus, you can control the sugar levels!
-
Portion Guidance : This recipe yields about 8-10 servings. Perfect for sharing (or not!)—no judgment here if you want to have a slice for yourself every day.
In Closing
Baking this funfetti cake recipe is more than just making dessert—it's about creating joyful moments. every sprinkle tells a story, whether it's a birthday celebration or an impromptu saturday gathering.
So, grab your mixing bowls, let your imagination run wild, and take the leap into baking something that will not only taste amazing but also bring smiles all around.
Happy baking, my friend!
Now go ahead and Bake Funfetti Cake - Perfectly Colorful Delight ; you won’t regret it!
Frequently Asked Questions
What makes the "Bake Funfetti Cake - Perfectly Colorful Delight" different from a regular vanilla cake?
The "Bake Funfetti Cake - Perfectly Colorful Delight" stands out because it incorporates rainbow sprinkles into both the batter and as a decoration, providing a festive and colorful appearance that enhances the traditional vanilla flavor. This whimsical touch makes it ideal for celebrations and adds a playful element to the cake.
Can I make the Bake Funfetti Cake - Perfectly Colorful Delight ahead of time?
Yes, you can make this cake ahead of time! You can prepare the cake layers a day in advance and store them in an airtight container in the fridge. Just be sure to frost the cake the same day you plan to serve it to prevent it from drying out.
What are some tips for making the Bake Funfetti Cake fluffy and moist?
To ensure your Bake Funfetti Cake is fluffy and moist, use room temperature ingredients such as eggs and butter, as they mix more evenly. Avoid overmixing the batter once the dry ingredients are added to keep the cake light, and remember to check for doneness using a toothpick – it should come out clean when baked properly.
How should I store leftover Bake Funfetti Cake - Perfectly Colorful Delight?
Store any leftover Funfetti cake in an airtight container at room temperature for up to 3 days. If you need to keep it longer, you can refrigerate it for up to a week or freeze it for up to 3 months. Just make sure to wrap it well to prevent freezer burn.
Can I customize the sprinkles used in the Bake Funfetti Cake - Perfectly Colorful Delight?
Absolutely! You can choose different themed sprinkles to match a specific occasion, like holiday colors or seasonal sprinkles. You can also experiment with different types of sprinkles, such as nonpareils or confetti, to create unique looks and textures.
What are some variations I can try with the Bake Funfetti Cake recipe?
You can easily switch things up by incorporating flavors like chocolate or lemon into your Funfetti cake. For a chocolate version, simply substitute part of the flour with cocoa powder, or add lemon zest for a refreshing lemon Funfetti. These variations keep the cake exciting and cater to different flavor preferences.
Delicious Funfetti Cake with Homemade Frosting Card
⚖️ Ingredients:
- 2 ½ cups (320g) all-purpose flour
- 2 ½ tsp baking powder
- ½ tsp salt
- ½ cup (115g) unsalted butter, softened
- 1 ½ cups (300g) granulated sugar
- 3 large eggs
- 1 tbsp vanilla extract
- 1 cup (240ml) whole milk
- ½ cup (80g) rainbow sprinkles
- 1 cup (230g) unsalted butter, softened
- 4 cups (480g) powdered sugar
- 2-4 tbsp milk
- 1 tsp vanilla extract
- ½ cup (80g) rainbow sprinkles (for decoration)
🥄 Instructions:
- Step 1: Grease and line the cake pans with parchment paper.
- Step 2: In a bowl, whisk together flour, baking powder, and salt.
- Step 3: In a separate bowl, beat softened butter and granulated sugar until light and fluffy.
- Step 4: Add eggs one at a time, mixing well after each addition; then mix in vanilla.
- Step 5: Gradually add the dry mixture to the butter mixture, alternating with milk.
- Step 6: Gently fold in rainbow sprinkles until just combined.
- Step 7: Divide the batter evenly between prepared pans and bake until a toothpick inserted comes out clean (30-35 minutes).
- Step 8: Allow cakes to cool in pans for 10 minutes, then transfer to a cooling rack to cool completely.
- Step 9: Beat softened butter until creamy; gradually add powdered sugar and mix. Add milk and vanilla, adjusting consistency as needed.
- Step 10: Once cakes are completely cool, place one layer on a serving plate. Spread frosting on top, add the second layer, and frost the top and sides. Decorate with additional sprinkles.
Previous Recipe: Fluffy Homemade Fried Donuts: A Family Favorite Recipe
Next Recipe: Easy Whip Cream Delicious Homemade Unsalted Butter: A Simple Guide