Quick & Delicious Sesame Buns: Bake in 40 Minutes!
Looking to Bake Delicious Sesame Buns in 40 Minutes? Enjoy my easy recipe for fluffy, golden buns - perfect for sandwiches or brunch!

- Introduction
- Recipe Overview
- Key Benefits
- Essential Ingredients Guide: The Backbone of Your Baking Success
- Mastering the Art of Professional Cooking
- Pro Tips & Secrets for Baking Success
- Perfect Presentation for Your Buns
- Storage & Make-Ahead Tips
- Creative Variations to Try
- Complete Nutrition Guide for Your Buns
- Wrapping It Up
- Frequently Asked Questions
- Recipe Card
Introduction
Oh my gosh, have you ever had one of those kitchen disasters where something simple just spirals out of control? picture this: it’s a rainy saturday afternoon, and i suddenly get the craving for something warm and comforting.
I decide to whip up homemade sesame bread . but, i totally misread the yeast packet, and instead of baking fluffy delights, i ended up with a lump of dough that looked more like a science experiment gone wrong.
Don't worry; i eventually nailed it! so today, let's dive into how to bake delicious sesame buns in 40 minutes , making sure you don’t face the same dough dilemmas i did.
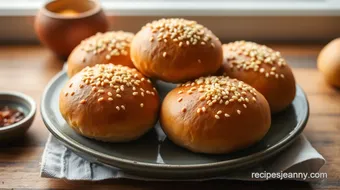
Imagine sinking your teeth into a warm, fluffy sesame bun that’s perfect for sandwiches or just on its own, lightly buttered.
Trust me, they’re a game changer for brunch or any casual gathering. i mean, who doesn’t love a little twist on the traditional buns ? plus, making these beautiful little bites at home is easier than you might think.
Recipe Overview
You might be surprised to know that these delightful asian buns have roots in various east asian cuisines, known for their rich flavors and diverse uses.
While many enjoy them as stand-alone snacks, they serve as a delicious vehicle for everything from savory pulled pork to fresh veggies.
Honestly, they are hot stuff these days! everyone wants to ditch store-bought buns for these luscious, pillowy clouds of joy.
Timing really is everything. this quick baking recipe requires just 15 minutes of prep and 25 minutes in the oven , making the total time only 40 minutes ! talk about a win for busy home cooks.
Even if you’re a newbie to baking, this family-friendly recipe is about as easy as it gets — no special skills required.
No need for that fancier-than-thou bread-making equipment; just your standard kitchen supplies will do.
Thinking about cost? these buns are super budget-friendly! the ingredients won't break the bank and will yield 12 perfectly fluffy sesame buns .
So, you’re not just whipping up one or two; you’ve got enough to share (or keep all to yourself, no judgment here!).
Key Benefits
Alright, let’s talk health benefits. sesame seeds are not only delicious; they’re also packed with nutrients. full of antioxidants, fiber, and healthy fats, these little powerhouses elevate your buns to a whole new level of goodness.
You get the flavors without derailing your diet! perfect for those of you who are health-conscious but can’t resist that warm homemade goodness.
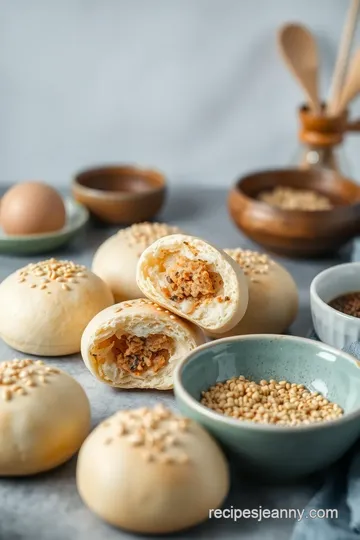
Got a special occasion coming up? these buns are perfect for brunch or a casual dinner party . you can easily customize your sesame buns with various toppings or fillings — talk about a conversation starter! want to impress your guests? try filling them with roasted veggies or bbq chicken.
Be prepared for compliments!
Now, let’s discuss the big advantages over other recipes you might find. sure, there are tons of bread recipes online, but this one stands out.
Using instant yeast means you can skip the long waiting game that comes with traditional yeast. more time to sit back, relax, and enjoy a glass of wine while your kitchen fills with warm, savory scents.
Oh, and don’t even get me started on the textures ! every bite gives you that delightful crunch of the sesame seed topping, perfectly balanced with the soft interior.
Whether you’re having a cozy night in or planning a family gathering, these buns will wow everyone.
So, how about we jump right into the ingredients you’ll need to get started? Grab your mixing bowls, preheat that oven, and let’s bake some magic happen!
Essential Ingredients Guide: The Backbone of Your Baking Success
If you’re anything like me, you probably find yourself wandering the aisles of the grocery store, hoping to capture the essence of a perfect recipe.
Baking at home can be so rewarding, especially when it comes to making those fluffy sesame buns that elevate any meal.
So today, let's get down to the nitty-gritty of what you need to know about your essential ingredients before we dive into how to bake delicious sesame buns in 40 minutes!
Premium Core Components
Let’s start with some basic, yet critical, components.
-
Flour : you’ll need two cups of all-purpose flour (240g) and one cup of bread flour (120g) . the bread flour gives those buns an extra chewiness we all crave.
Look for flour that’s finely milled and has a high protein content for the best results.
-
Sugar : Three tablespoons of granulated sugar (40g) is all you need. It doesn’t just sweeten; it helps with browning. Quality sugar crystals should be fine and free from lumps.
-
Yeast : use one packet of instant yeast (2 ¼ teaspoons or 7g) , which makes it super easy to bake! check for freshness by making sure the yeast is soft, dry, and smells slightly sweet.
-
Salt : One teaspoon of salt (5g) brings all that flavor together. Go for kosher or sea salt for a nice crunch and better flavor.
-
Water : A cup of warm water (240ml) at 105- 110° F (40- 43° C) will activate the yeast without killing it. Too hot? You’ll have a kitchen disaster!
-
Oil : Two tablespoons of vegetable oil (30ml) gives the buns some moisture. If you wanna get fancy, olive or sesame oil can add a lovely flavor twist.
Just remember to store all these ingredients properly. Keep your flours in a cool, dry place and your yeast in the fridge for maximum freshness.
Signature Seasoning Blend
Now, let’s talk spices! While our sesame buns don’t require a ton of seasoning, you can jazz them up a bit—what’s life without a little flavor?
-
Sesame seeds for topping : Two tablespoons (30g) will do the trick. You can choose white or black; both provide a nutty crunch that’s simply divine.
-
Herbs and spices : Feel free to toss in some garlic powder or dried herbs for a flavor variation that gives your buns a personality of their own.
And don’t forget, each region has its charm! Something like adding hints of five-spice powder can take your buns a step towards East Asian vibes.
Smart Substitutions
Life is unpredictable, right? Sometimes you run out of an ingredient or want a tweak for dietary reasons. Here’s where smart substitutions come in handy.
-
Flours : If you’re gluten-free, look for a gluten-free all-purpose flour blend. BAM, you can still join in on the sesame bun fun!
-
Yeast : Don’t have instant yeast? Active dry yeast can work, but you might have to let it proof longer—it’s a “slow and steady wins the race” situation.
-
Oil : No vegetable oil? No problem! Replace it with melted coconut oil for a subtle new flavor.
Kitchen Equipment Essentials
You’ve got your ingredients, and now it’s time to get equipped!
-
Mixing bowl : A must-have! Make sure it’s large enough for all that dough action.
-
Whisk : This little guy will help combine everything smoothly.
-
Baking sheet : Essential for laying out your beautifully shaped buns; I prefer one lined with parchment for easy cleanup.
-
Kitchen towel : A simple tip—this keeps your dough covered while it rises and keeps it warm.
-
Pastry brush : For that egg wash that makes your sesame seeds stick!
When all’s said and done, preparing these ingredients and gathering equipment sets you up for success. you won’t just be making simple baking at home —you’ll impress everyone with your homemade sesame bread .
So, are you ready? Let’s get into the juicy part—the instructions for baking these delights!
Mastering the Art of Professional Cooking
Professional cooking isn’t just about fancy techniques—it starts with essential preparation steps that can make or break your dish. think of it as your cooking boot camp.
You don't want to jump into a culinary masterpiece without the right prep. let’s break it down!
Essential Preparation Steps
Mise en place: this french term literally means “everything in its place.” before you get cooking, gather all your ingredients and tools.
It seems a bit tedious, but trust me, it saves time later. imagine hunting down flour when your dough is ready to rise.
Total chaos, right?
Time management: ever tried multitasking in the kitchen with dinner guests arriving? yikes! set a timer for each part of your dish.
For example, if you’re making those fluffy sesame buns , allow 15 minutes for prep and 25 minutes of bake time .
Stick to that, and you’ll impress even your mother-in-law!
Organization strategies: keep your workspace clean. i like to have all my utensils and ingredients within arm’s reach. it’s like having your own cooking corner! plus, you’ll avoid that “where did i put the whisk?” panic.
Safety considerations: don’t forget about safety! make sure to use a cutting board for chopping and avoid cross-contamination. wash your hands frequently.
It sounds basic, but it keeps you and your food safe.
Step-by-Step Process
Now, let’s get into the nitty-gritty. Following a clear, orderly process is key to achieving those perfect sesame buns .
-
Prepare the Dough: Start by mixing your dry ingredients in one bowl, and your wet ones in another. Combine 'em and stir until you have that lovely shaggy dough.
-
Knead the dough: you’ll want to knead that dough for 5- 7 minutes until it’s elastic. no shortcuts here—do it well! a good knead ensures those sesame buns turn out light and fluffy.
-
Dough rising: let it rise in a warm spot for 10- 15 minutes . keep an eye on it—it should double in size.
If your kitchen is chilly, pop it in a turned-off oven with the light on.
-
Shape those buns: after rising, punch down the dough and divide it. shape them into little balls and place them on a baking sheet.
Here’s where that sesame seed topping comes in—don’t forget it!
-
Bake to perfection: bake those beauties at 375° f ( 190° c) for 15- 20 minutes . golden brown is your goal.
You’ll know they’re done when they look and smell divine!
Expert Techniques
Here’s where we can get fancy. Knowing some professional methods can elevate your home cooking game.
- Yeast Dough Making: Make sure your warm water is around 105- 110° F (40- 43° C) . Too hot? Say goodbye to yeast.
- Egg Wash Techniques: Brush those buns with an egg wash to get a glossy finish. It’s what makes ‘em shine!
- Quality Checkpoints: When in doubt, you can always do the ‘thump test’—a hollow sound means your buns are ready for the spotlight.
Success Strategies
Let’s wrap this up with some savvy success strategies.
Common Mistakes to Avoid: Forgetting to proof your yeast can lead to a total flop. Trust me, I've learned that the hard way.
Quality Assurance Tips: Always taste as you go! Adjust your seasonings and filling to perfection.
Make-Ahead Options: These buns can be prepped and frozen before baking. Just let them rise and bake when you’re ready!
Making perfect homemade sesame bread is all about enjoying the process. Baking is a journey, and with a little practice, you’ll be cranking out soft sandwich buns like a pro.
So go ahead, give these quick baking recipes a shot! If you can bake delicious sesame buns in 40 minutes , you can tackle anything in your kitchen!
Stay tuned as we dive deeper into the Additional Information you’ll need to keep those baking adventures exciting!
Pro Tips & Secrets for Baking Success
Let’s dive into some pro tips that’ll make your journey to bake delicious sesame buns in 40 minutes a breeze! No kidding, I’ve learned a few tricks in my time.
Chef’s Personal Insights
First off, don’t sweat the small stuff! if your dough looks a little wonky, it’s all good. the secret sauce here is confidence.
Just keep kneading until it’s, you know, smooth and elastic . and oh man, nothing beats that delightful smell as they bake!
Time-Saving Techniques
Here’s a game-changer. if you pre-measure your ingredients, it’ll save you tons of time. have everything lined up like a cooking show! seriously, it makes your baking experience so much smoother.
You can have those fluffy sesame buns hot out of the oven in no time.
Flavor Enhancement Tips
Now, if you wanna kick it up a notch, think about adding some spices or herbs. a pinch of garlic powder or some finely chopped green onions slayed in the dough can really amp up the flavor.
Trust me; your taste buds will throw a little party!
Presentation Advice
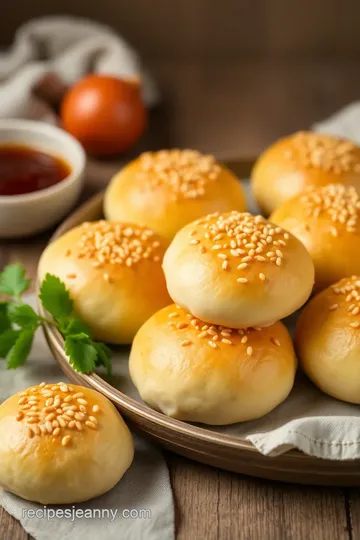
Don’t just throw those buns on a plate. this is your time to shine! brush a little melted butter on top right after they come out of the oven for that gorgeous shine.
A sprinkle of extra sesame seeds gives them that wow-factor! your friends and family will think you ordered takeout from a fancy bakery.
Perfect Presentation for Your Buns
Y’all know that food is as much about the eyes as it is about the stomach. Let’s talk about stunning presentation for your homemade sesame bread.
Plating Techniques
When you place those buns on a platter, try to fan them out a bit. let them breathe, you know? they deserve it! it’s not just about practicality but making them look inviting, too.
Garnish Ideas
Fresh herbs like parsley or cilantro can add color and freshness. Oh my gosh, a sprinkle of chopped scallions or a few chili flakes can make it look fancy and taste amazing!
Color Combinations
Get playful with colors. Think about pairing those buttery buns with something bright like a vibrant salad or a nice bowl of soup for contrast. Eye appeal is everything!
Visual Appeal Tips
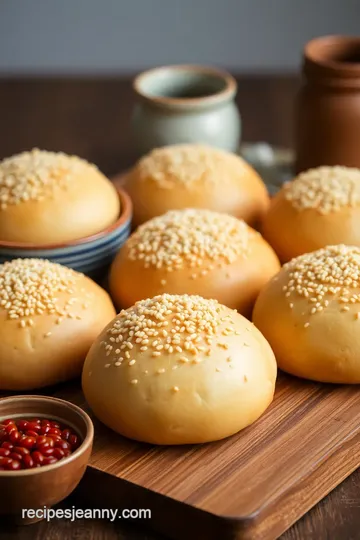
Use a nice, rustic cutting board or a trendy platter. It adds charm! People eat with their eyes first, so make sure your buns shine.
Storage & Make-Ahead Tips
Let’s keep those buns fresh and tasty. Here’s how to manage storage like a pro.
Storage Guidelines
If you have leftovers (though i highly doubt it!), let the cool completely before wrapping them in plastic wrap. store them at room temperature for 2-3 days.
If you wanna stretch it, pop 'em in the fridge.
Preservation Methods
You can freeze these delicious little buns! wrap them tightly in plastic, then store in an airtight container. they’ll last up to a month.
Just remember, when you’re ready to devour them, let them thaw out at room temperature.
Reheating Instructions
To bring back their fluffiness, heat them in the oven for a few minutes until warm. They’ll come back to life, but you can also pop them in the microwave—just cover with a paper towel to keep ‘em soft!
Freshness Duration
Trust your nose! If they smell off, it’s time to toss. But typically, if stored right, they’re good for 3 days at room temp and up to a month in the freezer.
Creative Variations to Try
Feeling adventurous? Here’s how to mix it up with these creative variations !
Flavor Adaptations
Wanna switch it up? toss in some cheese or bacon bits to your dough for a savory twist. or go sweeter with a hint of cinnamon and sugar for a delightful breakfast option.
Dietary Modifications
Got gluten-free friends? You can totally whip up gluten-free sesame buns ! Use a gluten-free flour mix. They’ll have just as much flavor and fun!
Seasonal Twists
For fall, think about adding pumpkin spice or mashed sweet potatoes into the dough. It’s all about keeping things seasonal and exciting!
Regional Variations
If you’re feeling like channeling your inner chef, think about regional adaptations. Korean bao buns are a great inspiration here. Imagine filling these beauties with bulgogi or spicy tofu!
Complete Nutrition Guide for Your Buns
Let’s keep it real! Here’s the nutritional breakdown of your fluffy creations. Knowledge is power!
Detailed Breakdown
One of these cute sesame buns packs about 130 calories , with around 4g of protein and 3g of fat . Perfect for a quick bite.
Health Benefits
They’re carbs, yes, but they also have some fiber and protein. Plus, sesame seeds are loaded with vitamins and minerals. So, you’re not just munching on fluff!
Dietary Considerations
If you’re watching your sodium, just be mindful because these babies can have around 150mg of sodium per bun. Moderation is key, my friends!
Portion Guidance
When serving, think about how many buns fit your crowd or meal. for light snacks, maybe one bun per person suffices.
But if it’s a party, you know you can’t just stop at one!
Wrapping It Up
So there you have it! ready to wow family and friends with your easy sesame bun recipe ? remember, baking can be totally fun ! whether you’re digging into fluffy sesame buns for a brunch gathering or a weeknight dinner, it’s all about enjoying the ride.
Roll up your sleeves and get to it! you got this!
Frequently Asked Questions
How do I Bake Delicious Sesame Buns in 40 Minutes if I'm a beginner?
If you're new to baking, don't worry! This recipe is designed to be easy and straightforward. Just follow the step-by-step instructions, and remember to take your time while kneading the dough to ensure it's smooth and elastic. Practice makes perfect!
What can I add to the sesame buns for extra flavor?
For added flavor, try incorporating minced garlic, dried herbs, or even cheese into the dough. You can also experiment with different toppings like poppy seeds or a sprinkle of spices before baking. These variations can make your sesame buns even more delicious!
How should I store leftover sesame buns?
To store leftover sesame buns, keep them in an airtight container at room temperature for up to 3 days. If you want to keep them longer, consider freezing them. Just wrap each bun individually in plastic wrap, place them in a freezer bag, and they can last up to 3 months.
Can I make these buns gluten-free?
Yes! You can make these sesame buns gluten-free by substituting the all-purpose and bread flour with a gluten-free all-purpose flour blend. Be sure to check that your yeast is gluten-free as well. The texture may vary slightly, but they will still be delightful!
What are some good serving suggestions for sesame buns?
These sesame buns are versatile! Serve them with spreads like hummus or tzatziki for an appetizer, or pair them with soups and salads for a more substantial meal. They also make great sliders or sandwich buns, perfect for your favorite fillings!
Is it possible to prepare the dough in advance?
Absolutely! You can prepare the dough in advance and let it rise. After the first rise, shape the buns and place them on the baking sheet, then cover and refrigerate for up to 24 hours. When you’re ready to bake, let them come to room temperature and rise again for about 10 minutes before baking.
Quick & Delicious Sesame Buns: Bake in 40 Minutes! Card
⚖️ Ingredients:
- 2 cups all-purpose flour
- 1 cup bread flour
- 3 tablespoons granulated sugar
- 1 packet instant yeast
- 1 teaspoon salt
- 1 cup warm water (105-110°F)
- 2 tablespoons vegetable oil
- 1 tablespoon water (for egg wash)
- 1 large egg (beaten, for egg wash)
- 2 tablespoons sesame seeds
🥄 Instructions:
- Step 1: In a large mixing bowl, whisk together the all-purpose flour, bread flour, sugar, instant yeast, and salt.
- Step 2: In a separate bowl, combine the warm water and vegetable oil.
- Step 3: Pour the wet ingredients into the dry mixture and stir until a shaggy dough forms.
- Step 4: Turn the dough onto a lightly floured surface and knead for about 5-7 minutes, until smooth and elastic.
- Step 5: Form the dough into a ball and place it in a greased bowl. Cover with a kitchen towel.
- Step 6: Allow the dough to rise in a warm place for 10-15 minutes until it doubles in size.
- Step 7: Preheat the oven to 375°F (190°C) and punch down the dough.
- Step 8: Divide the dough into 12 equal pieces and shape each piece into a ball.
- Step 9: Place the shaped buns on a baking sheet lined with parchment paper.
- Step 10: Cover the buns with a kitchen towel and let them rest for an additional 10 minutes.
- Step 11: In a small bowl, mix the egg and water for the egg wash.
- Step 12: Gently brush the tops of the buns with the egg wash and sprinkle sesame seeds over them.
- Step 13: Bake in the preheated oven for 15-20 minutes or until golden brown.
- Step 14: Remove from the oven and allow to cool for a few minutes before serving.
Previous Recipe: Quick & Creamy Blend Egg for Homemade Mayonnaise: My Easy Recipe
Next Recipe: Bake Colorful Layered Cookies Delightfully: Rainbow Layered Delight Cookies